There’s something magical about a brownie fresh out of the oven. The aroma wafts through the air, wrapping you in a warm, welcoming embrace that speaks of home, comfort, and love. I still remember the first time I made brownies with my grandmother. She’d whip up a batch for family gatherings, her laughter echoing through the kitchen as she donning an apron that had seen countless baking adventures. We’d sneak bites of the gooey batter, a taste so rich it promised something amazing to come. Today, I want to share a recipe that captures that same spirit—deliciously fudgy Star Spangled Brownies that are perfect for celebrating life’s special moments.
## Recipe Timing
- Prep Duration: 10 minutes
- Active Cooking: 25 minutes
- Total Duration: 35 minutes
- Portion Size: 16 squares
- Complexity: Simple
## Nutritional Recipe
- Calories per portion: 150
- Protein: 2g
- Carbs: 21g
- Fats: 6g
- Fiber: 1g
- Sugars: 14g
- Sodium: 50mg
## Why You’ll Love This Star Spangled Brownies
Not only do these brownies taste divine, but they also bring a festive flair to any gathering. Imagine cutting into a warm brownie, its center slightly gooey, decorated with vibrant red and blue sprinkles that evoke memories of summer barbecues and Fourth of July celebrations. They are easy to make, easy to impress, and even easier to enjoy. Perfect for both planned celebrations and spontaneous treats, these brownies are sure to become a favorite in your dessert repertoire.
## The Complete Cooking Journey
Creating these Star Spangled Brownies is a delightful journey from mixing the ingredients to the sight of them cooling on the counter. You’ll experience the buttery texture of the batter, the aromatic notes of cocoa, and the satisfying crunch of sprinkles as you decorate. Let’s dive right in!
## Ingredients:
- 1/2 cup unsalted butter
- 1 cup granulated sugar
- 2 large eggs
- 1 teaspoon vanilla extract
- 1/3 cup unsweetened cocoa powder
- 1/2 cup all-purpose flour
- 1/4 teaspoon salt
- 1/4 teaspoon baking powder
- Red and blue sprinkles or candies for decoration
## Method:
### Step 1: Preheat Your Oven
Start by preheating your oven to 350°F (175°C). This step is crucial for getting that perfect bake that we all adore in brownies. Grease and line an 8×8 inch baking pan so that your brownies can slide right out after baking.
### Step 2: Melt the Butter
In a medium saucepan, melt the 1/2 cup of unsalted butter over low heat. This gentle method ensures you avoid any burnt butter mishaps. Once it’s melted, remove the pan from the heat and stir in the 1 cup of granulated sugar, 2 large eggs, and 1 teaspoon of vanilla extract until everything is well combined.
### Step 3: Combine the Dry Ingredients
Next, beat in the 1/3 cup of unsweetened cocoa powder, 1/2 cup of all-purpose flour, 1/4 teaspoon of salt, and 1/4 teaspoon of baking powder. Stir until you have a smooth, thick batter that promises fudgy goodness.
### Step 4: Spread the Batter
Spread the brownie batter evenly into the prepared pan. You’ll want to make sure it’s nice and even; this will ensure they bake uniformly and you get those lovely edges!
### Step 5: Bake to Perfection
Pop the pan in the oven and bake for 20-25 minutes. You’ll know they’re ready when a toothpick comes out with a few moist crumbs attached—this is key for that perfect fudgy texture!
### Step 6: Cool and Decorate
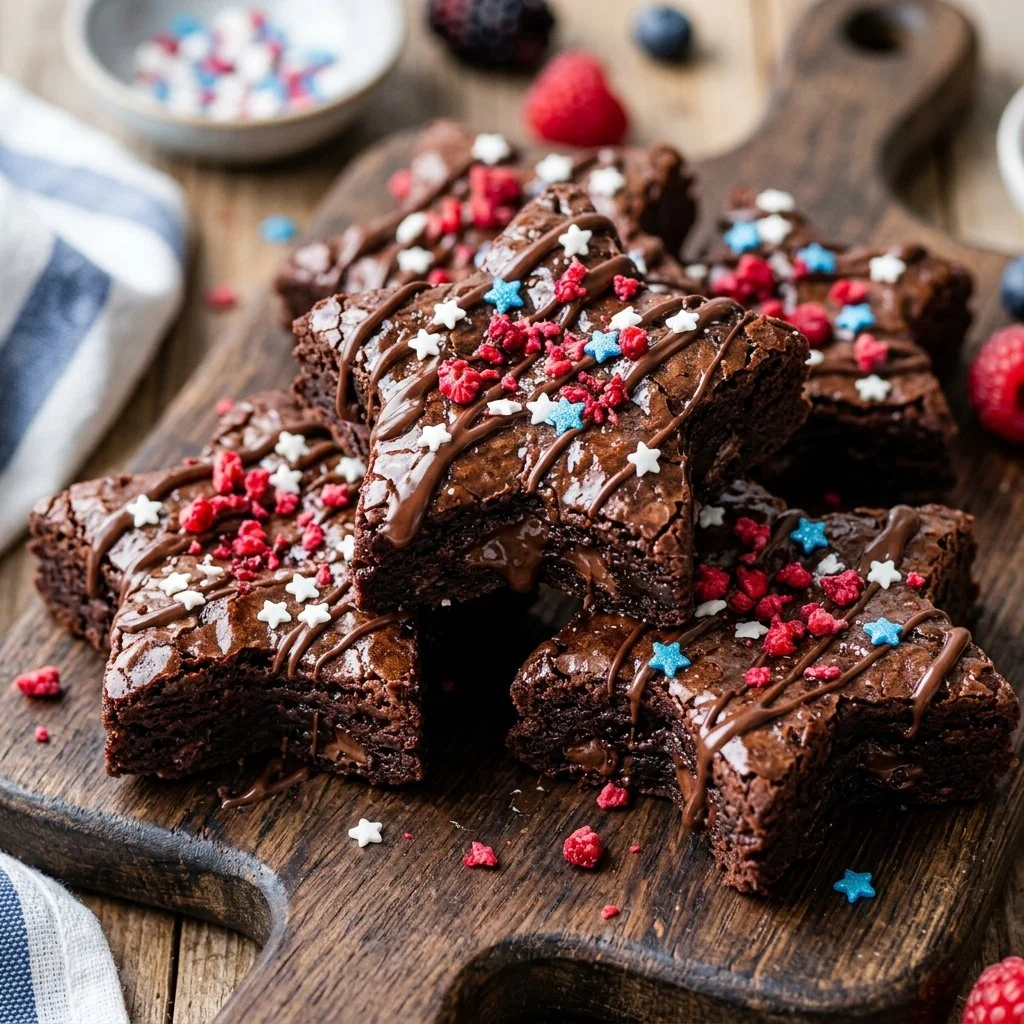
Once baked, allow the brownies to cool in the pan. When they’ve reached room temperature, it’s time for the fun part! Decorate the top with red and blue sprinkles or candies to create a star-spangled look that’s perfect for festive occasions.
### Step 7: Slice and Serve
Cut the brownies into generous squares. Each bite is a delightful mix of rich chocolate with a fun splash of color. Enjoy!
## Serving Suggestions & Pairings
These brownies shine on their own, but why not take things up a notch? Serve them warm with a scoop of vanilla ice cream for that classic a la mode experience, or pair them with a dollop of whipped cream for added indulgence. They also pair wonderfully with fresh berries or a drizzle of chocolate sauce.
## Storage & Leftovers Guide
If you happen to have any brownies left (though I doubt it!), they can be stored in an airtight container at room temperature for up to 3 days, or you can keep them in the fridge for up to a week. For longer storage, freeze them, ensuring they are well-wrapped. Just thaw at room temperature before serving!
## Kitchen Wisdom & Success Tips
- Don’t Overbake: Keep a close eye toward the end of the baking time. Overbaking can lead to dry brownies, and we definitely want fudginess in our lives!
- Use Quality Ingredients: The better the chocolate and cocoa, the richer your brownies will be. Aim for unsweetened cocoa powder with a deep chocolate flavor.
- Customize: Feel free to mix in nuts, chocolate chips, or even a sprinkle of sea salt before baking to elevate these brownies to your personal taste.
## Flavor Variations & Adaptations
These brownies are a blank canvas! Add in some mint extract for a minty twist or mix in peanut butter swirls for a nutty flavor explosion. You can also swap the sprinkles for crushed candies or chopped fruit for a unique touch.
## Reader Questions & Solutions
-
Can I use a different type of sugar?
Yes! Brown sugar will add more moisture and a slight caramel flavor to your brownies. -
What can I use instead of eggs?
You can replace each egg with 1/4 cup of unsweetened applesauce or 1 tablespoon of ground flaxseed mixed with 3 tablespoons of water. -
How do I know when the brownies are done?
Using a toothpick is your best bet! Look for moist crumbs on the toothpick rather than wet batter. -
Can I double this recipe?
Absolutely! Just bake in a larger pan and increase baking time slightly, checking for doneness as you go. -
What if my brownies don’t look shiny?
Shiny brownies typically come from beating the eggs and sugar well together, so a few extra whisking minutes might do the trick!
## Wrapping Up
These Star Spangled Brownies are not just treats; they’re a way to create memories, share joy, and celebrate life’s moments together. With their rich flavor and festive look, they are bound to become a beloved recipe in your collection. So preheat that oven and get ready to spread some happiness with these delightful brownies. Enjoy every gooey, chocolatey bite!
Happy baking! 🌟
PrintStar Spangled Brownies
Deliciously fudgy brownies decorated with red and blue sprinkles, perfect for celebrations.
- Prep Time: 10 minutes
- Cook Time: 25 minutes
- Total Time: 35 minutes
- Yield: 16 squares 1x
- Category: Dessert
- Method: Baking
- Cuisine: American
- Diet: Vegetarian
Ingredients
- 1/2 cup unsalted butter
- 1 cup granulated sugar
- 2 large eggs
- 1 teaspoon vanilla extract
- 1/3 cup unsweetened cocoa powder
- 1/2 cup all-purpose flour
- 1/4 teaspoon salt
- 1/4 teaspoon baking powder
- Red and blue sprinkles or candies for decoration
Instructions
- Preheat your oven to 350°F (175°C) and grease an 8×8 inch baking pan.
- Melt the unsalted butter in a medium saucepan over low heat, then remove from heat and stir in sugar, eggs, and vanilla until combined.
- Combine the cocoa powder, flour, salt, and baking powder into the mixture and stir until smooth.
- Spread the brownie batter evenly into the prepared pan.
- Bake for 20-25 minutes, checking with a toothpick for doneness.
- Cool the brownies in the pan and then decorate with red and blue sprinkles.
- Slice into squares and serve.
Notes
Serve warm with vanilla ice cream or whipped cream for an indulgent treat.
Nutrition
- Serving Size: 1 square
- Calories: 150
- Sugar: 14g
- Sodium: 50mg
- Fat: 6g
- Saturated Fat: 3g
- Unsaturated Fat: 2g
- Trans Fat: 0g
- Carbohydrates: 21g
- Fiber: 1g
- Protein: 2g
- Cholesterol: 25mg