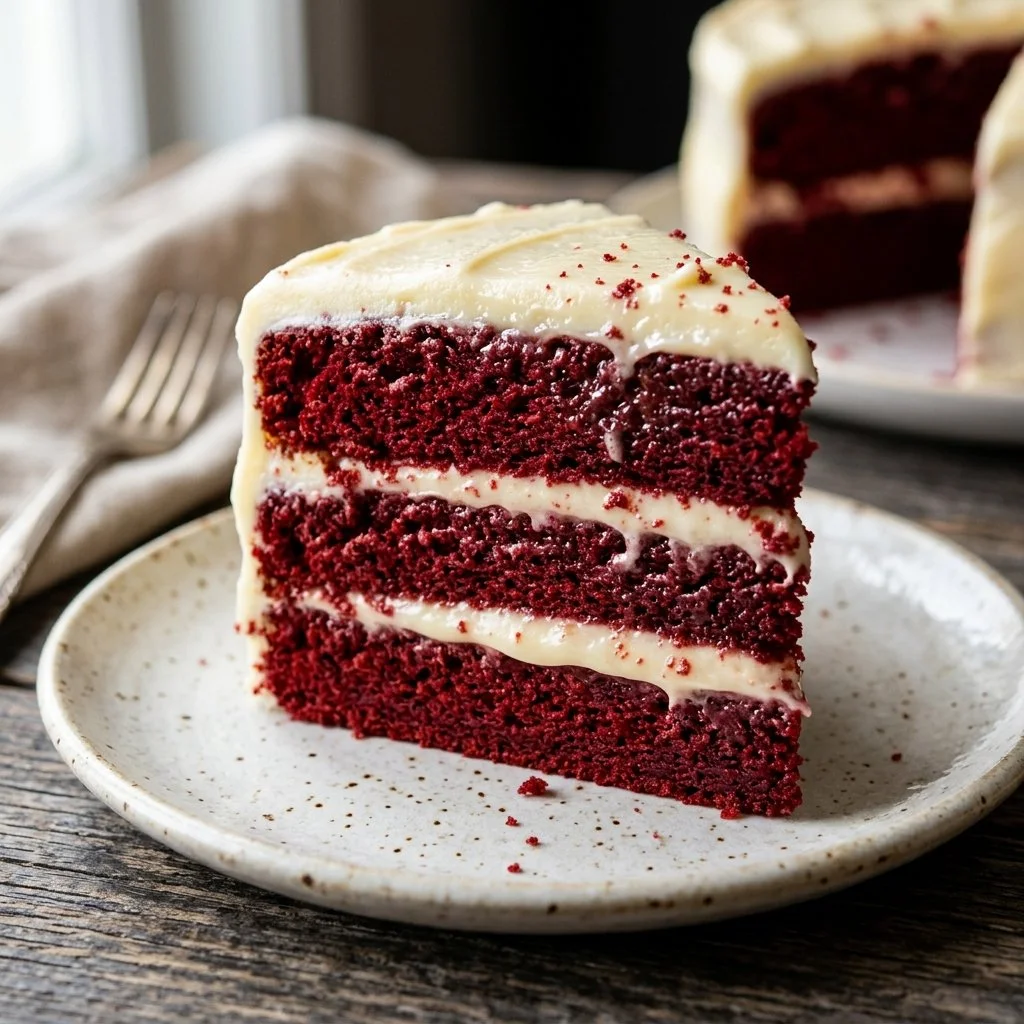
There’s something truly enchanting about a slice of red velvet cake. It’s a dessert that seems to capture the very essence of celebration and indulgence. Every bite carries with it the legacy of countless birthdays, anniversaries, and family gatherings, making it impossible not to associate this vibrant treat with joyous moments. I remember the first time I attempted this iconic cake; a smattering of red batter splashed across my kitchen, laughter spilling out as I navigated my way through a slight culinary disaster. But that very mishap gave way to the most delightful cake, embellished with swirls of rich cream cheese frosting—a sight both beautiful and heartwarming.
It is with that fond memory that I share with you my treasured Red Velvet Cake recipe—an enchanting treat that beckons joy and laughter alike.
Recipe Timing
- Prep Duration: 20 minutes
- Active Cooking: 30 minutes
- Total Duration: 50 minutes
- Portion Size: 12 servings
- Complexity: Simple
Nutritional Recipe
- Calories per portion: Approximately 450 calories
- Protein: 5 grams
- Carbs: 54 grams
- Fats: 25 grams
- Fiber: 1 gram
- Sugars: 34 grams
- Sodium: 300 mg
Why You’ll Love This Red Velvet Cake
The allure of red velvet cake lies not only in its striking appearance but also in its deliciously rich flavor. The smooth and velvety texture paired with the slight tang from the buttermilk creates a slice that’s simply irresistible. Topped off with luscious cream cheese icing, this cake is a dream for any dessert lover. It delivers a delightful balance of sweetness and richness, making it the perfect centerpiece for any occasion, be it a casual get-together or a glamorous celebration.
The Complete Cooking Journey
Every step in crafting this brilliant cake is an adventure of its own. From measuring and mixing to savoring the aroma as it bakes, the process is almost as delightful as the cake itself. The moment you pour in that vibrant red food coloring, the anticipation builds, making the experience even more magical. Once it’s dressed in its luscious icing, you’ll find that your kitchen has transformed into a realm of sweetness and color.
Ingredients:
- 2 1/2 cups all-purpose flour
- 1 1/2 cups granulated sugar
- 1 tsp baking soda
- 1 tsp salt
- 1 tsp cocoa powder
- 1 1/2 cups vegetable oil
- 1 cup buttermilk, at room temperature
- 2 large eggs, at room temperature
- 2 tbsp red food coloring
- 1 tsp vanilla extract
- 1 tsp white vinegar
Method:
Step 1: Preheat the Oven and Prep the Pans
Preheat your oven to 350°F (175°C) and grease and flour two 9-inch round cake pans to ensure your cake comes out perfectly without sticking.
Step 2: Sift the Dry Ingredients
In a large bowl, sift together the flour, sugar, baking soda, salt, and cocoa powder. This step lightens the flour and ensures that all elements are evenly distributed for a consistent texture.
Step 3: Mix the Wet Ingredients
In another bowl, mix together the vegetable oil, buttermilk, eggs, red food coloring, vanilla extract, and white vinegar until fully combined. The vibrant color of the red food coloring at this stage is a celebration all on its own!
Step 4: Combine Wet and Dry Ingredients
Gradually add the wet ingredients to the dry mixture and mix until you reach a smooth batter. Be sure not to overmix, as you want to keep that delightful lightness.
Step 5: Divide the Batter
Pour and evenly divide the luscious red batter between the prepared pans. Make sure they’re nice and even for that perfect layer cake!
Step 6: Bake the Cakes
Bake in the preheated oven for 25-30 minutes or until a toothpick inserted into the center comes out clean. The heavenly aroma will fill your kitchen, making it hard to resist a sneak taste!
Step 7: Cool the Cakes
Allow the cakes to cool in the pans for about 10 minutes. Then, gently transfer them to a wire rack to cool completely. The texture is just as important as the flavor!
Step 8: Frost and Serve
Finally, it’s time to frost your cakes! A generous layer of cream cheese icing will add the perfect finish. Cut a slice, serve, and watch as everyone’s eyes light up in delight.
Serving Suggestions & Pairings
This red velvet cake is a glorious standalone treat, but it pairs beautifully with a cup of freshly brewed coffee or a glass of cold milk. For an added touch, serve it alongside some fresh berries or a scoop of vanilla ice cream for a delightful contrast of flavors and temperatures.
Storage & Leftovers Guide
Store any leftover cake in an airtight container at room temperature for up to 3 days. Alternatively, you can refrigerate it for up to a week. For longer storage, slice the cake and freeze it for up to three months; just ensure you wrap it securely to maintain its freshness.
Kitchen Wisdom & Success Tips
- Room Temperature Ingredients: Ensure your eggs and buttermilk are at room temperature for a smoother batter.
- Sifting Flour: Sifting not only removes lumps but also aerates the flour for a lighter cake.
- Don’t Overmix: Gently combine to avoid a dense cake; a few lumps are perfectly fine.
Flavor Variations & Adaptations
Feel free to experiment with your red velvet cake! You can add a hint of espresso powder for a richer flavor or swap the cream cheese frosting for a ganache and incorporate dark chocolate for an exquisite twist. If you prefer a lighter option, consider using a whipped cream topping instead.
Reader Questions & Solutions
-
Q: What if I don’t have buttermilk?
A: You can create a homemade version by combining regular milk with a tablespoon of white vinegar or lemon juice. Let it sit for about 5 minutes before using. -
Q: How can I make this cake gluten-free?
A: Substitute the all-purpose flour with a 1:1 gluten-free baking blend. Make sure to also check that all other ingredients are gluten-free. -
Q: Can I use oil instead of butter for the frosting?
A: While butter is recommended for a rich cream cheese frosting, you can use a vegan butter substitute if you’re looking for a dairy-free option. -
Q: What’s the best way to incorporate cream cheese into the frosting?
A: Make sure your cream cheese is softened at room temperature for easy mixing. Beat it well to ensure a creamy consistency before adding in the sugar. -
Q: How do I prevent my cake from doming?
A: Bake at a lower temperature (around 325°F) and consider using baking strips to help create a flat top.
Wrapping Up
In the end, this Red Velvet Cake isn’t just a recipe; it’s a nostalgic trip that invites you to gather, celebrate, and indulge. Whether you’re making it for a special occasion or simply because you deserve a sweet treat, this cake is sure to bring joy to your heart and smile to your face. So, pull on that apron, gather your ingredients, and dive into the wonder of baking! Remember, the kitchen is always open for creativity—happy baking!
PrintRed Velvet Cake
An enchanting dessert that captures the essence of celebration with its rich flavor and velvety texture, topped with cream cheese frosting.
- Prep Time: 20 minutes
- Cook Time: 30 minutes
- Total Time: 50 minutes
- Yield: 12 servings 1x
- Category: Dessert
- Method: Baking
- Cuisine: American
- Diet: Vegetarian
Ingredients
- 2 1/2 cups all-purpose flour
- 1 1/2 cups granulated sugar
- 1 tsp baking soda
- 1 tsp salt
- 1 tsp cocoa powder
- 1 1/2 cups vegetable oil
- 1 cup buttermilk, at room temperature
- 2 large eggs, at room temperature
- 2 tbsp red food coloring
- 1 tsp vanilla extract
- 1 tsp white vinegar
Instructions
- Preheat the oven and prep the pans by greasing and flouring two 9-inch round cake pans.
- Sift together the flour, sugar, baking soda, salt, and cocoa powder in a large bowl.
- Mix the vegetable oil, buttermilk, eggs, red food coloring, vanilla extract, and white vinegar in another bowl until combined.
- Combine the wet ingredients with the dry ingredients and mix until smooth, being careful not to overmix.
- Divide the batter evenly between the prepared pans.
- Bake in the preheated oven for 25-30 minutes or until a toothpick comes out clean.
- Cool the cakes in the pans for 10 minutes, then transfer to a wire rack to cool completely.
- Frost the cooled cakes with cream cheese icing and serve.
Notes
Store leftover cake in an airtight container at room temperature for up to 3 days or refrigerate for up to a week.
Nutrition
- Serving Size: 1 slice
- Calories: 450
- Sugar: 34g
- Sodium: 300mg
- Fat: 25g
- Saturated Fat: 4g
- Unsaturated Fat: 21g
- Trans Fat: 0g
- Carbohydrates: 54g
- Fiber: 1g
- Protein: 5g
- Cholesterol: 30mg