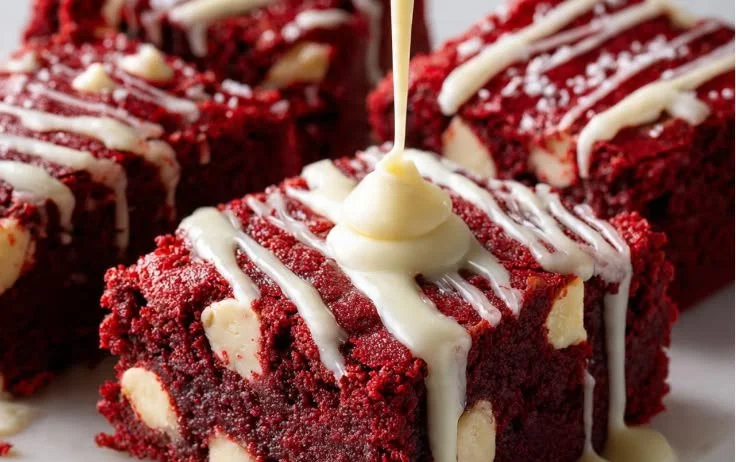
Ah, the magic of red velvet! There’s something about that iconic deep crimson hue that catches the eye and ignites the imagination. For many of us, red velvet evokes memories of special occasions: birthdays, anniversaries, or just those cozy nights with loved ones where a sweet treat can light up the room. I still remember the first time I tried red velvet cake at my aunt’s birthday party—it was love at first bite! But today, we’re diving into something even more delightful: luscious Red Velvet Brownies that marry the richness of chocolate with the vibrant color we adore. Trust me, once you have these brownies fresh out of the oven, there will be no turning back!
Recipe Timing
- Prep Duration: 15 minutes
- Active Cooking: 30 minutes
- Total Duration: 45 minutes
- Portion Size: 16 squares
- Complexity: Simple
Nutritional Recipe
- Calories per portion: Approximately 180
- Protein: 2.5 grams
- Carbs: 24 grams
- Fats: 9 grams
- Fiber: 1 gram
- Sugars: 15 grams
- Sodium: 75 mg
Why You’ll Love This Red Velvet Brownies
These Red Velvet Brownies are more than just a feast for the eyes—they’re a symphony of flavors and textures, poised to satisfy any chocolate lover’s cravings. Ready to indulge? Each bite delivers a fudge-like texture paired with rich cocoa undertones and that signature tang from the buttermilk. Plus, the vibrant red color adds a playful touch. Whether you savor them warm with a scoop of vanilla ice cream or at room temperature, they promise a delightful experience that will have friends and family coming back for seconds!
The Complete Cooking Journey
Let’s embark on this sweet adventure of baking together as we whip up these stunning Red Velvet Brownies!
Ingredients:
- 1 cup all-purpose flour
- 1/2 cup unsweetened cocoa powder
- 1/2 teaspoon baking powder
- 1/4 teaspoon baking soda
- 1/4 teaspoon salt
- 1/2 cup unsalted butter
- 1 cup granulated sugar
- 2 large eggs
- 1 teaspoon vanilla extract
- 1 tablespoon red food coloring
- 1/2 cup chocolate chips (optional)
Method:
Step 1: Preheat the Oven
Preheat the oven to 350°F (175°C) and grease a 9×9 inch baking pan to prevent those delicious brownies from sticking.
Step 2: Whisk the Dry Ingredients
In a bowl, whisk together the all-purpose flour, cocoa powder, baking powder, baking soda, and salt until well combined. This step ensures that all the dry ingredients blend seamlessly for a smooth batter.
Step 3: Melt and Mix the Butter and Sugar
In a separate bowl, melt the unsalted butter and mix in the granulated sugar. This creates a beautifully creamy mixture that’s the foundation for your brownies.
Step 4: Stir in Eggs, Vanilla, and Color
Next, stir in the eggs one at a time, integrating each fully before adding the next. Then, add the vanilla extract and the vibrant red food coloring, mixing until the color is even and luscious.
Step 5: Combine the Wet and Dry Ingredients
Gradually mix in the dry ingredients until just combined. It’s important not to overmix, or the texture will suffer. If using chocolate chips, fold them in gently at this stage for that extra chocolatey finish.
Step 6: Spread the Batter
Pour the rich, red batter into the prepared baking pan and spread it evenly. The anticipation is building; soon you’ll be treating yourself to a brownie!
Step 7: Bake to Perfection
Bake in the preheated oven for 25-30 minutes, or until a toothpick inserted in the center comes out clean. The aroma wafting through your kitchen will be absolutely irresistible!
Step 8: Cool and Serve
Allow the brownies to cool in the pan before cutting them into squares and serving. This step is crucial for achieving the perfect texture.
Serving Suggestions & Pairings
These brownies are incredible on their own, but why not elevate them further? Serve warm with a scoop of vanilla or cream cheese ice cream, or pair with fresh strawberries for a delightful contrast. Drizzle with a bit of chocolate sauce for added indulgence!
Storage & Leftovers Guide
If you happen to have leftovers (which can be rare!), store your Red Velvet Brownies in an airtight container for up to 4 days at room temperature. For longer storage, keep them in the refrigerator for up to a week.
Kitchen Wisdom & Success Tips
- Use Quality Ingredients: The flavor of your brownies will only be as good as the ingredients you use, so opt for high-quality cocoa powder and pure vanilla extract.
- Check Your Oven Temperature: Ovens can often be off by a degree or two, so use an oven thermometer if you have one.
- Don’t Overbake: Keep an eye on the brownies during the last few minutes of baking; they should be set but still slightly fudgy in the center for the perfect texture.
Flavor Variations & Adaptations
- For a fun twist, try adding a teaspoon of espresso powder for a mocha flavor.
- Mix in chopped nuts, like pecans or walnuts, for added crunch.
- Experiment with swirls of cream cheese for that classic red velvet cake honor!
Reader Questions & Solutions
-
Can I make these gluten-free?
Yes! Substitute the all-purpose flour with a 1:1 gluten-free blend for equally delicious results. -
What if I don’t have red food coloring?
You can try beet juice as a natural alternative, but keep in mind it may alter the flavor slightly. -
Can I freeze these brownies?
Absolutely! Wrap them in plastic wrap and place them in a freezer-safe bag. They can be frozen for up to 3 months. Thaw at room temperature before serving. -
How do I know when they are done baking?
When a toothpick inserted in the center comes out with a few moist crumbs, it’s done! It may look slightly undercooked; they’ll continue to set while cooling. -
Can I double the recipe?
Sure! Just adjust your baking time and use a larger pan to ensure even cooking.
Wrapping Up
There you have it—a simple yet elegant dessert that is bound to impress at any gathering. These Red Velvet Brownies are a celebration of flavor, color, and the pure joy of baking. So gather your ingredients, channel your inner pastry chef, and prepare to fall in love with each mouthwatering square. Happy baking!
PrintRed Velvet Brownies
Delicious Red Velvet Brownies that combine the richness of chocolate with a vibrant red color, perfect for any occasion.
- Prep Time: 15 minutes
- Cook Time: 30 minutes
- Total Time: 45 minutes
- Yield: 16 servings 1x
- Category: Dessert
- Method: Baking
- Cuisine: American
- Diet: Vegetarian
Ingredients
- 1 cup all-purpose flour
- 1/2 cup unsweetened cocoa powder
- 1/2 teaspoon baking powder
- 1/4 teaspoon baking soda
- 1/4 teaspoon salt
- 1/2 cup unsalted butter
- 1 cup granulated sugar
- 2 large eggs
- 1 teaspoon vanilla extract
- 1 tablespoon red food coloring
- 1/2 cup chocolate chips (optional)
Instructions
- Preheat the oven to 350°F (175°C) and grease a 9×9 inch baking pan.
- Whisk together the all-purpose flour, cocoa powder, baking powder, baking soda, and salt until well combined.
- Melt the unsalted butter and mix in the granulated sugar.
- Stir in the eggs one at a time, then add the vanilla extract and red food coloring.
- Combine the wet and dry ingredients until just mixed, then fold in chocolate chips if using.
- Spread the batter evenly into the prepared baking pan.
- Bake for 25-30 minutes, or until a toothpick comes out clean.
- Cool in the pan before cutting into squares and serving.
Notes
Serve warm with vanilla ice cream or fresh strawberries. Store leftovers in an airtight container for up to 4 days.
Nutrition
- Serving Size: 1 square
- Calories: 180
- Sugar: 15g
- Sodium: 75mg
- Fat: 9g
- Saturated Fat: 5g
- Unsaturated Fat: 4g
- Trans Fat: 0g
- Carbohydrates: 24g
- Fiber: 1g
- Protein: 2.5g
- Cholesterol: 50mg