There’s something undeniably magical about dessert cups, especially when they involve everyone’s favorite chocolate sandwich cookies: Oreos. I still remember the first time I was introduced to an Oreo dessert—sitting around a friend’s dining table, eyes wide with anticipation. As we dove into a homemade Oreo cheesecake pie, laughter and crumbs filled the room; those sweet moments lingered in my heart just like the rich chocolate flavors danced on my tongue. Fast forward to today, I’ve taken that nostalgic experience and transformed it into something even simpler: Oreo No-Bake Cheesecake Cups. These delightful treats are not only a walk down memory lane but also a perfect way to bring some joy to any gathering.
Recipe Timing
- Prep Duration: 15 minutes
- Active Cooking: 15 minutes
- Total Duration: 1 hour 15 minutes (including chill time)
- Portion Size: Serves 6
- Complexity: Simple
Nutritional Recipe
- Calories per portion: Approximately 350
- Protein: 4g per serving
- Carbs: 40g per serving
- Fats: 22g per serving
- Fiber: 1g per serving
- Sugars: 21g per serving
- Sodium: 320mg per serving
Why You’ll Love This Oreo No-Bake Cheesecake Cups
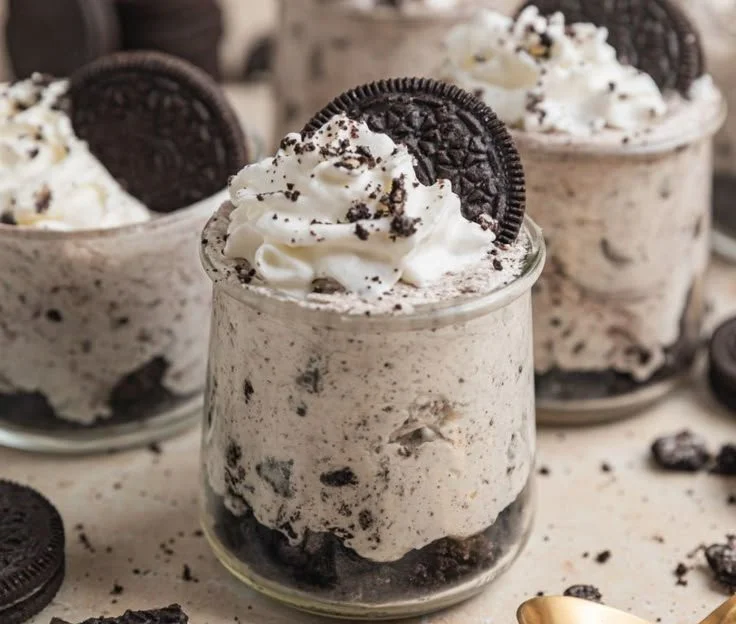
These Oreo No-Bake Cheesecake Cups are like a hug in dessert form. Picture this: a creamy and dreamy cheesecake filling layered with a crunchy Oreo base, all topped off with whipped cream and more crushed Oreos. They come together quickly and require no oven—just a bit of chilling magic. Plus, they’re perfect for gatherings, as they can be made in individual servings, allowing everyone to have their own personal cup of happiness. Whether it’s a casual weeknight or a festive celebration, these cups are bound to steal the show.
The Complete Cooking Journey
Making these delightful Oreo No-Bake Cheesecake Cups is truly a fun journey in the kitchen. You’ll start with the satisfying crunch of Oreo cookies before diving into the silky smoothness of the cheesecake filling. Each step is simple, and the result is decadently delicious! Let’s get you started on this sweet adventure.
Ingredients:
- 1 8 oz block of cream cheese, softened
- 1 8 oz. Cool Whip or whipped topping
- 2/3 c powdered sugar
- 1 tsp vanilla extract
- 24-26 Oreo cookies (more as desired)
Method:
Step 1: Crush the Oreos
Place the Oreos in a plastic bag and seal it tight. Using a rolling pin or a sturdy wooden spoon, crush the Oreos into fine crumbs. This will be your delicious base layered in the dessert dishes.
Step 2: Prepare the Dessert Dishes
Spoon 1 1/2 to 2 tablespoons of the crushed Oreos into the bottom of 6 small dessert dishes. Ensure the dishes are at least 3/4 cup to 1 cup in size. Set aside to form a solid base for your cheesecake filling.
Step 3: Mix the Cream Cheese Filling
In a hand or stand mixer, whip the softened cream cheese and powdered sugar together until creamy and smooth. You’ll be amazed at how easy it comes together!
Step 4: Add the Vanilla
Once your mixture is smooth, add in the vanilla extract. Beat until it’s mixed in beautifully, balancing the flavors perfectly.
Step 5: Fold in the Cool Whip
Gently fold in the Cool Whip until it is fully incorporated into the cream cheese mixture, creating a light and fluffy cheesecake filling.
Step 6: Add the Crushed Oreos
Fold in the remaining crushed Oreos to provide that classic Oreo flavor throughout the filling.
Step 7: Fill the Dessert Dishes
Divide the cheesecake filling evenly across each dessert dish. Gently press it onto the crushed Oreos so they create a cohesive layer.
Step 8: Chill and Set
Cover the dessert dishes and chill for about 1 hour or until you’re ready to serve. This chill time allows the flavors to meld beautifully.
Step 9: Garnish and Serve
Before serving, top each cup with a dollop of whipped cream and sprinkle more crushed Oreos on top for an added crunch factor. Enjoy!
Serving Suggestions & Pairings
These Oreo No-Bake Cheesecake Cups are a treat on their own, but why not elevate the experience? Serve alongside a warm cup of coffee or a scoop of vanilla ice cream to balance the rich flavors. They’re a perfect fit for birthday parties, holiday dinners, or even a movie night with friends—just be ready to share the recipe!
Storage & Leftovers Guide
If you happen to have leftovers (which, let’s be honest, is a rarity), these cheesecake cups can be stored in an airtight container in the refrigerator for up to 3 days. Just be sure to enjoy them quickly for the best taste and texture.
Kitchen Wisdom & Success Tips
- Soften the Cream Cheese: Make sure your cream cheese is at room temperature for easy mixing. You can speed up the softening process by slicing it into smaller pieces.
- Crush Oreos Efficiently: If you’re short on time, you can use a food processor to crush the Oreos quickly.
- Don’t Skip the Chill Time: Chilling is crucial for allowing the cheesecake filling to set properly. It enhances the flavor and texture.
Flavor Variations & Adaptations
Feeling adventurous? Try swapping out the Oreos for other cookie varieties! Golden Oreos or mint Oreos can introduce a fun twist. You can even mix in some chocolate chips or layer with fresh strawberries for a fruity touch.
Reader Questions & Solutions
-
Can I use regular whipped cream instead of Cool Whip?
Yes, you can whip heavy cream to soft peaks as a substitute, but it may slightly alter the texture. -
How do I make this gluten-free?
Simply use gluten-free Oreos to ensure the dessert is safe for those with gluten intolerance. -
What if I don’t have a mixer?
You can mix everything by hand, although it will take a bit more effort. Just be sure to cream the cheese well. -
Can I freeze these cups?
Yes, you can freeze the cups! Just be aware that the texture may change upon thawing. It’s best to enjoy them fresh. -
What’s the best way to serve these at a party?
You can prepare them in advance and place them on a platter. Use small spoons or dessert cups for convenient serving.
Wrapping Up
As you create these Oreo No-Bake Cheesecake Cups, remember that cooking is all about enjoying the process as much as the final product. Each layer you build tells a story of indulgence, comfort, and love. Celebrate those moments, share them with friends and family, and relish every sweet bite. You’ve got this! Happy cooking!
PrintOreo No-Bake Cheesecake Cups
Delightful no-bake dessert cups filled with creamy cheesecake and crunchy Oreo crumbles, perfect for any gathering.
- Prep Time: 15 minutes
- Cook Time: 15 minutes
- Total Time: 75 minutes
- Yield: 6 servings 1x
- Category: Dessert
- Method: No-Bake
- Cuisine: American
- Diet: Vegetarian
Ingredients
- 1 8 oz block of cream cheese, softened
- 1 8 oz Cool Whip or whipped topping
- 2/3 cup powdered sugar
- 1 tsp vanilla extract
- 24–26 Oreo cookies (more as desired)
Instructions
- Crush the Oreos: Place the Oreos in a plastic bag and seal it tight. Using a rolling pin or a sturdy wooden spoon, crush the Oreos into fine crumbs.
- Prepare the Dessert Dishes: Spoon 1 1/2 to 2 tablespoons of the crushed Oreos into the bottom of 6 small dessert dishes.
- Mix the Cream Cheese Filling: In a mixer, whip the softened cream cheese and powdered sugar together until creamy and smooth.
- Add the Vanilla: Once your mixture is smooth, add in the vanilla extract and beat until mixed.
- Fold in the Cool Whip: Gently fold in the Cool Whip until fully incorporated into the cream cheese mixture.
- Add the Crushed Oreos: Fold in the remaining crushed Oreos for classic flavor.
- Fill the Dessert Dishes: Divide the cheesecake filling evenly across each dessert dish.
- Chill and Set: Cover the dessert dishes and chill for about 1 hour.
- Garnish and Serve: Top each cup with whipped cream and more crushed Oreos before serving.
Notes
These cups can be made in advance and stored in the refrigerator for up to 3 days.
Nutrition
- Serving Size: 1 serving
- Calories: 350
- Sugar: 21g
- Sodium: 320mg
- Fat: 22g
- Saturated Fat: 14g
- Unsaturated Fat: 8g
- Trans Fat: 0g
- Carbohydrates: 40g
- Fiber: 1g
- Protein: 4g
- Cholesterol: 30mg