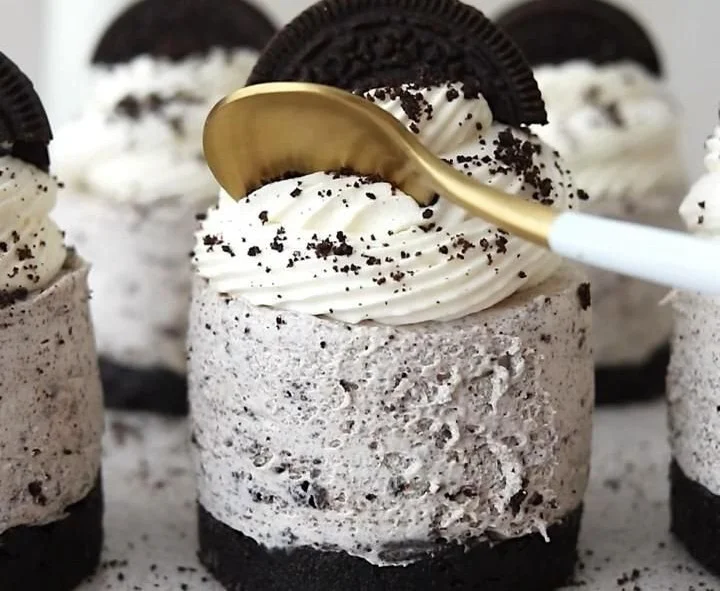
There’s something deeply nostalgic about indulging in a treat like a No-Bake Oreo Cheesecake. I remember sneaking a spoonful of my grandmother’s cheesecake from the fridge, feeling that rush of joy as the rich, creamy flavors melted in my mouth. That sweet comfort food memory comes rushing back every time I whip up this delightful dessert. The beauty of No-Bake Oreo Cheesecakes is that they capture the essence of that homemade nostalgia but require none of the fuss associated with baking. You can effortlessly create these little cups of happiness that are both striking and satisfying.
Ready to bring a little joy to your day? Let’s dive into the deliciousness of making your very own No-Bake Oreo Cheesecakes!
Recipe Timing
- Prep Duration: 20 minutes
- Active Cooking: 15 minutes
- Total Duration: 3 hours and 15 minutes (including chilling time)
- Portion Size: Serves 4-6
- Complexity: Simple
Nutritional Recipe
- Calories per portion: 320
- Protein: 4g
- Carbs: 29g
- Fats: 22g
- Fiber: 1g
- Sugars: 18g
- Sodium: 230mg
Why You’ll Love This No-Bake Oreo Cheesecakes
Imagine layers of creamy, sweet cheesecake set atop a crunchy, chocolatey base. This dessert is a crowd-pleaser, whether you’re hosting a party or simply craving a little something sweet at home. The beauty of a no-bake cheesecake is not only in its ease but in its versatility. You can enjoy it at family gatherings, perfect for birthdays, or simply as a midday snack. Plus, it brings that touch of elegance with minimal effort. What’s not to love?
The Complete Cooking Journey
Let’s embark on this easy yet rewarding cooking adventure together. Each step of creating these No-Bake Oreo Cheesecakes is simple, requiring minimal tools and time. Just gather your ingredients, and let’s get started!
Ingredients:
- 15 Oreo biscuits
- 200g Cream cheese (softened)
- 50g Sugar
- 200ml Whipped cream
- 3-4 Oreo cookies for topping
Method:
Step 1: Preparing the Biscuit Base
Start by crushing the Oreo biscuits into fine crumbs. This can be achieved with a rolling pin or a food processor. Mix the crumbs with a little melted butter to form a moist mixture. Press this into the bottom of your serving cups. This will serve as the delicious foundation for your cheesecake!
Step 2: Mixing the Cheesecake Filling
In a medium bowl, combine the softened cream cheese with sugar and the crushed Oreo cookies. Beat them together until smooth and creamy. The mixture should be rich and finger-lickin’ good!
Step 3: Incorporating the Whipped Cream
In a separate bowl, whip the cream until soft peaks form. This adds a lovely lightness to your cheesecake. Gently fold the whipped cream into the cream cheese mixture, being careful to keep that fluffy texture intact.
Step 4: Spoon It In
Now, it’s time to layer! Spoon the cheesecake filling over the pressed biscuit base in your cups. Make sure they are evenly filled and don’t be shy about licking the spoon—it’s delicious!
Step 5: Garnishing
To add a little flair, top the cheesecakes with a dollop of whipped cream and sprinkle crushed Oreo cookies over the top. This not only adds flavor but is also visually appealing.
Step 6: Chilling Time
Place your assembled cheesecakes in the refrigerator for a few hours, letting them set beautifully. This is the hardest part—waiting! But trust me, it’s worth it.
Serving Suggestions & Pairings
Serve these No-Bake Oreo Cheesecakes with a drizzle of chocolate sauce or a scoop of vanilla ice cream for an extra special treat. They pair beautifully with fresh berries or a side of coffee for the perfect afternoon indulgence.
Storage & Leftovers Guide
If you have any leftovers (which is rare because they’re so tasty!), you can store them in the refrigerator for up to three days. Just cover them to keep the flavors fresh. Don’t freeze them, as the texture may change once thawed.
Kitchen Wisdom & Success Tips
- Softening Cream Cheese: Ensure your cream cheese is adequately softened at room temperature for easy mixing.
- Don’t Rush the Whipping: Whip the cream until it holds soft peaks for that light texture.
- Crushing Oreos: A food processor gives you a fine crumb quickly; however, bagging them and using a rolling pin works just as well!
- Chill Well: Don’t rush the chilling process; letting the cheesecakes set properly is crucial for achieving the right consistency.
Flavor Variations & Adaptations
Feel free to experiment! Try adding flavors like peanut butter, or swirls of caramel or chocolate ganache. You could even substitute different cookies—how about Nutter Butters for a twist? The sky’s the limit!
Reader Questions & Solutions
-
Can I make this cheesecake without sugar?
Yes, you can use sugar substitutes or natural sweeteners like honey or maple syrup. Just be aware that it may change the flavor and texture slightly. -
How can I make this dairy-free?
Use dairy-free cream cheese and whipped coconut cream for the filling, adjusting to your taste. -
What if I can’t find Oreo cookies?
Any chocolate cookie will work—just find one that you love and adapt the recipe as needed! -
How do I prevent the filling from being too loose?
Make sure you whip the cream just until it forms soft peaks, and ensure your cream cheese is properly softened to incorporate air without over-mixing. -
Can I double the recipe?
Absolutely! Just ensure your cups are big enough to accommodate, or consider using a large dish for serving.
Wrapping Up
So, there you have it—your guide to crafting these delightful No-Bake Oreo Cheesecakes! From the simple preparation to that moment of joy when you take your first bite, it’s all about embracing the process and savoring the results. Whether you share these little cups of happiness with friends or keep them all to yourself (we won’t tell!), enjoy every creamy, crunchy, delicious moment. Happy cooking!
PrintNo-Bake Oreo Cheesecake
A delightful no-bake dessert featuring layers of creamy cheesecake set atop a crunchy Oreo base, perfect for any occasion.
- Prep Time: 20 minutes
- Cook Time: 15 minutes
- Total Time: 195 minutes
- Yield: 4-6 servings 1x
- Category: Dessert
- Method: No Bake
- Cuisine: American
- Diet: Vegetarian
Ingredients
- 15 Oreo biscuits
- 200g Cream cheese (softened)
- 50g Sugar
- 200ml Whipped cream
- 3–4 Oreo cookies for topping
Instructions
- Start by crushing the Oreo biscuits into fine crumbs.
- Mix the crumbs with a little melted butter to form a moist mixture.
- Press this into the bottom of your serving cups.
- In a medium bowl, combine the softened cream cheese with sugar and the crushed Oreo cookies.
- Beat them together until smooth and creamy.
- In a separate bowl, whip the cream until soft peaks form.
- Gently fold the whipped cream into the cream cheese mixture.
- Spoon the cheesecake filling over the pressed biscuit base in your cups.
- Top the cheesecakes with a dollop of whipped cream and sprinkle crushed Oreo cookies over the top.
- Place your assembled cheesecakes in the refrigerator for a few hours to set.
Notes
Serve with chocolate sauce or vanilla ice cream. Store leftovers in the refrigerator for up to three days.
Nutrition
- Serving Size: 1 serving
- Calories: 320
- Sugar: 18g
- Sodium: 230mg
- Fat: 22g
- Saturated Fat: 10g
- Unsaturated Fat: 6g
- Trans Fat: 0g
- Carbohydrates: 29g
- Fiber: 1g
- Protein: 4g
- Cholesterol: 40mg