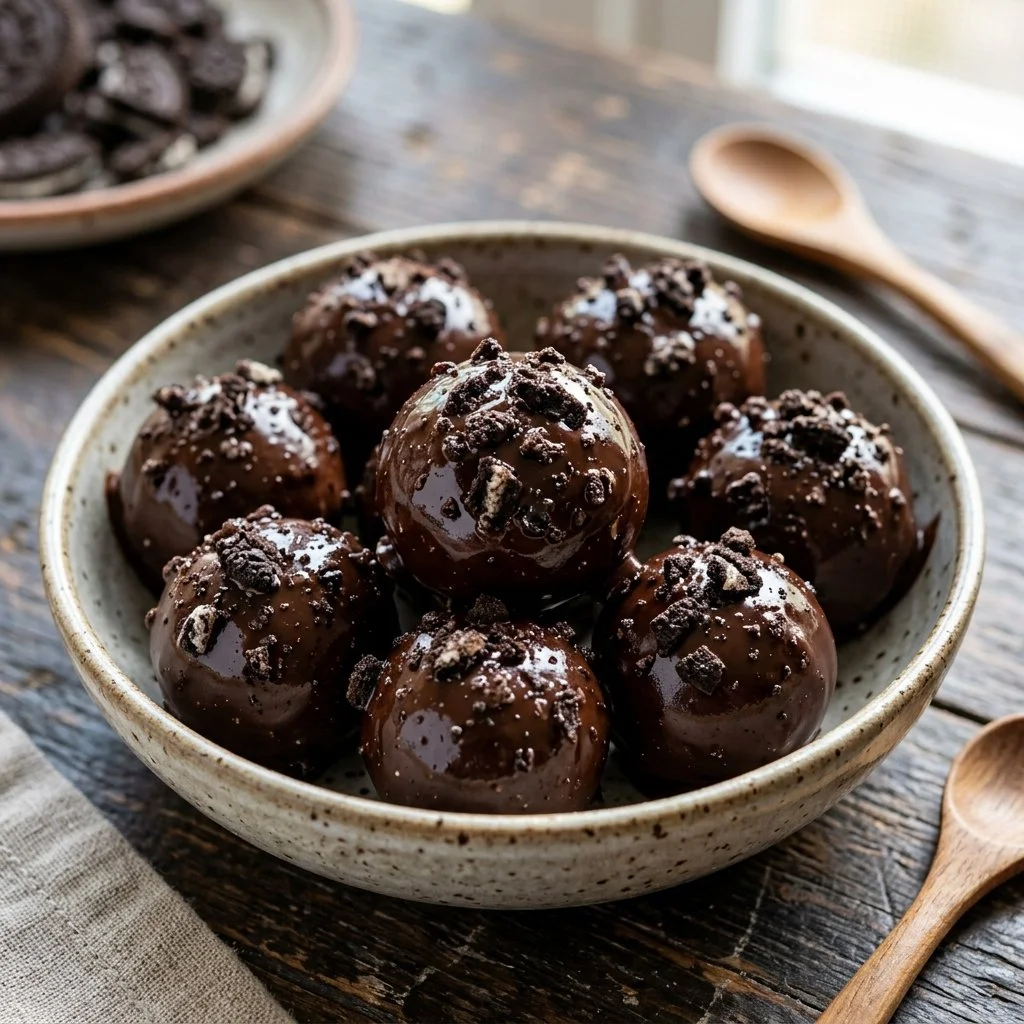
There’s something delightfully nostalgic about biting into a classic Oreo cookie. Whether enjoyed with a glass of milk on a rainy day or crumbled atop a rich dessert, they evoke memories of childhood and family gatherings. But what if I told you there’s a way to elevate your Oreo experience without turning on the oven? Enter No-Bake Oreo Balls—a delicious treat that marries the chocolatey goodness of Oreos with creamy cheesiness, all coated in rich melted chocolate. These little bites of heaven are perfect for any occasion, whether it’s a cozy night in, a party treat, or simply a way to share your love of sweets with friends.
Recipe Timing
- Prep Duration: 15 minutes
- Active Cooking: 10 minutes
- Total Duration: 45 minutes (including chilling time)
- Portion Size: Makes about 20 balls
- Complexity: Simple
Nutritional Recipe
- Calories per portion: Approximately 150 calories
- Protein: 2g per serving
- Carbs: 20g per serving
- Fats: 8g per serving
- Fiber: 0.5g per serving
- Sugars: 10g per serving
- Sodium: 80 mg per serving
Why You’ll Love This No-Bake Oreo Balls
These No-Bake Oreo Balls are the ultimate blend of creamy, crunchy, and chocolatey—perfect for satisfying your sweet tooth without any baking hassle. Imagine the joy of rolling these treats in your hands, watching them transform from simple ingredients into decadent bites of bliss! They’re wonderfully versatile too; you can add your own spin by incorporating different toppings or flavors. Plus, they’re a hit with both kids and adults alike, making them an easy crowd-pleaser.
The Complete Cooking Journey
Creating these incredible little bites is not only straightforward but also fun! This is a recipe where you can involve the kids, make some memories, and enjoy the process of bringing a simple treat to life. From crushing Oreos to dipping them in melted chocolate, every step equips you with a little more joy and a whole lot of delicious anticipation. Let’s dive into the steps of making these irresistible sweets.
Ingredients:
- 1 package Oreo cookies
- 1 package cream cheese, softened
- 1 cup chocolate chips (for coating)
- Sprinkles or crushed Oreos (for decoration, optional)
Method:
Step 1: Crush the Oreos
Begin by crushing the Oreo cookies until they turn into fine crumbs. You can use a food processor for speed or place them in a zip-lock bag and crush them with a rolling pin for a bit of old-school fun.
Step 2: Combine Cream Cheese and Oreos
In a mixing bowl, combine the crushed Oreos with the softened cream cheese. Use a spatula or your hands to mix them together until you achieve a smooth and uniform texture. This mixture is the heart of your Oreo balls!
Step 3: Create the Oreo Balls
Now it’s time to roll! Scoop out small portions of the mixture and roll them into bite-sized balls. Place them on a baking sheet lined with parchment paper—this prevents sticking and makes for easy clean-up.
Step 4: Chill and Set
Pop the baking sheet into the refrigerator and chill the balls for about 30 minutes. This step is crucial as it helps them firm up, making the chocolate dipping process much easier.
Step 5: Melt the Chocolate
While your Oreo balls are chilling, melt the chocolate chips. You can do this in the microwave in 30-second intervals, stirring in between, or use a double boiler for a more controlled melting process.
Step 6: Dip Each Ball
Once your Oreo balls are chilled and the chocolate is melted, it’s time for the fun part! Dip each chilled ball into the melted chocolate, letting the excess drip off. This step coats them beautifully in chocolatey goodness.
Step 7: Decorate the Coated Balls
Return the coated balls to the baking sheet and, while the chocolate is still wet, sprinkle with crushed Oreos or colorful sprinkles for that festive touch!
Step 8: Cool and Harden
Allow the coated Oreo balls to cool and harden completely before serving. If you can resist, consider letting them chill in the fridge for another 15-30 minutes for an extra firm bite.
Serving Suggestions & Pairings
These No-Bake Oreo Balls are perfect on their own, but you can elevate your presentation game by serving them on a decorative platter at parties or gatherings. Pair them with a glass of cold milk or a warm cup of coffee for a lovely afternoon treat. Drizzle some white chocolate over them for added flair, or pair with fresh berries for a balance of flavors.
Storage & Leftovers Guide
Store any leftover Oreo balls in an airtight container in the refrigerator. They’ll stay fresh for about 5 days, although I doubt they’ll last that long! You can also freeze them for up to 3 months—just make sure to separate layers with parchment paper so they don’t stick together.
Kitchen Wisdom & Success Tips
- Be patient with the chocolate melting process; watch the chocolate closely to avoid burning.
- Ensure the cream cheese is softened to make mixing easier.
- For a nutty twist, consider adding finely chopped nuts to the Oreo mixture before rolling.
- If you’re sensitive to chocolate, you can use white chocolate or even yogurt coating.
Flavor Variations & Adaptations
Feel free to get creative! You can swap Oreos with peanut butter Oreos for a nutty twist, add mint extract for a refreshing hint, or even use flavored chocolate for a unique spin. Gluten-free Oreos are also available for a gluten-free version of this tasty treat!
Reader Questions & Solutions
- Can I make these ahead of time? Yes! They keep well in the fridge for up to five days, or you can freeze them for longer storage.
- What if my mixture is too crumbly? If it’s too dry, add a little more softened cream cheese until the mixture holds together.
- Can I use another type of cookie? Absolutely! Feel free to experiment with different cookies, such as Nutter Butter or golden Oreos.
- How do I melt chocolate without a double boiler? A microwave! Just be sure to melt in short bursts and stir until fully melted.
- Are these suitable for parties? Definitely! They’re crowd-pleasers and are easy to pick up and enjoy.
Wrapping Up
These No-Bake Oreo Balls are not just a treat; they’re an experience! Easy to make, delightfully tasty, and perfect for any occasion, they invite you into the kitchen, inspire creativity, and, most importantly, bring joy to those you share them with. So gather your ingredients, roll up your sleeves, and let’s create something special that your friends and family will rave about! Enjoy the sweet moments—you’ve earned them!
PrintNo-Bake Oreo Balls

A delightful treat combining the chocolatey goodness of Oreos with creamy cheesiness, perfect for any occasion.
- Prep Time: 15 minutes
- Cook Time: 10 minutes
- Total Time: 45 minutes
- Yield: 20 balls 1x
- Category: Dessert
- Method: No-Bake
- Cuisine: American
- Diet: Vegetarian
Ingredients
- 1 package Oreo cookies
- 1 package cream cheese, softened
- 1 cup chocolate chips (for coating)
- Sprinkles or crushed Oreos (for decoration, optional)
Instructions
- Crush the Oreo cookies until they turn into fine crumbs.
- Combine the crushed Oreos with the softened cream cheese in a mixing bowl.
- Create small portions of the mixture and roll them into bite-sized balls.
- Chill the balls for about 30 minutes in the refrigerator.
- Melt the chocolate chips in the microwave or using a double boiler.
- Dip each chilled ball into the melted chocolate, letting the excess drip off.
- Decorate with crushed Oreos or sprinkles while the chocolate is still wet.
- Cool the coated Oreo balls until the chocolate hardens completely.
Notes
Store leftover Oreo balls in an airtight container in the refrigerator for up to 5 days or freeze for up to 3 months.
Nutrition
- Serving Size: 1 ball
- Calories: 150
- Sugar: 10g
- Sodium: 80mg
- Fat: 8g
- Saturated Fat: 4g
- Unsaturated Fat: 4g
- Trans Fat: 0g
- Carbohydrates: 20g
- Fiber: 0.5g
- Protein: 2g
- Cholesterol: 30mg