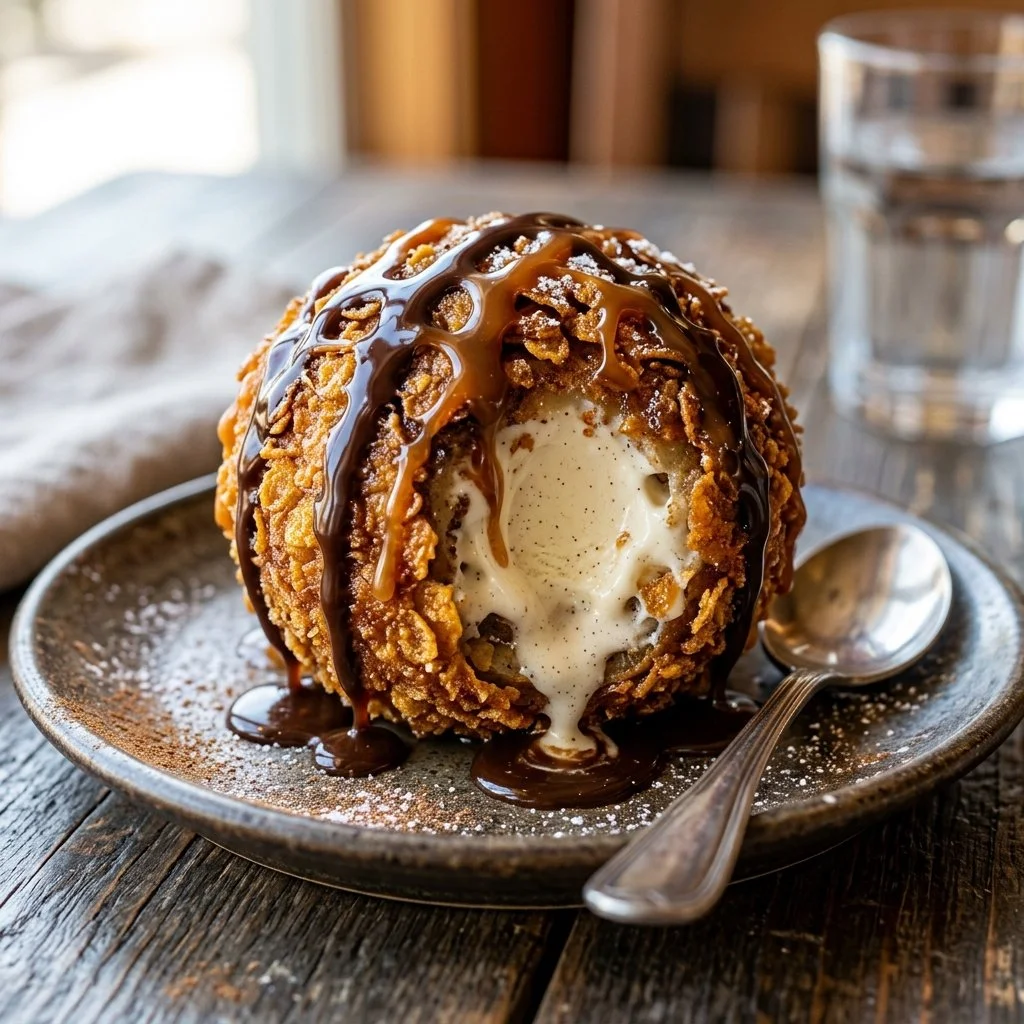
You know those moments when a childhood memory or a simple food experience can transport you back to a specific time and place? For me, that experience is fried ice cream. Growing up, it was a rare treat, something special that would often follow family dinners at our favorite Mexican restaurant. The anticipation of that golden, crispy shell giving way to cool, creamy vanilla ice cream was nothing short of magical—a combination that seemed simultaneously impossible and delightful.
Now, let’s recreate that magic in your own kitchen! Making fried ice cream at home is easier than you might think, and it’s bound to bring joy and nostalgia to your gatherings. So roll up those sleeves and let’s dive into this sweet adventure!
Recipe Timing
- Prep Duration: 20 minutes (plus 2 hours freezing)
- Active Cooking: 15 minutes
- Total Duration: 2 hours 35 minutes
- Portion Size: Serves 4
- Complexity: Simple
Nutritional Recipe
- Calories per portion: Approximately 450
- Protein: 8 grams
- Carbs: 58 grams
- Fats: 23 grams
- Fiber: 1 gram
- Sugars: 28 grams
- Sodium: 320 mg
Why You’ll Love This Fried Ice Cream
Imagine a perfect summer day—hot sun, laughter, and the satisfying crunch of that crispy cornflake coating. Fried ice cream embodies all of that. It’s not just a dessert; it’s an experience. With each bite, you get the contrast of that cool, creamy center and the warm, crispy exterior. The beautiful drizzle of chocolate syrup and the light cloud of whipped cream on top make it feel indulgent, like a tiny celebration on your plate. Whether it’s a birthday party, a family gathering, or a cozy weekend treat, fried ice cream will surely become a favorite tradition.
The Complete Cooking Journey
Now that your sweet tooth is tingling, let’s proceed to the steps that will yield this delightful dish.
Ingredients:
- 4 cups vanilla ice cream
- 1 cup cornflakes, crushed
- 1 cup all-purpose flour
- 2 eggs
- 1 teaspoon vanilla extract
- 1 teaspoon cinnamon
- Vegetable oil for frying
- Chocolate syrup (for serving)
- Whipped cream (for serving)
Method:
Step 1: Scoop and Freeze the Ice Cream
Start by scooping out your vanilla ice cream into balls. Place them on a baking sheet lined with parchment paper and freeze for at least 2 hours until they are very firm. This step is crucial! The firmer they are, the easier (and mess-free) the frying will be.
Step 2: Combine Cornflakes and Cinnamon
While your ice cream balls are freezing, take a bowl and mix the crushed cornflakes with cinnamon. This mixture will give that deliciously spiced flavor to the crispy coating.
Step 3: Beat the Eggs
In another bowl, beat the eggs with the vanilla extract until well combined. This mixture will help adhere the cornflake crust to the ice cream.
Step 4: Prepare the Ice Cream Balls for Frying
Once your ice cream balls are perfectly frozen, remove them and roll each one first in flour, followed by dipping them into the egg mixture, and finally coating them in the cornflake mixture. Make sure they are fully covered to achieve that golden crunch when fried.
Step 5: Heat the Oil
In a deep fryer or large pot, heat vegetable oil to 375°F (190°C). A thermometer is your best friend here! This temperature ensures the ice cream inside will stay frozen while the outside gets crispy.
Step 6: Fry the Coated Ice Cream Balls
Carefully fry the coated ice cream balls for about 10-15 seconds until they are golden brown. Keep an eye on them; this is a quick process!
Step 7: Drain and Cool
Once golden, remove the fried ice cream balls and let them drain on paper towels to absorb excess oil.
Step 8: Serve with Toppings
Serve immediately, drizzled with chocolate syrup and topped with a generous dollop of whipped cream. Enjoy the delightfully crispy and creamy combination while it’s still warm!
Serving Suggestions & Pairings
Fried ice cream is an absolute star on its own, but here are some delightful pairings:
- Serve it alongside fresh fruit like strawberries or bananas for a refreshing contrast.
- Add a scoop of complementary ice cream flavors, such as chocolate or strawberry, for a colorful dessert platter.
- Enjoy it with a side of churros for a full-on dessert fiesta!
Storage & Leftovers Guide
Fried ice cream is best enjoyed fresh, but if you have leftovers, you can store them in the freezer. Just wrap them individually in plastic wrap and place them in an airtight container. They can last for up to a week, but keep in mind that reheating may affect their texture.
Kitchen Wisdom & Success Tips
- Make sure the ice cream balls are very firm when you start—the warmer they are, the more difficult it will be to fry them.
- Experiment with different toppings! Try caramel sauce, sprinkles, or crushed nuts for added texture and flavor.
- If making for a crowd, you can double or triple the recipe—it’s sure to impress!
Flavor Variations & Adaptations
Feeling a bit adventurous? Here are some flavor variations to try:
- Chocolate Fried Ice Cream: Use chocolate ice cream instead of vanilla for a rich twist.
- Coconut Fried Ice Cream: Add shredded coconut to the cornflake mixture for an island vibe.
- Spicy Fried Ice Cream: Infuse your flour with a bit of cayenne for a surprisingly delicious kick!
Reader Questions & Solutions
-
Can I use a different type of ice cream?
Yes! Use any flavor you love, but keep in mind that the texture may vary. -
What type of oil is best for frying?
Vegetable oil is great, but canola or peanut oil works well, too, owing to their high smoke points. -
Can I freeze fried ice cream after frying?
While it’s best fresh, you can freeze them again, but the texture may not be the same. -
Do I have to freeze the ice cream for 2 hours?
It’s strongly recommended to ensure they hold their shape during frying. -
Can I make this gluten-free?
Absolutely! Swap out regular flour for a gluten-free blend and use gluten-free cornflakes.
Wrapping Up
Fried ice cream isn’t just a dessert; it’s a joyful experience that evokes memories of laughter and summer nights. With just a few simple steps, you can create this delightful dish right in your kitchen, bound to impress family and friends alike. So grab those ingredients, make a batch, and indulge in the crispy, creamy bliss of homemade fried ice cream. Happy cooking!
PrintFried Ice Cream
Experience the magic of fried ice cream, featuring a crispy cornflake coating over a cool, creamy vanilla center, perfect for family gatherings or special occasions.
- Prep Time: 20 minutes
- Cook Time: 15 minutes
- Total Time: 155 minutes
- Yield: 4 servings 1x
- Category: Dessert
- Method: Frying
- Cuisine: Mexican
- Diet: Vegetarian
Ingredients
- 4 cups vanilla ice cream
- 1 cup cornflakes, crushed
- 1 cup all-purpose flour
- 2 eggs
- 1 teaspoon vanilla extract
- 1 teaspoon cinnamon
- Vegetable oil for frying
- Chocolate syrup (for serving)
- Whipped cream (for serving)
Instructions
- Scoop and freeze the ice cream into balls, placing them on a lined baking sheet. Freeze for at least 2 hours until firm.
- Combine crushed cornflakes and cinnamon in a bowl.
- Beat the eggs with vanilla extract in another bowl.
- Prepare the ice cream balls by rolling in flour, dipping in egg mixture, and coating with cornflakes.
- Heat the vegetable oil in a deep fryer or pot to 375°F (190°C).
- Fry the coated ice cream balls for 10-15 seconds until golden brown.
- Drain on paper towels to absorb excess oil.
- Serve immediately with chocolate syrup and whipped cream on top.
Notes
Ensure ice cream balls are very firm for easy frying and experiment with toppings to enhance flavors.
Nutrition
- Serving Size: 1 serving
- Calories: 450
- Sugar: 28g
- Sodium: 320mg
- Fat: 23g
- Saturated Fat: 10g
- Unsaturated Fat: 8g
- Trans Fat: 0g
- Carbohydrates: 58g
- Fiber: 1g
- Protein: 8g
- Cholesterol: 70mg