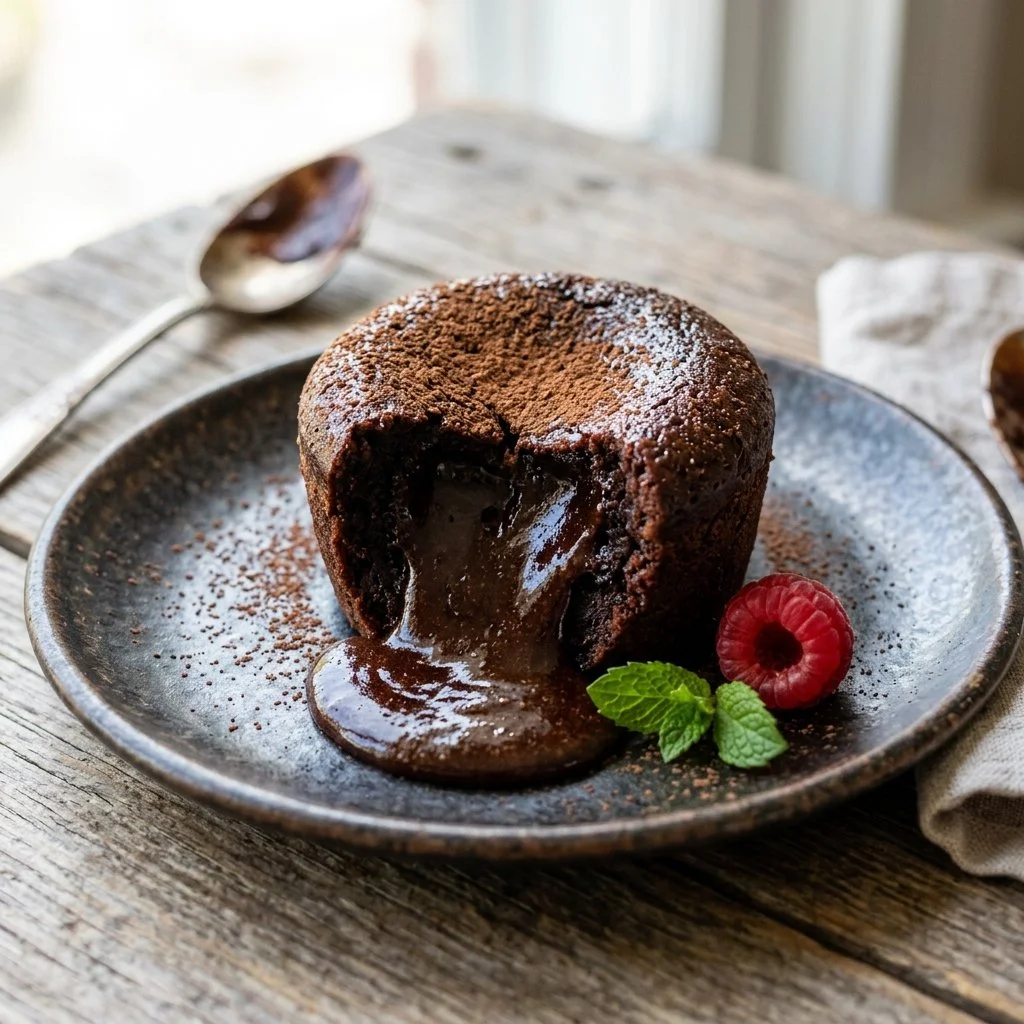
As I stood in my kitchen one sun-drenched afternoon, the tantalizing aroma of melting chocolate enveloped me. This wasn’t just any chocolate — it was the foundation of my beloved Chocolate Lava Cake, a dessert that never fails to spark joy and ignite memories. Each time I make this cake, I’m transported back to evenings spent with friends and family, where laughter mingles with the rich scent of chocolate. Nestled within each bite is the surprise of warm, gooey chocolate just waiting to spill out. It’s a dessert that teaches us to embrace life’s beautiful messiness, and what better way to indulge than in a homemade version!
Recipe Timing
- Prep Duration: 15 minutes
- Active Cooking: 14 minutes
- Total Duration: 29 minutes
- Portion Size: 4 servings
- Complexity: Simple
Nutritional Recipe
- Calories per portion: Approximately 350
- Protein: 6g per serving
- Carbs: 35g per serving
- Fats: 22g per serving
- Fiber: 1g per serving
- Sugars: 20g per serving
- Sodium: 120mg per serving
Why You’ll Love This Chocolate Lava Cake
This Chocolate Lava Cake is not just another dessert; it’s a moment of indulgence that can make any occasion feel like a celebration. The beauty lies in its simplicity — with just a handful of ingredients and a few straightforward steps, you can create something that looks elaborate and tastes utterly decadent. The magic unfolds when you slice into the cake; that molten center is a chocolate lover’s dream. Pair it with a scoop of velvety vanilla ice cream, and you’ve got yourself a dessert that offers both warmth and comfort. It’s perfect for dinner parties, date nights, or simply when you need a sweet treat to brighten your day.
The Complete Cooking Journey
The journey to creating this sumptuous dessert begins with preheating your oven, a gentle reminder that delightful things are on the way. The chocolate and butter melt together, merging their rich flavors into a silky embrace. As you whisk the eggs and sugar, there’s something magical about watching the mixture turn pale, a sign that your dessert is well on its way to perfection. Folding in the flour and salt adds structure to your deliciously decadent batter, ready to be transformed into something beautiful. After a brief time in the oven, the sweet aroma fills your kitchen, enticing everyone around you. The final touch? A dusting of powdered sugar, a simple act that elevates your creation visually and adds a touch of elegance.
Ingredients:
- 1/2 cup unsalted butter
- 1 cup semisweet chocolate chips
- 2 large eggs
- 2 large egg yolks
- 1/4 cup granulated sugar
- 2 tablespoons all-purpose flour
- 1/4 teaspoon salt
- Powdered sugar (for dusting)
- Vanilla ice cream (optional, for serving)
Method:
Step 1: Preheat the Oven
Preheat the oven to 425°F (220°C). Grease four ramekins with butter and dust with flour, ensuring that every nook is covered to help your cakes glide out effortlessly.
Step 2: Melt the Chocolate
In a microwave-safe bowl, melt the butter and chocolate chips together in 30-second intervals, stirring until smooth. This process allows for a creamy consistency without overcooking.
Step 3: Whisk the Eggs
In a separate bowl, whisk together the eggs, egg yolks, and granulated sugar until pale and frothy, which brings a lovely fluffiness to the mixture.
Step 4: Combine Chocolate and Egg Mixtures
Add the melted chocolate mixture to the egg mixture and stir to combine, creating a luscious base for your batter.
Step 5: Fold with Flour
Fold in the flour and salt until just combined. Be gentle! You want to keep that airy texture while ensuring everything is well mixed.
Step 6: Pour into Ramekins
Pour the batter evenly into the prepared ramekins, filling them about three-quarters of the way to allow room for the cakes to rise.
Step 7: Bake to Perfection
Bake for 12-14 minutes until the edges are firm but the center is soft. You want that perfect balance of cooked outside and molten center.
Step 8: Cool Slightly
Let cool for 1 minute, then invert onto plates, deep breaths as you reveal the lava center!
Step 9: Dust and Serve
Dust with powdered sugar and serve with vanilla ice cream if desired, finishing your masterpiece with a flourish.
Serving Suggestions & Pairings
This delicious cake serves well at dinner parties, anniversaries, or a simple family gathering. Pair it with fresh berries for a fruity contrast, or drizzle with warm caramel sauce for an extra layer of sweetness. The warm chocolate pairs beautifully with rich vanilla ice cream, but feel free to experiment with flavored ice creams or whipped cream for a personal touch!
Storage & Leftovers Guide
If you happen to have any leftovers (which I highly doubt!), store them in an airtight container in the refrigerator for up to 2 days. To reheat, pop them in the microwave for about 15-20 seconds, just until the center is warm and molten again.
Kitchen Wisdom & Success Tips
- Don’t overbake! Ensure that you keep an eye on your cakes towards the end of baking time. An extra minute can turn that gooey center into a cooked cake!
- Dusting your ramekins with flour is crucial, or you might find your cakes stubbornly stuck to the sides.
- For extra decadence, consider adding a sprinkle of sea salt on top just before serving; it beautifully contrasts the sweetness!
Flavor Variations & Adaptations
Try swapping out the semisweet chocolate for dark chocolate for an intense flavor, or mix in a dash of espresso powder to enhance chocolate notes. For a fruity twist, consider adding a dollop of raspberry puree into the center before baking for that surprise burst of flavor.
Reader Questions & Solutions
- Can I make the batter ahead of time? Yes! You can prepare the batter and refrigerate it for up to 24 hours. Just add a few minutes to the baking time if starting from cold.
- What if I don’t have ramekins? Muffin tins also work. Just adjust the cooking time accordingly.
- Can I use different types of chocolate? Absolutely! Each type will give you a different flavor profile. White chocolate will create a milder dessert, while dark chocolate will pack a richer taste.
- How do I know when my cake is done? The edges should be firm when gently shaken, and the center will jiggle slightly — that’s your cue for a perfectly molten lava cake!
- Is there a gluten-free option? Yes! Substitute all-purpose flour with a gluten-free flour blend for the same great taste without the gluten.
Wrapping Up
Now that you have the recipe for Chocolate Lava Cake, I encourage you to gather your ingredients, roll up your sleeves, and dive into this delightful baking adventure! Whether you’re celebrating a special occasion or simply treating yourself after a long day, this dessert promises to wrap you in warmth and joy. Remember, the magic of cooking lies not just in the flavors but in the experiences you create along the way. Happy baking!
PrintChocolate Lava Cake
A rich and indulgent dessert with a warm, gooey chocolate center, perfect for special occasions or a sweet treat.
- Prep Time: 15 minutes
- Cook Time: 14 minutes
- Total Time: 29 minutes
- Yield: 4 servings 1x
- Category: Dessert
- Method: Baking
- Cuisine: American
- Diet: Vegetarian
Ingredients
- 1/2 cup unsalted butter
- 1 cup semisweet chocolate chips
- 2 large eggs
- 2 large egg yolks
- 1/4 cup granulated sugar
- 2 tablespoons all-purpose flour
- 1/4 teaspoon salt
- Powdered sugar (for dusting)
- Vanilla ice cream (optional, for serving)
Instructions
- Preheat the oven to 425°F (220°C). Grease four ramekins with butter and dust with flour.
- Melt the butter and chocolate chips together in a microwave-safe bowl in 30-second intervals.
- Whisk together the eggs, egg yolks, and granulated sugar until pale and frothy.
- Combine the melted chocolate mixture with the egg mixture and stir to combine.
- Fold in the flour and salt until just combined.
- Pour the batter into the prepared ramekins, filling them three-quarters full.
- Bake for 12-14 minutes until the edges are firm but the center is soft.
- Cool for 1 minute, then invert onto plates.
- Dust with powdered sugar and serve with vanilla ice cream if desired.
Notes
For a fruity twist, consider adding a dollop of raspberry puree into the center before baking.
Nutrition
- Serving Size: 1 serving
- Calories: 350
- Sugar: 20g
- Sodium: 120mg
- Fat: 22g
- Saturated Fat: 13g
- Unsaturated Fat: 9g
- Trans Fat: 0g
- Carbohydrates: 35g
- Fiber: 1g
- Protein: 6g
- Cholesterol: 185mg