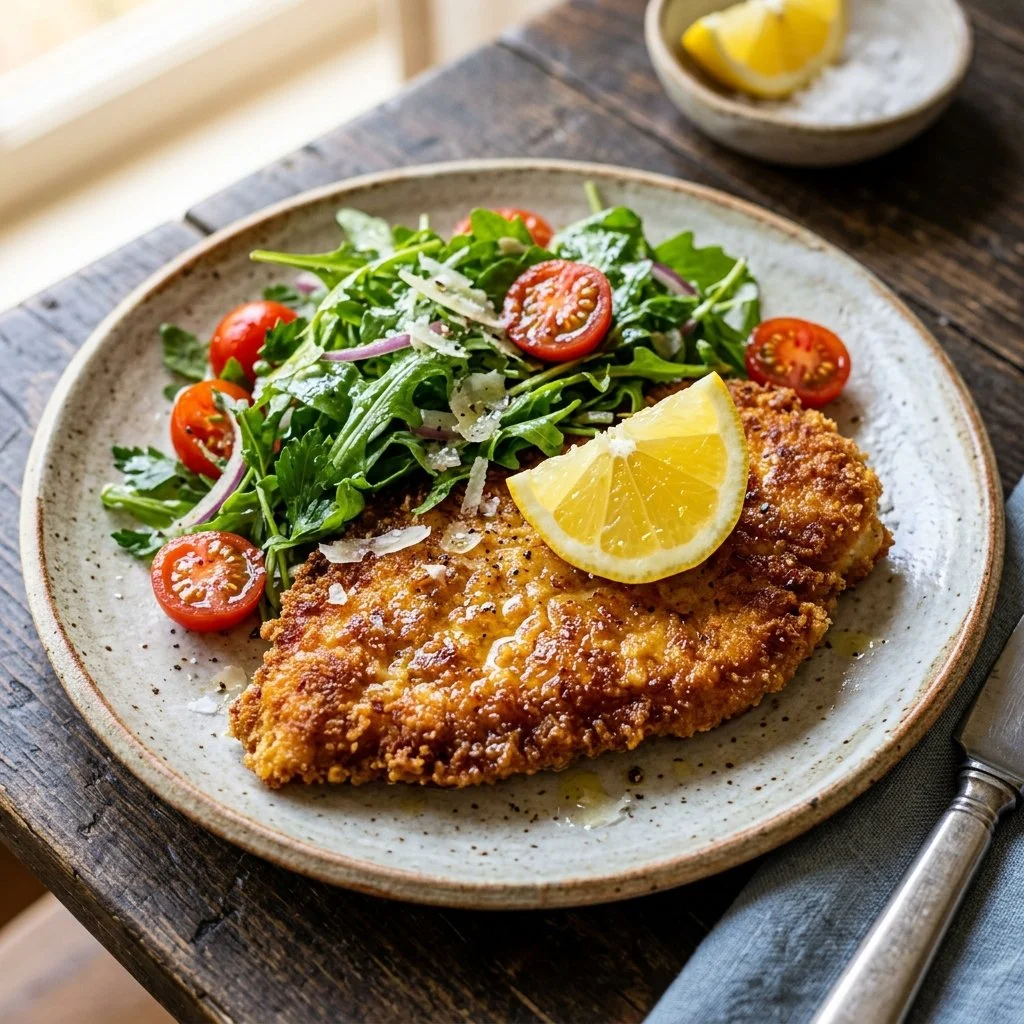
I can still remember the first time I tasted Chicken Milanese. It was a rainy evening, and I had wandered into a little trattoria nestled in the heart of a bustling street. The aroma wafting from the kitchen was utterly irresistible, and before I knew it, I was seated at a cozy table, eagerly anticipating my meal. When the server placed the plate before me, the golden-brown chicken, perfectly crisped and glistening with olive oil, beckoned me to dig in. A squeeze of fresh lemon over the top elevated the dish to celestial heights, and in that moment, I felt a warm embrace of comfort that only good food can provide.
That experience ignited a passion within me, not only for savoring such heavenly flavors but also for recreating them in my own kitchen. Today, I invite you to join me in crafting this delightful dish—Chicken Milanese—a simple yet elegant meal that brings joy to any dining table.
Recipe Timing
- Prep Duration: 20 minutes
- Active Cooking: 15 minutes
- Total Duration: 35 minutes
- Portion Size: Serves 2
- Complexity: Simple
Nutritional Recipe
- Calories per portion: Approximately 380
- Protein: 30g per serving
- Carbs: 32g per serving
- Fats: 16g per serving
- Fiber: 1g per serving
- Sugars: 1g per serving
- Sodium: 680mg per serving
Why You’ll Love This Chicken Milanese
The beauty of Chicken Milanese lies in its simplicity and versatility. This dish is not just pleasing to the eye; it’s also a feast for the senses. The crunchy, golden crust provides that satisfying crunch with every bite, complemented by the succulent, juicy chicken hidden within. When served with a side of bright, zesty lemon, you have a harmonious balance of flavors that will leave your taste buds singing. Plus, it’s quick to make, making it a perfect option for busy weeknights or a leisurely weekend meal.
The Complete Cooking Journey
Embarking on this culinary adventure is a delightful process. From the rhythmic pounding of the chicken breasts to the satisfying sizzle of the frying oil, each step brings you closer to a dish that will surely impress your family and guests. As you create this classic Italian fare, you’ll fill your kitchen with delicious aromas, building anticipation for that first crispy bite.
Ingredients:
- 2 boneless, skinless chicken breasts
- 1 cup breadcrumbs
- 1/2 cup grated Parmesan cheese
- 1/2 cup all-purpose flour
- 2 large eggs
- Salt and pepper to taste
- Olive oil for frying
- Lemon wedges for serving
Method:
Step 1: Preheat the Oven
Preheat the oven to 200°F (93°C) to keep the chicken warm once it’s cooked.
Step 2: Season the Flour
Place the flour in a shallow dish and season it generously with salt and pepper. This will add an extra layer of flavor to the chicken as it cooks.
Step 3: Beat the Eggs
In another shallow dish, beat the eggs until they are fully combined. This is your binder, helping all that crunchy goodness stick to the chicken.
Step 4: Prepare the Breadcrumb Mixture
In a third dish, mix together the breadcrumbs and grated Parmesan cheese. This combination will create a deliciously cheesy, crispy crust.
Step 5: Pound the Chicken
Pound the chicken breasts gently until they are about 1/2 inch thick. This step not only tenderizes the meat but also ensures even cooking.
Step 6: Dredge the Chicken
Dredge each chicken breast in the seasoned flour, making sure to shake off any excess. Then, dip it into the beaten eggs, and finally coat it with the breadcrumb and Parmesan mixture, pressing lightly to adhere.
Step 7: Heat the Olive Oil
In a large skillet, heat enough olive oil over medium-high heat to generously cover the bottom. You want the oil hot enough that it sizzles when you add the chicken.
Step 8: Fry the Chicken
Fry the chicken breasts for 3-4 minutes on each side until they are golden brown and cooked through. You want them crispy on the outside and juicy on the inside.
Step 9: Keep the Chicken Warm
Once cooked, transfer the chicken to a baking sheet and place it in the warm oven while you fry the remaining pieces, ensuring everything is served hot.
Step 10: Serve
Plate the chicken with a few lemon wedges on the side, inviting everyone to squeeze fresh lemon juice over their servings just before digging in.
Serving Suggestions & Pairings
Chicken Milanese pairs beautifully with a fresh arugula salad, drizzled with a simple lemon vinaigrette. For a heartier option, serve it alongside creamy mashed potatoes or roasted vegetables. A crisp glass of white wine, such as Pinot Grigio, complements the dish splendidly, enhancing the vibrant flavors.
Storage & Leftovers Guide
Leftovers can be stored in an airtight container in the refrigerator for up to 3 days. To reheat, place the chicken in a preheated oven at 350°F (175°C) for about 10-15 minutes to maintain its crispiness. You can also reheat it in a skillet with a little olive oil for that freshly-fried feel.
Kitchen Wisdom & Success Tips
- For the crispiest chicken, avoid overcrowding the skillet while frying; this helps maintain the oil’s temperature.
- You can customize the breadcrumb mixture by adding your favorite herbs or spices for a personal touch.
- If you prefer a lighter version, try baking the chicken instead of frying. Just spray the breaded chicken with a little olive oil and bake at 400°F (200°C) for about 20-25 minutes, flipping halfway through, until golden and cooked through.
Flavor Variations & Adaptations
Feel free to experiment with different types of cheese in the breadcrumb mixture, like Pecorino Romano or even a sprinkle of garlic powder for an added punch. You can also swap the chicken for thinly sliced eggplant or zucchini for a delightful vegetarian version.
Reader Questions & Solutions
-
My chicken isn’t crispy! What did I do wrong?
Ensure the oil is hot enough before adding the chicken, and avoid overcrowding the skillet to maintain that sizzle. -
Can I freeze Chicken Milanese?
Yes, you can freeze the uncooked breaded chicken. When ready to eat, simply fry straight from the freezer, adjusting the cooking time as necessary. -
What side dishes go well with Chicken Milanese?
Fresh salads, sautéed greens, or pasta with marinara are all great accompaniments that bring balance to the meal. -
Is there a gluten-free alternative for the breadcrumbs?
Absolutely! Use crushed gluten-free cornflakes or almond flour as a tasty substitute. -
How do I know when the chicken is fully cooked?
The best way is to use a meat thermometer; the internal temperature should reach 165°F (74°C). Alternatively, the meat should no longer be pink inside when you cut through.
Wrapping Up
As you gather around the table with your loved ones, savoring that first bite of your homemade Chicken Milanese, remember that the joy of cooking lies not just in feeding the body but in nurturing the soul. This dish, with its rich flavors and crispy texture, is perfect for sharing moments filled with laughter and love. So roll up your sleeves, channel your inner chef, and enjoy every step of the process. Happy cooking!
PrintChicken Milanese
A simple yet elegant Chicken Milanese, featuring crispy golden chicken breasts served with fresh lemon.
- Prep Time: 20 minutes
- Cook Time: 15 minutes
- Total Time: 35 minutes
- Yield: 2 servings 1x
- Category: Main Course
- Method: Frying
- Cuisine: Italian
- Diet: Non-Vegetarian
Ingredients
- 2 boneless, skinless chicken breasts
- 1 cup breadcrumbs
- 1/2 cup grated Parmesan cheese
- 1/2 cup all-purpose flour
- 2 large eggs
- Salt and pepper to taste
- Olive oil for frying
- Lemon wedges for serving
Instructions
- Preheat the oven to 200°F (93°C) to keep the chicken warm once it’s cooked.
- Place the flour in a shallow dish and season it generously with salt and pepper.
- In another shallow dish, beat the eggs until they are fully combined.
- In a third dish, mix together the breadcrumbs and grated Parmesan cheese.
- Pound the chicken breasts gently until they are about 1/2 inch thick.
- Dredge each chicken breast in the seasoned flour, then dip it into the beaten eggs, and finally coat it with the breadcrumb and Parmesan mixture.
- Heat enough olive oil in a large skillet over medium-high heat.
- Fry the chicken breasts for 3-4 minutes on each side until golden brown.
- Transfer the cooked chicken to a baking sheet and place it in the warm oven.
- Plate the chicken with lemon wedges on the side for serving.
Notes
For the crispiest chicken, avoid overcrowding the skillet while frying. Leftovers can be stored in an airtight container for up to 3 days.
Nutrition
- Serving Size: 1 serving
- Calories: 380
- Sugar: 1g
- Sodium: 680mg
- Fat: 16g
- Saturated Fat: 5g
- Unsaturated Fat: 10g
- Trans Fat: 0g
- Carbohydrates: 32g
- Fiber: 1g
- Protein: 30g
- Cholesterol: 186mg