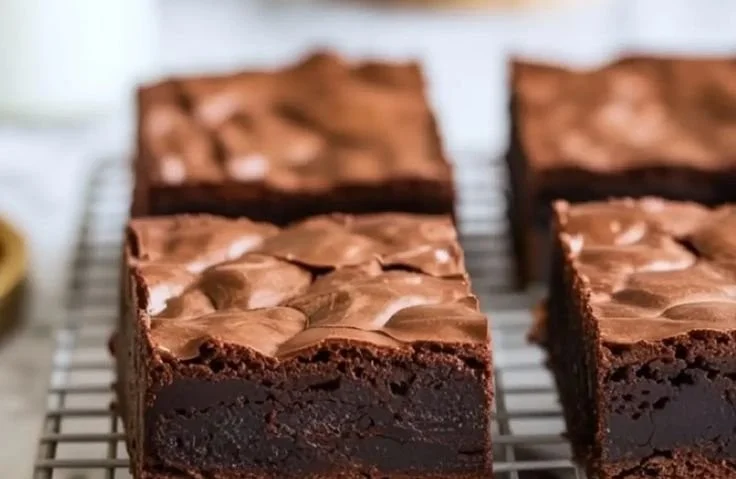
There’s something nostalgic about a good brownie, isn’t there? It seems no matter how many times I bake these fudgy squares, they evoke warm memories of afternoons spent in my grandmother’s kitchen. The smell of chocolate wafting through the air, the sound of laughter, and the excitement of licking the batter off the spoon are all cherished moments. Now, imagine taking those rich, chewy brownies and elevating them with a silky, smooth chocolate frosting. This Brownie Frosting Recipe isn’t just an accompaniment; it’s the finishing touch that transforms a simple dessert into a decadent experience.
Recipe Timing
- Prep Duration: 10 minutes
- Active Cooking: 10 minutes
- Total Duration: 20 minutes
- Portion Size: Serves about 12 brownies
- Complexity: Simple
Nutritional Recipe
- Calories per portion: Approx. 150
- Protein: 1g per serving
- Carbs: 25g per serving
- Fats: 7g per serving
- Fiber: 0g per serving
- Sugars: 21g per serving
- Sodium: 40mg per serving
Why You’ll Love This Brownie Frosting Recipe
This frosting is rich, smooth, and irresistibly chocolatey. It’s designed to complement the fudgy texture of brownies without overwhelming them. With just a handful of ingredients, you’ll create a spread that’s perfect for both special occasions and casual family gatherings. Plus, the simple steps ensure that even novice bakers can whip up this delightful treat without a hitch. Trust me; once you’ve tasted this frosting, you might find it’s the star of the show!
The Complete Cooking Journey
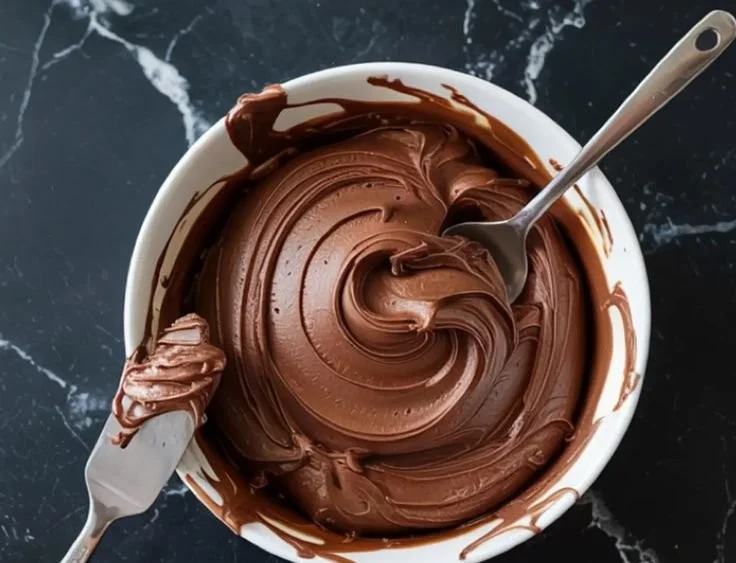
Let’s take a moment to savor the process of making this frosting. First, you’ll soften the butter until it’s creamy and oh-so-smooth; then you’ll blend in cocoa powder, creating a lovely chocolate base. As you sift and incorporate the powdered sugar, you’ll watch as the mixture transforms into a velvety thick frosting. By gradually adding heavy cream, the frosting gains a light and airy texture that spreads beautifully. Finally, a hint of vanilla and a pinch of sea salt elevate the flavors to new heights. It’s a rewarding culinary journey, where every step leads to a delicious destination.
Ingredients:
- 1/2 cup (1 stick) unsalted butter, softened
- 1/3 cup unsweetened cocoa powder
- 2 cups powdered sugar, sifted
- 2 to 4 tablespoons heavy cream
- 1 teaspoon vanilla extract
- 1/8 teaspoon fine sea salt
Method:
Step 1: Soften the Butter
Use butter that is very soft but not melted. Press your finger into it—it should yield easily. Place the butter in a mixing bowl and beat until smooth and creamy.
Step 2: Add Cocoa Powder
Stir in the cocoa powder gradually to avoid dust clouds. Mix until the butter and cocoa are fully combined into a smooth chocolate base.
Step 3: Incorporate Powdered Sugar
Sift the powdered sugar to remove clumps. Add it in batches, mixing well after each addition. This helps create a smooth consistency and prevents any lumps from forming in your frosting.
Step 4: Add Cream Gradually
Pour in 2 tablespoons of heavy cream and mix. Continue adding cream, 1 tablespoon at a time, until the frosting is spreadable but thick. The texture should be creamy and hold soft peaks.
Step 5: Finish with Vanilla and Salt
Stir in the vanilla extract and a pinch of salt. Mix thoroughly to balance and brighten the chocolate flavor, giving it that extra touch of perfection.
Step 6: Adjust if Needed
Taste the frosting. If it’s too thick, add a bit more cream; if it’s too soft, add a little extra powdered sugar. The final texture should be easy to spread yet remain on your cooled brownies.
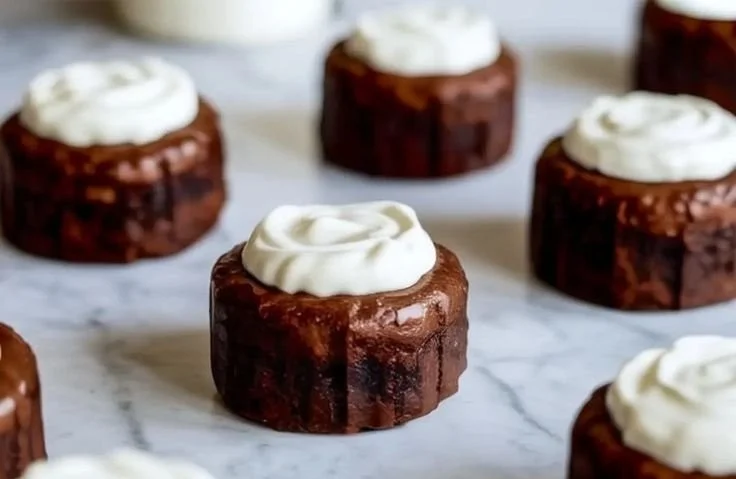
Step 7: Frost the Brownies
Make sure your brownies are fully cooled or even chilled. Spread the frosting in wide, even strokes using a butter knife or offset spatula. Let sit at room temperature to set slightly, or refrigerate for a firmer finish.
Serving Suggestions & Pairings
These brownies with chocolate frosting are perfect on their own, but pair them with a scoop of vanilla ice cream for a delicious contrast. A sprinkle of sea salt on top adds a savory twist that beautifully complements the sweetness.
Storage & Leftovers Guide
Store any leftover brownies in an airtight container at room temperature for up to 3 days. If you prefer a firmer frosting, refrigerate the brownies, but allow them to come to room temperature before serving for the best texture.
Kitchen Wisdom & Success Tips
- Soften Butter Properly: Place the butter out at room temperature for about 30-60 minutes before starting. Alternatively, you can cut it into small pieces to speed up the softening process.
- Sift Your Sugar: Sifting powdered sugar before mixing is crucial for a smooth frosting. It helps eliminate any lumps that may spoil the texture.
- Temperature Matters: Ensure your brownies are completely cooled before frosting to prevent the blend from melting off.
Flavor Variations & Adaptations
Feel free to experiment! Add a hint of espresso powder to intensify the chocolate flavor or incorporate a swirl of peanut butter for a nutty twist. If you’re feeling adventurous, try folding in crushed mint candies for a festive touch.
Reader Questions & Solutions
-
Can I use margarine instead of butter?
- Yes, but it may slightly alter the flavor and texture. Butter provides a richer taste.
-
How can I make this frosting dairy-free?
- Replace butter with a dairy-free spread and use coconut cream or almond milk in place of heavy cream.
-
What can I do if my frosting is too watery?
- Add more sifted powdered sugar gradually until you reach your desired consistency.
-
Can I freeze leftover frosting?
- Absolutely! Store in an airtight container in the freezer for up to three months. Just be sure to let it thaw in the refrigerator before using.
-
Is there a way to flavor the frosting without cocoa powder?
- Yes! You can substitute cocoa powder with melted chocolate or use flavor extracts like almond or mint for a different spin.
Wrapping Up
There you have it! This Brownie Frosting Recipe not only elevates your brownies, but it also connects you back to those cherished kitchen moments, full of love and laughter. Whether it’s a casual weeknight dessert or a special occasion, this frosting is sure to please. So, roll up your sleeves, whip up this easy frosting, and relish the magic of home baking. Happy cooking!
PrintBrownie Frosting Recipe

A rich and smooth frosting that elevates brownies and adds a decadent touch to your dessert experience.
- Prep Time: 10 minutes
- Cook Time: 10 minutes
- Total Time: 20 minutes
- Yield: 12 brownies 1x
- Category: Dessert
- Method: Mixing
- Cuisine: American
- Diet: Vegetarian
Ingredients
- 1/2 cup unsalted butter, softened
- 1/3 cup unsweetened cocoa powder
- 2 cups powdered sugar, sifted
- 2 to 4 tablespoons heavy cream
- 1 teaspoon vanilla extract
- 1/8 teaspoon fine sea salt
Instructions
- Soften the butter by placing it in a mixing bowl and beating until smooth and creamy.
- Add the cocoa powder gradually to avoid dust clouds, mixing until fully combined.
- Incorporate the sifted powdered sugar in batches, mixing well after each addition to ensure a smooth consistency.
- Add 2 tablespoons of heavy cream and mix, continuing to add cream until the frosting is spreadable but thick.
- Finish by stirring in the vanilla extract and a pinch of salt, mixing thoroughly to enhance the flavor.
- Adjust the consistency as needed by adding more cream if too thick, or more powdered sugar if too soft.
- Frost the cooled brownies using a butter knife or offset spatula.
Notes
Store leftover brownies in an airtight container at room temperature for up to 3 days; refrigerate for firmer frosting.
Nutrition
- Serving Size: 1 brownie
- Calories: 150
- Sugar: 21g
- Sodium: 40mg
- Fat: 7g
- Saturated Fat: 4g
- Unsaturated Fat: 3g
- Trans Fat: 0g
- Carbohydrates: 25g
- Fiber: 0g
- Protein: 1g
- Cholesterol: 15mg