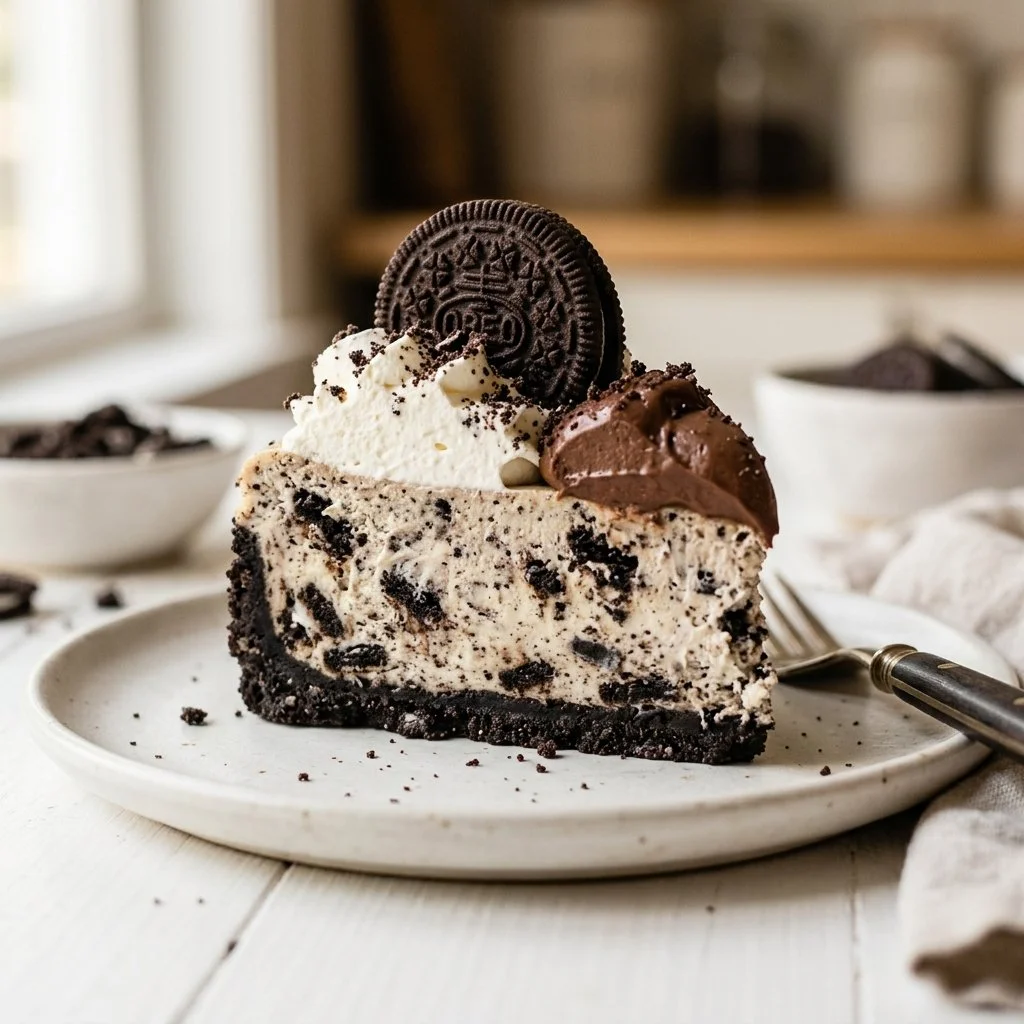
There’s something undeniably delightful about a no-bake cheesecake, especially when it has the delightful crunch and rich flavor of Oreos woven into every creamy bite. I still remember the first time I tasted an Oreo cheesecake—it was a warm summer evening, and the air was filled with laughter and the clinking of glasses on the patio. My friend Jane had whipped up this luscious dessert as a surprise, and as soon as I took my first bite, I was transported to dessert heaven. Ever since, it’s been a staple in my repertoire, a go-to for family gatherings, potlucks, and birthday celebrations. If you’re craving something creamy, dreamy, and utterly delicious, this No-Bake Oreo Cheesecake is just the ticket!
Let’s dive into how you can bring this delightful treat to life in your own kitchen!
Recipe Timing
- Prep Duration: 20 minutes
- Active Cooking: 10 minutes
- Total Duration: 4 hours 30 minutes (including chilling time)
- Portion Size: Serves 10-12
- Complexity: Simple
Nutritional Recipe
- Calories per portion: ~350
- Protein: 4g per serving
- Carbs: 30g per serving
- Fats: 25g per serving
- Fiber: 1g per serving
- Sugars: 15g per serving
- Sodium: 200mg per serving
Why You’ll Love This No-Bake Oreo Cheesecake
This No-Bake Oreo Cheesecake is truly a crowd-pleaser! Not only is it simple to make, but it also requires no baking—perfect for those hot summer days when you’d much rather not heat up your kitchen. It’s silky, sweet, and has just the right amount of crunch from those irresistible Oreo crumbles. Plus, the combination of cream cheese and whipped topping creates a texture that’s both light and decadent. Each bite is a harmonious blend of flavors that will make your taste buds dance!
The Complete Cooking Journey
Making this cheesecake doesn’t involve the usual fuss of baking and waiting for a cake to rise. Instead, it’s all about mixing and chilling, making it accessible for even the most novice chefs. Though the chilling time feels like a test of patience, I assure you, it’s well worth the wait. Fortunately, while it sets, you can breathe easy and allow anticipation to build as everyone wonders what delicious treat awaits!
Ingredients:
- 2 cups Oreo cookie crumbs
- 1/2 cup unsalted butter, melted
- 2 cups cream cheese, softened
- 1 cup powdered sugar
- 1 teaspoon vanilla extract
- 2 cups whipped topping (like Cool Whip)
- 1 cup crushed Oreos for topping
Method:
Step 1: Prepare the Crust
In a bowl, combine Oreo cookie crumbs and melted butter. Press the mixture into the bottom of a 9-inch springform pan to form the crust.
Step 2: Beat the Cream Cheese Mixture
In another bowl, beat the softened cream cheese, powdered sugar, and vanilla extract until smooth and creamy.
Step 3: Fold in the Whipped Topping
Gently fold in the whipped topping until well combined, creating a velvety filling.
Step 4: Pour and Smooth
Pour the cheesecake filling over the crust and smooth the top for a beautiful finish.
Step 5: Garnish with Crushed Oreos
Sprinkle crushed Oreos on top for decoration; this adds a delicious crunch and makes it look irresistible!
Step 6: Refrigerate Until Set
Refrigerate for at least 4 hours or until set—this step is crucial as it brings the cheesecake together.
Step 7: Serve Chilled and Enjoy!
Slice into portions and serve chilled. Enjoy the delightful creamy texture with the satisfying crunch that only Oreos can provide!
Serving Suggestions & Pairings
To elevate your Oreo cheesecake experience, serve it up with a dollop of extra whipped topping, a drizzle of chocolate sauce, or even some fresh raspberries for a pop of color and tartness. Pair it with a steaming cup of coffee or a glass of cold milk—it’s comfort food at its finest!
Storage & Leftovers Guide
This No-Bake Oreo Cheesecake can be stored in the refrigerator for up to 5 days. Be sure to cover it tightly with plastic wrap or foil to keep it fresh. If you happen to have any leftovers, they’re even better the next day as the flavors continue to meld!
Kitchen Wisdom & Success Tips
- Make sure the cream cheese is softened for easy mixing. Leave it out for at least an hour or microwave it for a few seconds (but don’t let it get warm!).
- For easier slicing, use a warm knife. Just dip it in hot water, wipe it, and cut through the cheesecake—this helps get clean, perfect slices!
- Experiment with different cookie types; golden Oreos or even mint Oreos can give you a whole new flavor experience.
Flavor Variations & Adaptations
Feeling adventurous? Try adding peanut butter to the cheesecake filling for a richer flavor, or experiment with flavored whipped toppings. You can even whip in some melted chocolate for a chocolate lover’s delight!
Reader Questions & Solutions
1. Can I use low-fat cream cheese?
Yes! Low-fat cream cheese works well for this recipe, but the texture might be slightly different—just as creamy and delicious!
2. What can I substitute for whipped topping?
If you prefer homemade, you can whip heavy cream to soft peaks and fold it in as a delicious alternative.
3. Can I freeze this cheesecake?
Absolutely! If you want to freeze it for later, make sure it’s well wrapped in plastic and then aluminum foil. It can last in the freezer for about 2 months. Thaw it overnight in the fridge before serving.
4. How can I make the crust gluten-free?
Use gluten-free Oreo cookies to create the crust and ensure your dessert is safe for those with gluten sensitivities.
5. It’s too soft! How can I firm it up?
If your mixture is too soft, consider adding an additional 1/2 cup of powdered sugar or refrigerating it longer to help it set up properly.
Wrapping Up
This No-Bake Oreo Cheesecake is not just a dessert; it’s a moment of joy and nostalgia, a celebration of taste that brings people together. Every layer tells a story—of crumbled cookies and creamy goodness, perfect for sharing with friends and family. I hope you dive into this recipe and create your own beautiful memories around the table. So gather your ingredients, roll up your sleeves, and get ready to impress everyone with your tasty creation!
PrintNo-Bake Oreo Cheesecake

A delightful no-bake cheesecake with the rich flavor of Oreos, perfect for summer gatherings.
- Prep Time: 20 minutes
- Cook Time: 10 minutes
- Total Time: 270 minutes
- Yield: 10-12 servings 1x
- Category: Dessert
- Method: No-Bake
- Cuisine: American
- Diet: Vegetarian
Ingredients
- 2 cups Oreo cookie crumbs
- 1/2 cup unsalted butter, melted
- 2 cups cream cheese, softened
- 1 cup powdered sugar
- 1 teaspoon vanilla extract
- 2 cups whipped topping (like Cool Whip)
- 1 cup crushed Oreos for topping
Instructions
- Prepare the Crust: In a bowl, combine Oreo cookie crumbs and melted butter. Press the mixture into the bottom of a 9-inch springform pan to form the crust.
- Beat the Cream Cheese Mixture: In another bowl, beat the softened cream cheese, powdered sugar, and vanilla extract until smooth and creamy.
- Fold in the Whipped Topping: Gently fold in the whipped topping until well combined, creating a velvety filling.
- Pour and Smooth: Pour the cheesecake filling over the crust and smooth the top for a beautiful finish.
- Garnish with Crushed Oreos: Sprinkle crushed Oreos on top for decoration; this adds a delicious crunch and makes it look irresistible!
- Refrigerate Until Set: Refrigerate for at least 240 minutes or until set—this step is crucial as it brings the cheesecake together.
- Serve Chilled and Enjoy: Slice into portions and serve chilled. Enjoy the delightful creamy texture with the satisfying crunch that only Oreos can provide!
Notes
For a different flavor, experiment with peanut butter or flavored whipped toppings.
Nutrition
- Serving Size: 1 slice
- Calories: 350
- Sugar: 15g
- Sodium: 200mg
- Fat: 25g
- Saturated Fat: 15g
- Unsaturated Fat: 10g
- Trans Fat: 0g
- Carbohydrates: 30g
- Fiber: 1g
- Protein: 4g
- Cholesterol: 30mg