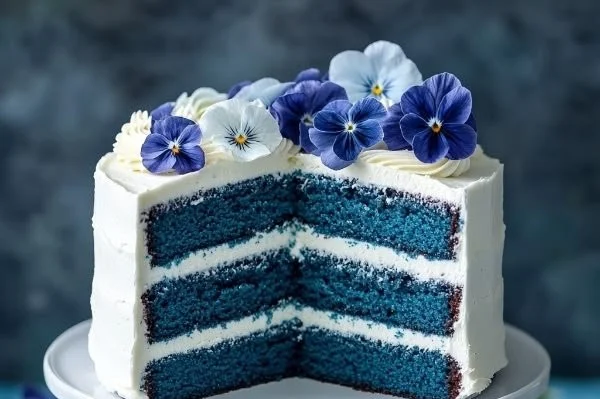
The moment I saw a Blue Velvet Cake, my heart skipped a beat. The rich, vibrant hue of blue frosting against the fluffy layers of cake was like something out of a dream! It’s not just a cake; it’s a showstopper that perfectly embodies creativity and excitement in the kitchen. I remember baking it for my daughter’s birthday, and the sheer delight on her face when she saw the blue layers was priceless. It’s fascinating how a simple idea can bloom into a beautiful, festive dessert, perfectly suitable for any occasion—from birthdays to holiday gatherings.
Recipe Timing
- Prep Duration: 20 minutes
- Active Cooking: 30 minutes
- Total Duration: 50 minutes
- Portion Size: Serves 12
- Complexity: Simple
Nutritional Recipe
- Calories per portion: Approximately 400 calories
- Protein: 4g per serving
- Carbs: 57g per serving
- Fats: 20g per serving
- Fiber: 1g per serving
- Sugars: 32g per serving
- Sodium: 220mg per serving
Why You’ll Love This Blue Velvet Cake
The Blue Velvet Cake is not just a feast for the eyes—it’s incredibly moist, with a hint of cocoa that perfectly complements the sweetness. It’s like a luxurious red velvet cake’s cool cousin, adding a quirky twist that is bound to spark conversations at any gathering. This cake invites you to get creative, offering endless possibilities for frosting and decor. With its unique color and flavor, it’s a refreshing change from your classic desserts, making it a favorite for both kids and adults alike!
The Complete Cooking Journey
Let’s set off on this culinary adventure! The process is straightforward, making this cake beginner-friendly while still offering a gratifying experience for seasoned bakers. From mixing the ingredients to pulling the freshly baked cakes out of the oven, each step builds anticipation. And don’t even get me started on the final reveal when you frost it—pure bliss awaits!
Ingredients:
- 2 ½ cups all-purpose flour
- 1 ½ cups granulated sugar
- 1 cup vegetable oil
- 1 cup buttermilk
- 3 large eggs
- 1 teaspoon vanilla extract
- 1 teaspoon baking soda
- 1 teaspoon vinegar
- 2 tablespoons cocoa powder
- 1 tablespoon blue food coloring
- ½ teaspoon salt
Method:
Step 1: Preheat the Oven and Prepare the Cake Pans
Preheat the oven to 350°F (175°C) and prepare two 9-inch round cake pans by greasing them or lining with parchment paper for easy removal.
Step 2: Combine Dry Ingredients
In a large bowl, combine the flour, sugar, cocoa powder, and salt. Use a whisk to ensure everything is well blended and free of lumps.
Step 3: Mix Wet Ingredients Together
In another bowl, mix the vegetable oil, buttermilk, eggs, and vanilla extract together. Whisk this mixture thoroughly until you have a smooth consistency.
Step 4: Blend Wet and Dry Ingredients
Slowly blend the wet ingredients into the dry ingredients, mixing gently until just combined. Be careful not to overmix, as we want to keep the texture light and fluffy.
Step 5: Add Baking Soda, Vinegar, and Blue Food Coloring
Once everything is combined, add in the baking soda, vinegar, and blue food coloring. Stir until combined, and watch the batter transform into a vibrant blue.
Step 6: Pour Into Pans and Bake
Pour the batter evenly into the prepared cake pans. Bake for 25-30 minutes or until a toothpick comes out clean when inserted into the center.
Step 7: Cool Before Serving
Let the cakes cool completely in the pans before carefully removing them. This step is essential to avoid crumbling while frosting.
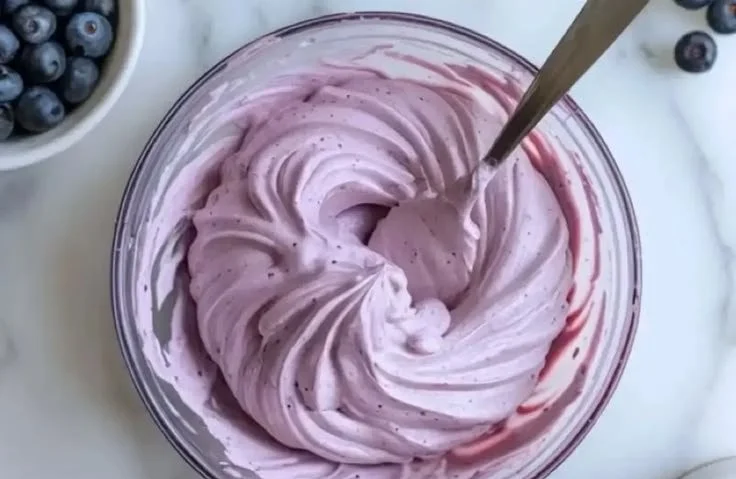
Step 8: Frost with Cream Cheese Frosting
Once cooled, frost the layers generously with your favorite cream cheese frosting. The tangy sweetness of cream cheese pairs beautifully with the moist cake.
Serving Suggestions & Pairings
This show-stopping cake shines both on its own and alongside a fresh fruit salad or chocolate-dipped strawberries. You can also serve it with a scoop of vanilla ice cream or a drizzle of salted caramel sauce for an extra indulgent treat.
Storage & Leftovers Guide
Store any leftover cake in an airtight container at room temperature for up to 3 days. If you need to keep it longer, wrap it tightly in plastic wrap and refrigerate for up to a week. You can also freeze individual slices—perfect for a sweet snack whenever a craving hits!
Kitchen Wisdom & Success Tips
- Prep Ahead: You can prepare the cake layers a day in advance. Just refrigerate them wrapped in plastic.
- Don’t Rush the Cooling: Make sure the cakes are completely cool before frosting to ensure the frosting doesn’t melt off.
- Make It Personal: Feel free to experiment with different frosting colors or add sprinkles for a fun twist!
Flavor Variations & Adaptations
Feeling adventurous? Try substituting half the cocoa powder with instant coffee powder for a mocha twist! Or swap in a bit of almond extract instead of vanilla for a delightful flavor boost. The possibilities are endless!
Reader Questions & Solutions
-
Q: Can I use a different color for the cake?
A: Absolutely! Any gel food coloring will work wonders; just follow the same measurement for vibrant results. -
Q: What if I don’t have buttermilk?
A: No worries! You can create a buttermilk substitute by adding 1 tablespoon of vinegar or lemon juice to 1 cup of milk and letting it sit for about 5-10 minutes. -
Q: Can I bake this as a sheet cake?
A: Yes! Pour the batter into a 9×13-inch baking dish and adjust your bake time to about 30-35 minutes. -
Q: How do I fix a sunken cake?
A: A sunken cake often indicates it’s underbaked or too much air was incorporated. Ensure your oven temp is accurate and avoid overmixing. -
Q: Is freezing the cake layers a good idea?
A: Yes! Freezing cake layers is a fantastic way to prep ahead. Wrap cooled layers in plastic wrap and store in the freezer for up to a month.
Wrapping Up
Baking a Blue Velvet Cake is more than just following a recipe; it’s about creating memories and bringing joy to your kitchen. The stunning blue layers and decadent flavor will not only impress your guests but also inspire you to experiment further. So gather your ingredients, turn on your favorite music, and let the baking magic happen! Enjoy each moment and remember—every cake baked with love is a gift that keeps on giving. Happy baking!
PrintBlue Velvet Cake
A stunning blue velvet cake that’s moist and flavorful, perfect for celebrations.
- Prep Time: 20 minutes
- Cook Time: 30 minutes
- Total Time: 50 minutes
- Yield: 12 servings 1x
- Category: Dessert
- Method: Baking
- Cuisine: American
- Diet: Vegetarian
Ingredients
- 2 ½ cups all-purpose flour
- 1 ½ cups granulated sugar
- 1 cup vegetable oil
- 1 cup buttermilk
- 3 large eggs
- 1 teaspoon vanilla extract
- 1 teaspoon baking soda
- 1 teaspoon vinegar
- 2 tablespoons cocoa powder
- 1 tablespoon blue food coloring
- ½ teaspoon salt
Instructions
- Preheat the oven to 350°F (175°C) and prepare two 9-inch round cake pans by greasing them or lining with parchment paper.
- Combine the flour, sugar, cocoa powder, and salt in a large bowl and whisk together.
- Mix the vegetable oil, buttermilk, eggs, and vanilla extract in another bowl until smooth.
- Blend the wet ingredients into the dry ingredients until just combined.
- Add the baking soda, vinegar, and blue food coloring, then stir until combined.
- Pour the batter evenly into the prepared pans and bake for 25-30 minutes or until a toothpick comes out clean.
- Cool the cakes completely in the pans before removing.
- Frost the layers with cream cheese frosting once cooled.
Notes
Store leftover cake in an airtight container for up to 3 days, or refrigerate for up to a week.
Nutrition
- Serving Size: 1 serving
- Calories: 400
- Sugar: 32g
- Sodium: 220mg
- Fat: 20g
- Saturated Fat: 5g
- Unsaturated Fat: 13g
- Trans Fat: 0g
- Carbohydrates: 57g
- Fiber: 1g
- Protein: 4g
- Cholesterol: 80mg