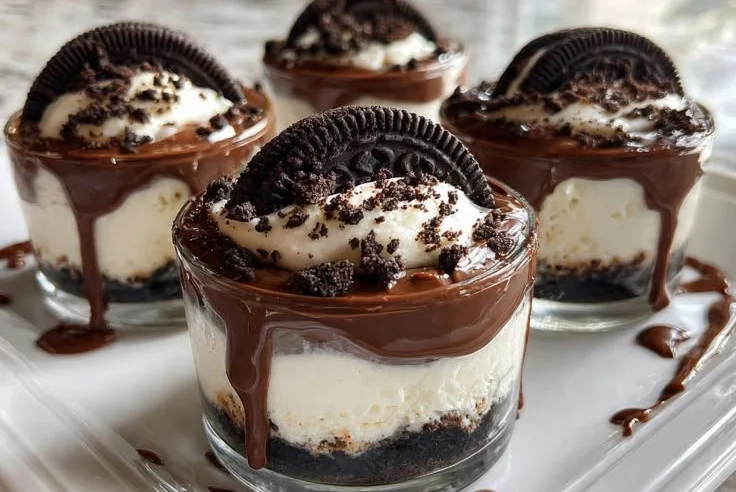
There’s something truly magical about desserts that evoke nostalgia, creating a bridge between our past and present. As a child, I remember raiding the pantry for Oreos, stacking them high, and dunking them into a glass of cold milk while laughing with friends. Fast forward to today, and I find those same joyful moments coursing through me as I whip up a dessert that brings back those sweet memories—Oreo Lava Cheesecake Cups. This treat combines the rich cocoa flavor of Oreos with the creamy delight of cheesecake and the irresistible allure of a molten chocolate center. It’s a dessert that whispers “comfort” while delivering a delightfully decadent thrill.
Recipe Timing
- Prep Duration: 20 minutes
- Active Cooking: 20 minutes
- Total Duration: 4 hours 40 minutes (includes refrigeration)
- Portion Size: Serves 6
- Complexity: Simple
Nutritional Recipe
- Calories per portion: Approximately 320
- Protein: 4g
- Carbs: 27g
- Fats: 23g
- Fiber: 1g
- Sugars: 15g
- Sodium: 150mg
Why You’ll Love This Oreo Lava Cheesecake Cups
These Oreo Lava Cheesecake Cups are the epitome of indulgence. They boast layers of crushed Oreos that provide that familiar crunch, enveloped in a velvety cheesecake filling that melts in your mouth. But wait, the best part is the surprise molten chocolate center that oozes out with every spoonful—it’s like a treasure chest of sweetness. Not only are these adorable little cups a showstopper at gatherings, but they also make for an excellent weeknight treat. Plus, they’re incredibly easy to whip up, making it the perfect recipe for both novice and experienced bakers.
The Complete Cooking Journey
Picture this: You’re about to embark on a culinary adventure where every step brings you closer to crafting these luscious cheesecake cups. Grab your ingredients, let that creativity flow, and allow the kitchen to become your stage!
Ingredients:
- 1 package Oreo cookies
- 8 oz cream cheese, softened
- 1/2 cup sugar
- 1 tsp vanilla extract
- 1 cup heavy cream
- 1/2 cup chocolate chips
Method:
Step 1: Crush the Oreos
Begin by smashing the Oreo cookies into fine crumbs, separating half for the topping. This step is not only satisfying, but it also sets the foundation for our dessert. Use a food processor or a ziplock bag and a rolling pin for a little stress relief—whichever you prefer!
Step 2: Beat the Cream Cheese Mixture
In a mixing bowl, combine the softened cream cheese, sugar, and vanilla extract. Mix until everything is smooth and creamy—like a cloud waiting to be layered into our cups.
Step 3: Whip the Cream
In another bowl, whip the heavy cream until stiff peaks form. This will create that luxurious texture we’re after. Be careful not to overwhip, or you’ll end up with butter! Gently fold the whipped cream into the cream cheese mixture, embracing the lightness that will give our cheesecake its melt-in-your-mouth quality.
Step 4: Layer the Cups
Take your serving cups and start layering! Add a generous amount of crushed Oreos at the bottom followed by a layer of the cheesecake mixture. Repeat the process until you almost fill your cups, saving some space for the chocolate center.
Step 5: Create the Molten Center
Melt the chocolate chips in the microwave or over a double boiler until smooth. Pour a small amount of this molten chocolate into each cup, carefully tucking it into the cheesecake layer to surprise your guests with that delicious molten goodness.
Step 6: Final Layering
Top each cup with the remaining cheesecake mixture, smoothing it out. Sprinkle those reserved crushed Oreos on top, adding a beautiful finish to your delightful creations.
Step 7: Refrigerate and Chill
Cover your cups and refrigerate for at least 4 hours, or until set. This waiting game might be the hardest part, but believe me, it’s worth it. Once set, serve these chilled and watch the smiles light up as they dig in.
Serving Suggestions & Pairings
These cheesecake cups are delightful on their own, but they shine even further when paired with a scoop of vanilla bean ice cream or a dollop of whipped cream on top. A drizzle of warm chocolate sauce adds an extra touch of indulgence that will wow your guests. Serve them at parties, and they’ll surely be the star of the dessert table!
Storage & Leftovers Guide
If you find yourself with leftovers (not likely, but just in case!), you can store these Oreo Lava Cheesecake Cups in the refrigerator for up to 3 days. Just make sure to keep them covered to maintain their creamy texture.
Kitchen Wisdom & Success Tips
- Soften your cream cheese: Ensure your cream cheese is softened to room temperature to avoid lumps in your cheesecake mixture.
- Whip with care: When whipping the cream, start on low speed and gradually increase to high for best results.
- Make ahead: These cups can be made a day in advance, allowing the flavors to meld beautifully.
Flavor Variations & Adaptations
Feeling adventurous? Try substituting the Oreos with other cookies like chocolate chip or peanut butter cookies. You can also infuse flavors by adding instant coffee granules to enhance that rich chocolate experience or even fold in some fresh berries for a fruity twist.
Reader Questions & Solutions
- Can I use low-fat cream cheese? Yes, and it will still yield delicious results, though the creaminess may be slightly altered.
- What if I don’t have heavy cream? You can substitute it with whipped topping, but the texture will differ.
- How do I ensure my chocolate center doesn’t harden? Pour it while still warm and consume shortly after refrigerating; this ensures the perfect molten texture.
- Can I freeze these cups? Freezing is not recommended as it can change the texture of the cheesecake.
- How can I make this recipe gluten-free? Use gluten-free Oreos and ensure all other ingredients are gluten-free.
Wrapping Up
Indulging in an Oreo Lava Cheesecake Cup is like diving into a treasure chest filled with nostalgic flavors and delightful textures. With each bite, you invite joy into your day and create moments that linger longer than the dessert itself. So gather your friends or family, make these cups together, and share the laughter and love that happens over food. Happy baking!
PrintOreo Lava Cheesecake Cups
Decadent Oreo Lava Cheesecake Cups featuring layers of crushed Oreos and a molten chocolate center.
- Prep Time: 20 minutes
- Cook Time: 20 minutes
- Total Time: 280 minutes
- Yield: 6 servings 1x
- Category: Dessert
- Method: No-Cook
- Cuisine: American
- Diet: None
Ingredients
- 1 package Oreo cookies
- 8 oz cream cheese, softened
- 1/2 cup sugar
- 1 tsp vanilla extract
- 1 cup heavy cream
- 1/2 cup chocolate chips
Instructions
- Crush the Oreo cookies into fine crumbs, reserving half for topping.
- Beat the cream cheese, sugar, and vanilla in a mixing bowl until smooth.
- Whip the heavy cream in another bowl until stiff peaks form, then fold it into the cream cheese mixture.
- Layer the cups by adding crushed Oreos, followed by cheesecake mixture, repeating until cups are nearly full.
- Create the molten center by melting chocolate chips, pouring a small amount into each cup.
- Top with remaining cheesecake mixture and sprinkle reserved crushed Oreos on top.
- Refrigerate for at least 4 hours until set before serving.
Notes
These cups can be made a day in advance and stored for up to 3 days in the refrigerator.
Nutrition
- Serving Size: 1 cup
- Calories: 320
- Sugar: 15g
- Sodium: 150mg
- Fat: 23g
- Saturated Fat: 12g
- Unsaturated Fat: 8g
- Trans Fat: 0g
- Carbohydrates: 27g
- Fiber: 1g
- Protein: 4g
- Cholesterol: 30mg