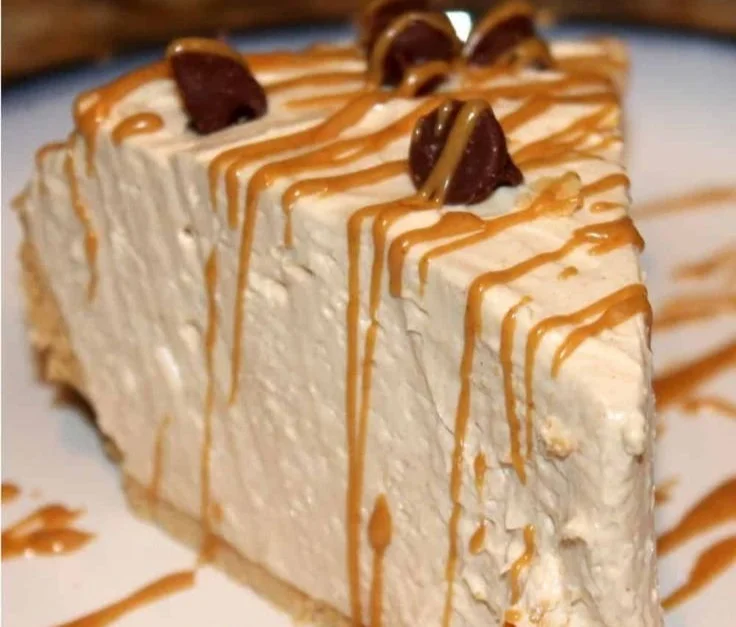
There’s something incredibly comforting about pie, especially when the crust gives way to a creamy filling that feels like a hug in dessert form. I still remember the first time I tasted a peanut butter pie at a family picnic; the sun was shining, laughter filled the air, and that pillowy creaminess was a moment of pure bliss. It’s amazing how food can hold memories and evoke such joy, isn’t it? Today, I’m excited to share a recipe that encapsulates this delightful experience: a No Bake Peanut Butter Pie. This treat brings the same nostalgic sweetness but with none of the fuss of baking.
Recipe Timing
- Prep Duration: 15 minutes
- Active Cooking: 15 minutes
- Total Duration: 4 hours (includes chilling time)
- Portion Size: Serves 8-10
- Complexity: Simple
Nutritional Recipe
- Calories per portion: Approximately 350 calories
- Protein: 8 grams per serving
- Carbs: 30 grams per serving
- Fats: 24 grams per serving
- Fiber: 1 gram per serving
- Sugars: 15 grams per serving
- Sodium: 220 mg per serving
Why You’ll Love This No Bake Peanut Butter Pie
This No Bake Peanut Butter Pie is everything you’ve ever wanted in a dessert: it’s rich, creamy, and incredibly fluffy, thanks to the Cool Whip. The combination of creamy peanut butter and tangy cream cheese gives it a depth of flavor that is just divine. Plus, it’s perfect for warm weather, and you don’t need to turn on your oven! Whether it’s a celebration or just a treat for yourself, this pie will surely win hearts.
The Complete Cooking Journey
Creating this delightful pie is a breeze. With just a few simple steps, you’ll have a dessert that tastes like a labor of love without all the fuss. It’s perfect for beginner cooks or anyone who is short on time but still wants to impress.
Ingredients:
- 1 cup powdered sugar
- 8 oz cream cheese
- 1 cup creamy peanut butter
- 16 oz Cool Whip
- 1 graham cracker crust
Method:
Step 1: Cream Together
In a large mixing bowl, combine the softened cream cheese and the creamy peanut butter. Using a hand mixer on medium speed, beat them together until they achieve a smooth and creamy consistency. This will be the heart of your filling!
Step 2: Sweeten It Up
Slowly add in the powdered sugar, continuing to mix. The mixture will become thicker, but keep mixing until it’s evenly combined and there are no lumps of sugar—only a luxurious peanut butter cream.
Step 3: Fold In the Magic
Gently fold in the Cool Whip using a spatula. This step adds the lightness to the pie, so be gentle to maintain that airy texture. Fold until fully incorporated; the filling should be fluffy and well-combined.
Step 4: Fill the Crust
Transfer your creamy filling into the graham cracker crust, spreading it evenly with a spatula. Don’t rush this part; enjoy the transformation of ingredients into a beautiful pie!
Step 5: Chill Out
Cover the pie with plastic wrap and place it in the refrigerator to chill for at least 4 hours, or until set. This step is crucial for flavors to meld and for the pie to hold its shape.
Step 6: Slice and Serve
Once chilled, remove the pie from the fridge. Slice it into generous portions and serve as is, or add your favorite toppings, like chocolate drizzle or crushed peanuts. Enjoy every creamy, dreamy bite!
Serving Suggestions & Pairings
This pie is perfect on its own, but do consider pairing it with a dollop of extra Cool Whip and fresh fruit, like sliced bananas or strawberries. A cup of coffee or a tall glass of cold milk also complements this dessert beautifully.
Storage & Leftovers Guide
Leftovers (if there are any!) can be stored in the refrigerator for up to 5 days. Make sure to cover it well to keep it fresh. If you want to keep it longer, you can freeze slices tightly wrapped in plastic wrap and foil for up to a month. Thaw in the refrigerator overnight before enjoying!
Kitchen Wisdom & Success Tips
- Ensure your cream cheese is softened for a smooth filling.
- For added flavor, consider mixing in a splash of vanilla extract.
- If you prefer a chocolate twist, swirl in some melted chocolate with the peanut butter.
Flavor Variations & Adaptations
Feel free to get creative! Swap out the creamy peanut butter for crunchy if you like some texture, or try almond butter for a different nutty flavor. Adding a layer of chocolate ganache on top before chilling makes for a decadent chocolate-peanut butter experience.
Reader Questions & Solutions
- Can I use natural peanut butter? Absolutely! Just remember it’s oilier, so you might want to adjust the sugar to taste.
- Can I make it dairy-free? Yes! Substitute the cream cheese with a dairy-free cream cheese alternative and use coconut whipped cream in place of Cool Whip.
- How do I prevent it from being too sweet? You can reduce the powdered sugar in the filling to suit your preference.
- Can I add toppings? Yes! Crushed nuts, chocolate shavings, and caramel sauce all make wonderful toppings.
- Can this be made ahead of time? Definitely! It’s best made the day before serving.
Wrapping Up
This No Bake Peanut Butter Pie is more than just a dessert; it’s a nostalgic reminder of simple pleasures. With its smooth, rich flavors and no-bake ease, it’s bound to become a favorite in your home. So, roll up your sleeves, gather those ingredients, and let’s create something truly delightful together. Happy baking, or should I say, happy chilling! Enjoy your culinary adventure!
PrintNo Bake Peanut Butter Pie
A creamy and rich no bake peanut butter pie perfect for warm weather and nostalgia.
- Prep Time: 15 minutes
- Cook Time: 15 minutes
- Total Time: 240 minutes
- Yield: 8-10 servings 1x
- Category: Dessert
- Method: No Bake
- Cuisine: American
- Diet: Vegetarian
Ingredients
- 1 cup powdered sugar
- 8 oz cream cheese
- 1 cup creamy peanut butter
- 16 oz Cool Whip
- 1 graham cracker crust
Instructions
- Cream together the softened cream cheese and the creamy peanut butter until smooth.
- Slowly add in the powdered sugar and mix until well combined.
- Fold in the Cool Whip gently to maintain an airy texture.
- Transfer the creamy filling into the graham cracker crust, spreading it evenly.
- Cover with plastic wrap and chill in the refrigerator for at least 4 hours.
- Slice and serve, adding toppings if desired.
Notes
Ensure cream cheese is softened for a smooth filling. Leftovers can be stored in the refrigerator for up to 5 days.
Nutrition
- Serving Size: 1 slice
- Calories: 350
- Sugar: 15g
- Sodium: 220mg
- Fat: 24g
- Saturated Fat: 6g
- Unsaturated Fat: 11g
- Trans Fat: 0g
- Carbohydrates: 30g
- Fiber: 1g
- Protein: 8g
- Cholesterol: 30mg