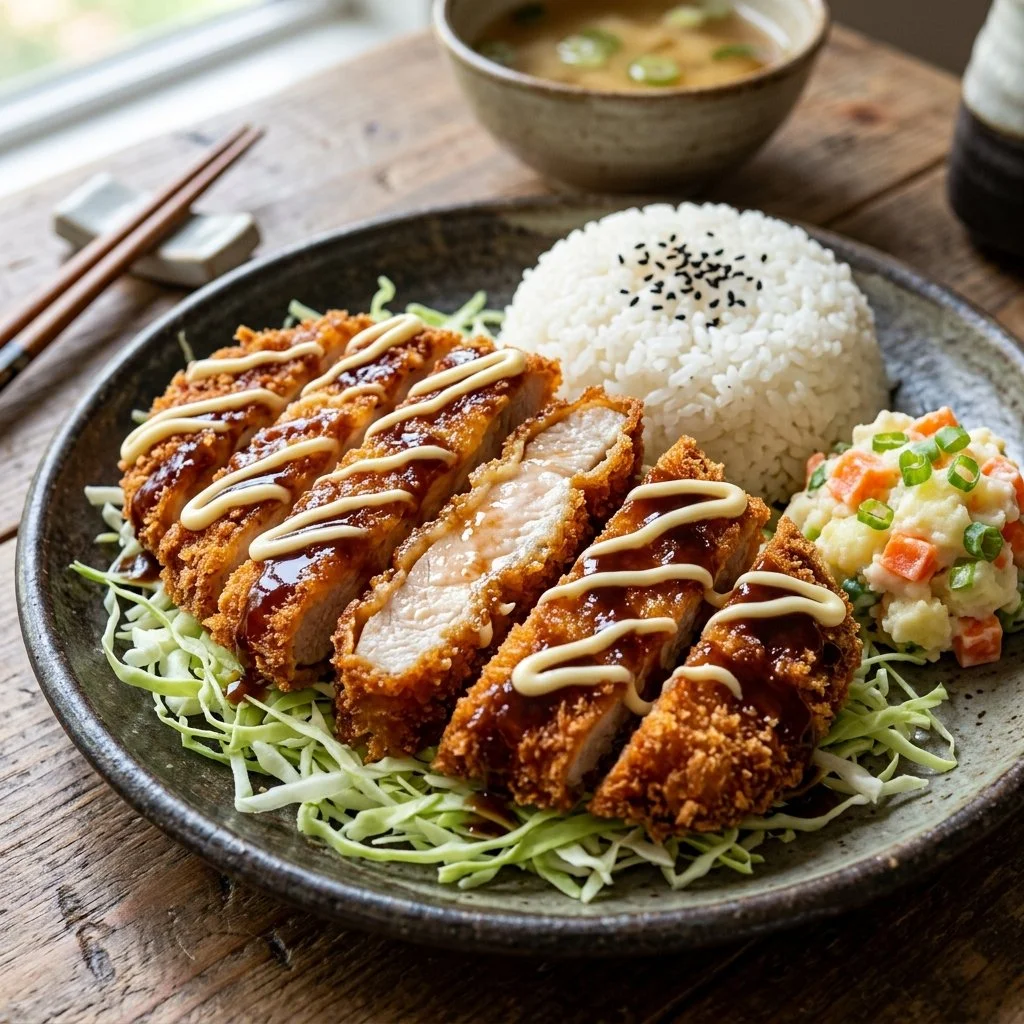
There’s something beautifully comforting about a plate of Chicken Katsu. Just the thought of biting into crispy, golden chicken that’s tender and juicy inside is enough to take me back to the little ramen shop I frequented during my college days. The warm, inviting atmosphere, the sound of the frying pan sizzling, and the rich aroma filling the air—this dish reminds me of cozy meals shared with friends, laughter echoing in the background, and that delicious moment when the first bite transports you straight to a place of pure contentment.
Recipe Timing
- Prep Duration: 10 minutes
- Active Cooking: 10 minutes
- Total Duration: 20 minutes
- Portion Size: Serves 4
- Complexity: Simple
Nutritional Recipe
- Calories per portion: Approximately 350
- Protein: 28 grams per serving
- Carbs: 34 grams per serving
- Fats: 12 grams per serving
- Fiber: 1 gram per serving
- Sugars: 2 grams per serving
- Sodium: Approximately 650 mg per serving
Why You’ll Love This Chicken Katsu
Chicken Katsu is not just a meal; it’s an experience. The dish masterfully balances crispy texture with savory flavors, offering a delightful crunch that gives way to juicy chicken. It’s perfect for a quick weeknight dinner or a flavor-packed weekend treat. The best part? It’s incredibly customizable! Serve it over a bed of rice, alongside a mountain of shredded cabbage, or tucked into a sandwich for a delightful lunch.
The Complete Cooking Journey
Making Chicken Katsu is fun and straightforward. With just a few simple steps, you can create a restaurant-worthy dish right in your own kitchen. From the rhythmic coating of the chicken to the fragrant sizzle of frying, each moment brings you closer to your delicious reward. Let’s embark on this culinary adventure together!
Ingredients:
- Boneless, skinless chicken breasts
- Salt
- Pepper
- All-purpose flour
- Eggs
- Panko breadcrumbs
- Vegetable oil
- Tonkatsu sauce
- Shredded cabbage (optional)
Method:
### Step 1: Season the Chicken
Start by seasoning the chicken breasts with salt and pepper. This is your chance to infuse flavor into the chicken, setting the foundation for this dish.
### Step 2: Prepare the Coating Station
Dredge the seasoned chicken in flour, ensuring it’s evenly coated. Then, dip it into beaten eggs, allowing the excess to drip off. Finally, generously coat it with panko breadcrumbs for that perfect crispy texture.
### Step 3: Heat the Oil
In a frying pan, heat vegetable oil over medium heat. You want enough oil for shallow frying, so don’t be shy!
### Step 4: Fry the Chicken
Once the oil is hot (you can test it by dropping a breadcrumb in—if it sizzles, you’re good to go!), carefully place the coated chicken in the pan. Fry until golden brown and fully cooked, about 4-5 minutes per side.
### Step 5: Drain and Slice
Once perfectly golden, drain the chicken on paper towels to absorb any excess oil. Let it rest for a moment before slicing it into delightful strips that are ready to soak up that tonkatsu sauce.
### Step 6: Final Touches
Serve your Chicken Katsu with a generous drizzle of tonkatsu sauce and a side of shredded cabbage if you like. This adds a refreshing crunch and balances the richness of the dish.
Serving Suggestions & Pairings
Chicken Katsu shines on its own but pairs beautifully with steamed white rice or a simple side salad. For a Japanese twist, consider miso soup or pickled vegetables. Don’t forget an ice-cold Japanese beer or a flavorful green tea to complement the meal!
Storage & Leftovers Guide
If you have leftovers (which is rare, trust me!), you can store the chicken in an airtight container in the fridge for up to 3 days. Reheat in the oven to maintain the crispiness or enjoy cold in a salad or sandwich.
Kitchen Wisdom & Success Tips
- Panko Breadcrumbs: For the ultimate crunch, use Japanese panko breadcrumbs as they’re lighter and crispier than regular breadcrumbs.
- Chicken Thickness: Pound the chicken to an even thickness for uniform cooking.
- Tonkatsu Sauce: Make your own by mixing ketchup, Worcestershire sauce, and a bit of sugar if you can’t find it in stores.
- Batch Frying: Fry in batches to avoid overcrowding the pan, ensuring each piece gets maximum crispy goodness.
Flavor Variations & Adaptations
Feel free to switch things up! Try using chicken thighs for a richer flavor, or experiment with different coatings like crushed cornflakes for a twist. You could also spice things up with a sprinkle of chili powder in the flour for a kick!
Reader Questions & Solutions
-
Can I bake Chicken Katsu instead of frying?
Yes! Coat the chicken as directed, then place on a baking sheet and bake at 400°F (200°C) for 20 minutes, flipping halfway through for an equally tasty, healthier option. -
What can I substitute for tonkatsu sauce?
A mixture of ketchup, soy sauce, and a little honey works in a pinch! -
Can I prepare Chicken Katsu ahead of time?
Absolutely! You can coat the chicken and keep it in the fridge until you’re ready to fry. Just make sure to let it sit at room temperature for a bit before frying. -
Is this dish gluten-free?
Use gluten-free flour and breadcrumbs, and you’ll have a delicious gluten-free version of this classic dish! -
Can I make this with other proteins?
Definitely! This recipe works well with pork cutlets or even tofu for a vegetarian option.
Wrapping Up
Chicken Katsu is more than just a dish; it’s a celebration of flavor, texture, and the joy of home cooking. With its golden crispiness and succulent chicken, it’s sure to become a beloved staple in your home. Whether you’re hosting a family dinner or simply treating yourself to something delicious, this recipe is a comfort that never disappoints. So roll up your sleeves, gather your ingredients, and let the delightful aromas fill your kitchen—your homemade Chicken Katsu awaits!
PrintChicken Katsu
Crispy and juicy Chicken Katsu, a comforting Japanese dish, perfect for weeknight dinners or flavorful lunches.
- Prep Time: 10 minutes
- Cook Time: 10 minutes
- Total Time: 20 minutes
- Yield: 4 servings 1x
- Category: Main Course
- Method: Frying
- Cuisine: Japanese
- Diet: None
Ingredients
- 4 Boneless, skinless chicken breasts
- Salt
- Pepper
- 1 cup All-purpose flour
- 2 Eggs
- 2 cups Panko breadcrumbs
- Vegetable oil (for frying)
- Tonkatsu sauce
- Shredded cabbage (optional)
Instructions
- Season the chicken breasts with salt and pepper.
- Dredge the seasoned chicken in flour, coat with beaten eggs, and then coat with panko breadcrumbs.
- Heat vegetable oil in a frying pan over medium heat.
- Fry the coated chicken for 4-5 minutes per side until golden brown.
- Drain the chicken on paper towels and let it rest before slicing.
- Serve with tonkatsu sauce and shredded cabbage if desired.
Notes
For ultimate crunch, use Japanese panko breadcrumbs. Let chicken rest for even cooking.
Nutrition
- Serving Size: 1 serving
- Calories: 350
- Sugar: 2g
- Sodium: 650mg
- Fat: 12g
- Saturated Fat: 2g
- Unsaturated Fat: 8g
- Trans Fat: 0g
- Carbohydrates: 34g
- Fiber: 1g
- Protein: 28g
- Cholesterol: 240mg