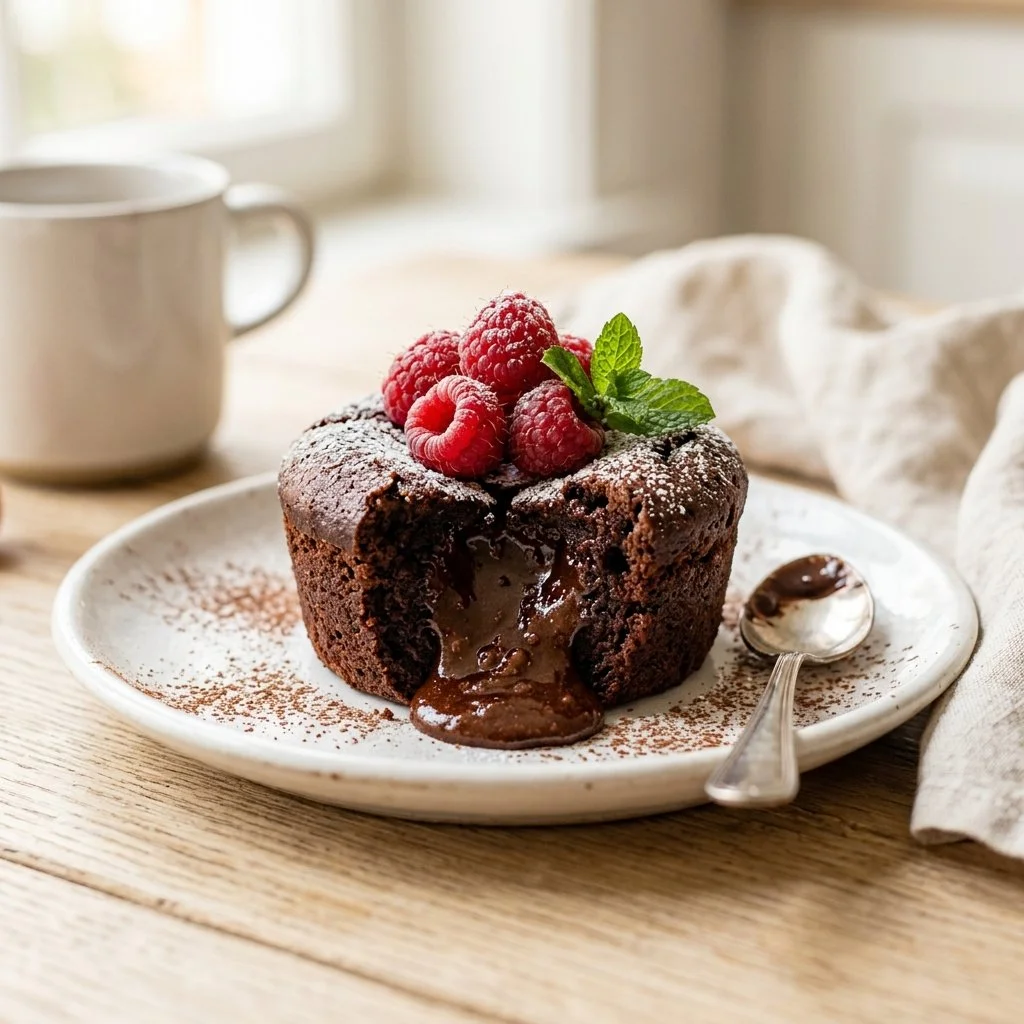
There’s something undeniably magical about indulging in a warm, gooey chocolate lava cake. Just picturing that moment when you sink your fork into the soft center, revealing a molten chocolate river that flows onto the plate, can bring a smile to my face. I remember the first time I had one of these delights at a cozy restaurant with dim lights and the faint sound of laughter surrounding us. I was instantly enchanted. I decided it was time to recreate that love and bring it into my own kitchen.
Chocolate lava cake is perfect for any occasion, be it a romantic dinner, a gathering with friends, or simply treating yourself after a long day. The beauty lies in its simplicity—the way a handful of basic ingredients transforms into an impressive dessert that feels lavish yet is surprisingly easy to make. Let me take you on a delicious journey to create this irresistible treat!
Recipe Timing
- Prep Duration: 15 minutes
- Active Cooking: 14 minutes
- Total Duration: 29 minutes
- Portion Size: Serves 4
- Complexity: Simple
Nutritional Recipe
- Calories per portion: Approximately 280 calories
- Protein: 5 grams
- Carbs: 27 grams
- Fats: 18 grams
- Fiber: 1 gram
- Sugars: 15 grams
- Sodium: 120 mg
Why You’ll Love This Chocolate Lava Cake
This chocolate lava cake is the epitome of dessert bliss. It captures the richness of bittersweet chocolate, balanced with just a touch of sweetness. The contrast of the firm edges with that luscious, molten center creates a textural experience that is delightful in every bite. It’s not just about taste; it’s about creating a moment where you can savor life’s little joys. Each time you make this cake, it becomes more than just a recipe—it’s a memory in the making.
The Complete Cooking Journey
As you gather your ingredients and start measuring, you’ll feel a sense of anticipation. The warm scent of melting chocolate will fill your kitchen, wrapping you in a cozy embrace. Each step in this recipe brings excitement, from whisking the eggs to watching the cakes puff up in the oven. And the best part? You get to share it with those you love—or keep it all for yourself, no judgment here!
Ingredients:
- 1/2 cup unsalted butter
- 1 cup bittersweet chocolate chips
- 2 large eggs
- 2 large egg yolks
- 1/4 cup granulated sugar
- 2 tablespoons all-purpose flour
- 1/4 teaspoon salt
- Powdered sugar for dusting (optional)
Method:
Step 1: Preheat the Oven and Prepare Ramekins
Preheat your oven to 425°F (220°C). Grease four ramekins with butter and dust with flour, ensuring each ramekin is well-coated. This guarantees your cakes will pop right out, leaving you worry-free during the unveiling.
Step 2: Melt the Chocolate and Butter
Melt the butter and chocolate chips together in a double boiler or microwave, stirring until smooth. Let this rich mixture cool slightly; it’s akin to creating a chocolatey elixir that will give life to your cakes!
Step 3: Whisk the Eggs and Sugar
In a bowl, whisk together the eggs, egg yolks, and granulated sugar until pale and fluffy. This step is vital; the air you incorporate will help create a deliciously light texture in your cake.
Step 4: Combine Chocolate and Egg Mixtures
Stir the melted chocolate mixture into the egg mixture until fully combined. The rich aroma will envelop you, making it hard not to taste-test. Just a tiny spoonful won’t hurt!
Step 5: Fold in Flour and Salt
Gently fold in the flour and salt until just combined. Be careful not to overmix; we want our batter tender and ready for the oven.
Step 6: Distribute the Batter
Divide the batter among the prepared ramekins, filling each about three-quarters full. Just the right amount for that lava-like center!
Step 7: Bake to Perfection
Bake in the preheated oven for 12-14 minutes, until the edges are firm but the center remains soft and slightly jiggly. Your kitchen will surely be filled with the wonderful scent of baking chocolate—just wait for it!
Step 8: Cool and Invert
Let the cakes cool for 1 minute. Now comes the thrilling moment: invert each ramekin onto a plate to release your gorgeous creations.
Step 9: Dust and Serve
Dust with powdered sugar if desired and serve immediately. This is where the magic happens—watch as your guests’ eyes light up when they cut into their cake and watch the chocolate flow!
Serving Suggestions & Pairings
A scoop of vanilla bean ice cream or a dollop of whipped cream makes an excellent pairing with this cake. Fresh raspberries or strawberries add a vibrant pop of color and a refreshing contrast to the rich chocolate. To elevate your experience further, try this alongside a cup of espresso or a glass of dessert wine.
Storage & Leftovers Guide
While this dessert is best enjoyed fresh, you can store any leftovers in an airtight container in the refrigerator for up to 2 days. To reheat, simply warm them in the microwave for a few seconds until the center is just melted again.
Kitchen Wisdom & Success Tips
- Use high-quality chocolate for the best flavor.
- Ensure you don’t overbake the cakes; a little jiggle in the center is key.
- If you’re feeling adventurous, add a teaspoon of vanilla extract to the batter for an additional layer of flavor.
Flavor Variations & Adaptations
For a more indulgent twist, you can add a teaspoon of espresso powder to the batter, enhancing the chocolate flavor. If you’d like to be creative with your fillings, consider adding a piece of caramel or peanut butter at the center before baking for an extra surprise.
Reader Questions & Solutions
-
Can I use milk chocolate instead of bittersweet?
- Yes, but your lava cake will be sweeter. Adjust the sugar down a bit if you prefer a less sweet dessert.
-
What if I don’t have ramekins?
- Use a muffin tin! Just be sure to adjust the baking time down to about 8-10 minutes.
-
How do I know when my cakes are done?
- The edges should be firm, and the center should still be a bit wobbly to ensure that lava texture.
-
Can I make the batter ahead of time?
- Absolutely! You can prepare the batter in advance and refrigerate it for up to a day. Just bring it back to room temperature before baking.
-
What can I use as a substitute for egg yolks?
- You can use commercial egg replacers or blended silken tofu, but it may alter the texture slightly.
Wrapping Up
This chocolate lava cake recipe is not just an indulgent dessert; it’s an experience that brings warmth and joy to any gathering or quiet evening at home. Each bite is a testament to the love and passion you pour into your cooking. Don’t shy away from creating this delightful dessert; unleash the chocolatier within, savor the moments, and enjoy the sweet satisfaction of baking something truly special. Happy baking!
PrintChocolate Lava Cake
Indulge in a warm, gooey chocolate lava cake with a molten center that flows onto the plate, perfect for any occasion.
- Prep Time: 15 minutes
- Cook Time: 14 minutes
- Total Time: 29 minutes
- Yield: 4 servings 1x
- Category: Dessert
- Method: Baking
- Cuisine: American
- Diet: Vegetarian
Ingredients
- 1/2 cup unsalted butter
- 1 cup bittersweet chocolate chips
- 2 large eggs
- 2 large egg yolks
- 1/4 cup granulated sugar
- 2 tablespoons all-purpose flour
- 1/4 teaspoon salt
- Powdered sugar for dusting (optional)
Instructions
- Preheat the oven to 425°F (220°C) and grease four ramekins with butter and dust with flour.
- Melt the butter and chocolate chips together in a double boiler or microwave, stirring until smooth.
- Whisk together the eggs, egg yolks, and granulated sugar until pale and fluffy.
- Stir the melted chocolate mixture into the egg mixture until combined.
- Fold in the flour and salt until just combined.
- Distribute the batter among the prepared ramekins, filling each about three-quarters full.
- Bake for 12-14 minutes until the edges are firm but the center remains soft.
- Let the cakes cool for 1 minute, then invert onto plates.
- Dust with powdered sugar if desired and serve immediately.
Notes
Best enjoyed fresh, but leftovers can be stored in the refrigerator for up to 2 days.
Nutrition
- Serving Size: 1 serving
- Calories: 280
- Sugar: 15g
- Sodium: 120mg
- Fat: 18g
- Saturated Fat: 10g
- Unsaturated Fat: 8g
- Trans Fat: 0g
- Carbohydrates: 27g
- Fiber: 1g
- Protein: 5g
- Cholesterol: 200mg