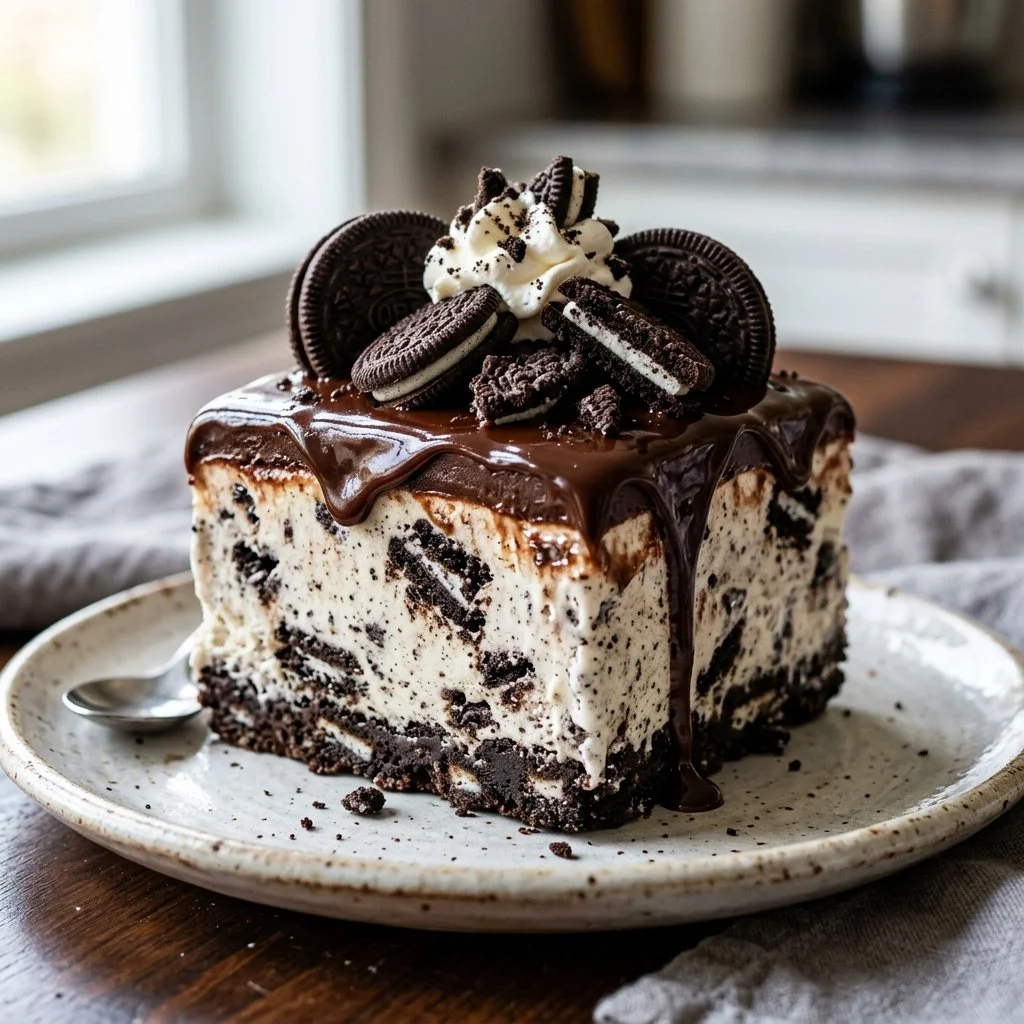
The sun peeks through the kitchen window, casting a warm glow on the counter where I’m preparing a treat that never fails to bring a smile. Memories flood back as I crush those iconic black-and-white cookies; recreating this Oreo Ice Cream Cake feels like a hug from my childhood. Every birthday gathering, summer picnic, or random Wednesday afternoon was made sweeter with a chilled slice of this delight. There’s something magical about the combination of creamy vanilla ice cream, crunchy Oreo crust, and fluffy whipped cream. It’s a slice of nostalgia, and I’m beyond excited to share this recipe with you!
Recipe Timing
- Prep Duration: 30 minutes
- Active Cooking: 10 minutes
- Total Duration: 5 hours 40 minutes (including freezer time)
- Portion Size: Serves 12
- Complexity: Simple
Nutritional Recipe
- Calories per portion: ~320
- Protein: 4g per serving
- Carbs: 40g per serving
- Fats: 17g per serving
- Fiber: 1g per serving
- Sugars: 22g per serving
- Sodium: 160mg per serving
Why You’ll Love This Oreo Ice Cream Cake
This Oreo Ice Cream Cake is a crowd-pleaser that marries the irresistible crunch of Oreos with the creamy richness of vanilla ice cream. It’s not just a dessert; it’s a celebration! The way each forkful melts in your mouth, with sweet creaminess and an explosion of that signature chocolatey cookie flavor, makes it a must-have for any gathering. Plus, it requires minimal effort, allowing you to focus on enjoying those moments with loved ones.
The Complete Cooking Journey
Making this cake is like embarking on a delicious adventure! It starts with a simple crust made of crushed Oreo cookies, then layers of luscious vanilla ice cream, whipped cream, and drizzled chocolate syrup. The anticipation builds as it freezes into a perfect cake. When you slice into it, you’re greeted with a beautiful cross-section of creamy goodness, tempting anyone who lays eyes on it. Let’s dive into making this dreamy dessert!
Ingredients:
- 24 Oreo cookies
- 1/4 cup butter, melted
- 1.5 quarts vanilla ice cream
- 1 cup whipped cream
- Chocolate syrup (for drizzling)
- Additional crushed Oreos (for topping)
Method:
Step 1: Preheat and Prepare the Crust
Preheat your oven to 350°F (175°C). Crush the Oreo cookies and mix them with melted butter until well combined. Press this mixture firmly into the bottom of a springform pan to form the crust. Bake for 10 minutes, then let it cool.
Step 2: Spread the Ice Cream
Allow the vanilla ice cream to soften slightly at room temperature. Once softened, spread it evenly over the cooled crust, smoothing the top to create a lovely, flat layer.
Step 3: First Freeze
Freeze the cake for at least 4 hours, or until the ice cream is firm and solid.
Step 4: Add the Whipped Cream Layer
Once the ice cream is firm, spread the whipped cream over the top of the ice cream layer, creating a fluffy and cloud-like finish.
Step 5: Drizzle and Top
Drizzle chocolate syrup generously over the whipped cream layer, then sprinkle with additional crushed Oreos to add that extra crunch and visual appeal.
Step 6: Final Freeze
Freeze the cake again for about 1 hour before it’s time to serve. This ensures everything is perfectly set.
Step 7: Slice and Enjoy
When you’re ready to indulge, carefully slice the cake and serve. Enjoy every delectable bite of your homemade Oreo Ice Cream Cake!
Serving Suggestions & Pairings
Pair this cake with a scoop of extra vanilla ice cream or a refreshing glass of cold milk. If you feel adventurous, consider serving it alongside fresh fruit like strawberries or raspberries to balance the richness. This dessert shines at birthday parties, summer barbecues, or family gatherings, creating a festive atmosphere.
Storage & Leftovers Guide
Your leftover Oreo Ice Cream Cake can be stored in the freezer for up to 2 weeks. Just ensure it’s covered well to prevent freezer burn. You can slice portions and wrap them individually for on-the-go indulgence!
Kitchen Wisdom & Success Tips
- Make sure to let the ice cream soften just enough to spread it easily without melting too much of the crust.
- For added flavor, consider mixing in mini chocolate chips to the vanilla ice cream before spreading.
- If you’re short on time, you can skip the baking and use a prepared Oreo crust available at most grocery stores.
Flavor Variations & Adaptations
Feel free to swap out the vanilla ice cream for other flavors like cookies and cream or mint chocolate chip for a twist on this classic. Mixing in some chopped nuts or a layer of fruit preserves between the ice cream layers can also add exciting flavor dimensions.
Reader Questions & Solutions
-
Can I use gluten-free Oreos?
Yes! Gluten-free Oreos will work perfectly for making this cake gluten-free! -
How do I make it dairy-free?
Substitute dairy ingredients with coconut cream, almond milk, or other dairy-free options for ice cream and whipped cream. -
What if my whipped cream isn’t thickening?
Make sure your cream is chilled, and consider using heavy cream for better stability. Whip until you have soft peaks, and avoid overwhipping. -
Can I make this in advance?
Absolutely! This cake can be made a couple of days in advance and stored in the freezer, making it perfect for parties. -
How do I cut clean slices?
Run your knife under hot water for a few seconds and then dry it before slicing; this will result in cleaner, neater slices.
Wrapping Up
Creating your Oreo Ice Cream Cake is not just about making a dessert. It’s about fostering connections, sharing joy, and reveling in sweet, simple pleasures. I invite you to bring this cake into your kitchen, and let it become a part of your special moments. So, grab your Oreo cookies and let the delicious journey begin! Your taste buds will thank you!
PrintOreo Ice Cream Cake
A delicious and nostalgic Oreo Ice Cream Cake combining creamy vanilla ice cream, a crunchy Oreo crust, and fluffy whipped cream.
- Prep Time: 30 minutes
- Cook Time: 10 minutes
- Total Time: 340 minutes
- Yield: 12 servings 1x
- Category: Dessert
- Method: Freezing
- Cuisine: American
- Diet: Vegetarian
Ingredients
- 24 Oreo cookies
- 1/4 cup butter, melted
- 1.5 quarts vanilla ice cream
- 1 cup whipped cream
- Chocolate syrup (for drizzling)
- Additional crushed Oreos (for topping)
Instructions
- Preheat your oven to 350°F (175°C). Crush the Oreo cookies and mix them with melted butter until well combined. Press this mixture firmly into the bottom of a springform pan to form the crust. Bake for 10 minutes, then let it cool.
- Allow the vanilla ice cream to soften slightly at room temperature. Once softened, spread it evenly over the cooled crust, smoothing the top to create a lovely, flat layer.
- Freeze the cake for at least 4 hours, or until the ice cream is firm and solid.
- Once the ice cream is firm, spread the whipped cream over the top of the ice cream layer, creating a fluffy and cloud-like finish.
- Drizzle chocolate syrup generously over the whipped cream layer, then sprinkle with additional crushed Oreos to add that extra crunch and visual appeal.
- Freeze the cake again for about 1 hour before it’s time to serve. This ensures everything is perfectly set.
- When you’re ready to indulge, carefully slice the cake and serve. Enjoy every delectable bite of your homemade Oreo Ice Cream Cake!
Notes
For best results, let the ice cream soften slightly before spreading. Consider using gluten-free Oreos or dairy-free substitutes for adaptations.
Nutrition
- Serving Size: 1 slice
- Calories: 320
- Sugar: 22g
- Sodium: 160mg
- Fat: 17g
- Saturated Fat: 8g
- Unsaturated Fat: 9g
- Trans Fat: 0g
- Carbohydrates: 40g
- Fiber: 1g
- Protein: 4g
- Cholesterol: 20mg