There’s something truly magical about the aroma of fresh cherries wafting through your kitchen, isn’t there? It brings back memories of sun-drenched afternoons spent in my grandmother’s garden, where she would hop off her old wicker chair just to pick the ripest cherries from her tree. These cherries weren’t destined for the store; instead, they were lovingly transformed into her famous cherry pie filling. Those afternoons were filled with laughter and stories, and I can still hear her guiding me—“Always choose the sweetest fruits, dear, for they hold the essence of summer.” It’s that essence that I strive to capture in my own homemade cherry pie filling.
## Recipe Timing
- Prep Duration: 10 minutes
- Active Cooking: 10 minutes
- Total Duration: 20 minutes
- Portion Size: Fills one standard pie or enough for several other desserts
- Complexity: Simple
## Nutritional Recipe
- Calories per portion: Approximately 150
- Protein: 1g
- Carbs: 36g
- Fats: 0g
- Fiber: 1g
- Sugars: 28g
- Sodium: 5mg
## Why You’ll Love This Homemade Cherry Pie Filling
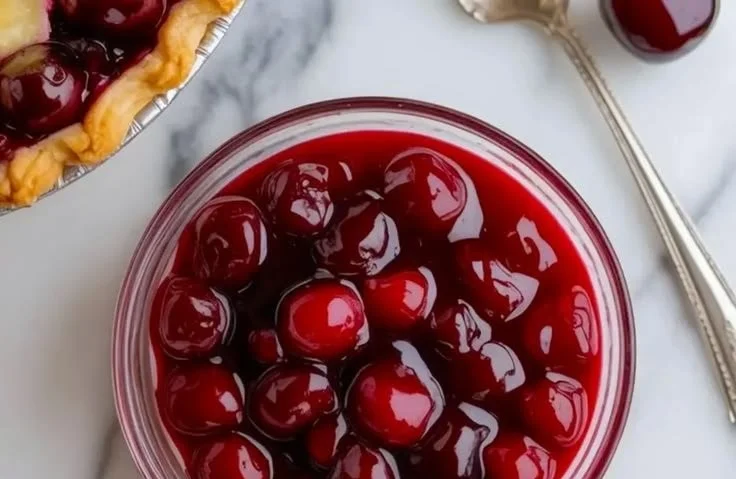
This homemade cherry pie filling is the embodiment of summer, bursting with the natural sweetness of fresh cherries and a hint of almond that elevates each bite. It’s not just a filling; it’s a canvas for nostalgia, a celebration of good times, and a way to bring warmth into your home. Whether nestled in a flaky pie crust, dolloped on a scoop of vanilla ice cream, or spooned over pancakes, a taste of this cherry filling is bound to brighten your day.
## The Complete Cooking Journey
Getting started with this cherry pie filling is easy-peasy! You might want to gather your ingredients and a little enthusiasm for the experience. From pitting those cherries to stirring the juicy mixture on the stovetop, each step is filled with yummy anticipation. Let’s dive in!
## Ingredients:
- 2 pounds fresh cherries, pitted
- 1 cup granulated sugar
- 1/4 cup cornstarch
- 1 tablespoon lemon juice
- 1/2 teaspoon almond extract
- 1/4 teaspoon salt
- 1 cup water
## Method:
### Step 1: Prepare the Cherry Base
In a saucepan, combine the pitted cherries, sugar, cornstarch, lemon juice, almond extract, salt, and water. This medley will form the sweet base of your filling, so get ready for some delicious aromas to start filling your kitchen.
### Step 2: Thicken and Bubble Away
Stir over medium heat until the mixture begins to thicken and bubble. Keep your eyes on it! The transformation is mesmerizing as the colors deepen, and the mixture turns into a glossy, enticing filling.
### Step 3: Final Simmering
Continue to cook for an additional 2-3 minutes. This is where the magic happens! The filling reaches that perfect gooey consistency that will hold its shape beautifully in your beloved pie.
### Step 4: Cooling Down
Remove from heat and let it cool before using in your cherry pie or other desserts. Trust me, letting it cool will make it easier to handle and allow all those flavors to meld together perfectly.
## Serving Suggestions & Pairings
This homemade cherry pie filling doesn’t just belong in pies! Use it as a topping for cheesecake, mix it into your morning yogurt, or swirl it into pancake batter for a delightful breakfast twist. Its bright flavor pairs beautifully with a dollop of whipped cream or a scoop of vanilla ice cream for a comforting dessert.
## Storage & Leftovers Guide
Store any leftover cherry filling in an airtight container in the refrigerator for up to one week. If you want to keep it for longer, it can be frozen for up to three months. Just remember to defrost it in the fridge before using, and you’ll have summer ready to enjoy any time of the year!
## Kitchen Wisdom & Success Tips
- Pitting Cherries: Using a cherry pitter can save you lots of time and avoid the mess of doing it manually. If you don’t have one, simply cut the cherry in half and remove the pit with your fingers.
- Adjusting Sweetness: Feel free to adjust the sugar based on the sweetness of your cherries. If they’re extra tart, a little more sugar will help balance it out.
- Thickening Alternatives: If you don’t have cornstarch on hand, you can substitute with arrowroot powder or tapioca flour, but adjust the quantity accordingly.
## Flavor Variations & Adaptations
Try adding a splash of vanilla extract for a different flavor profile, or mix in some blueberries or raspberries for a berry medley that will delight your taste buds. Want a twist? A sprinkle of nutmeg will work wonders, too!
## Reader Questions & Solutions
-
What if I can’t find fresh cherries?
Frozen cherries work just as well! Just thaw and drain the excess liquid before using them in this recipe. -
Can I reduce the sugar?
Absolutely! You can reduce the sugar by half if you prefer a less sweet filling. Keep in mind that cherries sweetness can vary, so adjust to your taste. -
My filling is too runny; what should I do?
If your filling turns out runny, you can return it to the stove and add a little more cornstarch mixed with water (in a slurry) to thicken it further. -
How do I pit cherries quickly?
If you’re pitting a lot, consider using a chopstick or similar tool to push out the pit from a halved cherry. -
Can I can the cherry filling?
Yes, if you’re experienced with canning, this cherry filling can be safely canned using proper canning techniques to enjoy all year round!
## Wrapping Up
Making your own cherry pie filling may just become a beloved tradition in your kitchen, much like it is in mine. It celebrates the beauty of fresh ingredients, the joy of cooking, and the sweetness of sharing with loved ones. Bring the summer vibes indoors and reward yourself with a scoop of homemade cherry bliss! I hope you find the time to create this filling, infusing each bite with memories to cherish and share. Enjoy your culinary adventure!
PrintHomemade Cherry Pie Filling
This homemade cherry pie filling is bursting with the natural sweetness of fresh cherries and a hint of almond that elevates each bite.
- Prep Time: 10 minutes
- Cook Time: 10 minutes
- Total Time: 20 minutes
- Yield: Fills one standard pie 1x
- Category: Dessert
- Method: Stovetop
- Cuisine: American
- Diet: Vegetarian
Ingredients
- 2 pounds fresh cherries, pitted
- 1 cup granulated sugar
- 1/4 cup cornstarch
- 1 tablespoon lemon juice
- 1/2 teaspoon almond extract
- 1/4 teaspoon salt
- 1 cup water
Instructions
- In a saucepan, combine the pitted cherries, sugar, cornstarch, lemon juice, almond extract, salt, and water.
- Stir over medium heat until the mixture begins to thicken and bubble.
- Continue to cook for an additional 2-3 minutes until the filling reaches a gooey consistency.
- Remove from heat and let it cool before using in your cherry pie or other desserts.
Notes
Use as a topping for cheesecake or swirl into pancake batter for a delightful breakfast twist. Store leftovers in an airtight container for up to one week or freeze for up to three months.
Nutrition
- Serving Size: 1 serving
- Calories: 150
- Sugar: 28g
- Sodium: 5mg
- Fat: 0g
- Saturated Fat: 0g
- Unsaturated Fat: 0g
- Trans Fat: 0g
- Carbohydrates: 36g
- Fiber: 1g
- Protein: 1g
- Cholesterol: 0mg