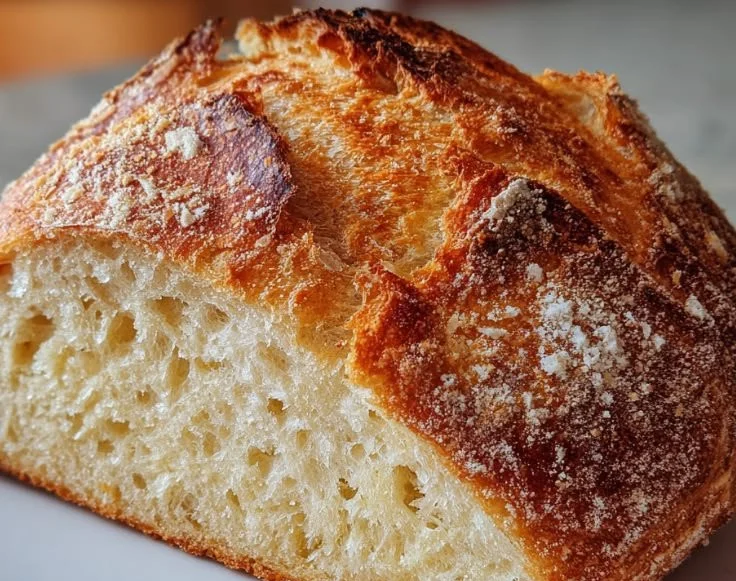
There’s something magical about the aroma of freshly baked bread that fills your kitchen, wrapping you in warmth and comfort. I remember the first time I attempted to make my own Italian bread; I was just a teenager, standing in my mom’s kitchen with flour dusting my countertop and my heart racing with excitement. From that day, baking bread became more than just a culinary task for me; it transformed into an art, a way to weave memories with each loaf I kneaded. Today, I invite you to join me on a journey to create your very own Crusty Italian Bread – Fresh, Golden, and Irresistibly Warm!
Recipe Timing
- Prep Duration: 20 minutes
- Active Cooking: 30 minutes
- Total Duration: 2-3 hours (including rising time)
- Portion Size: Serves 10-12
- Complexity: Simple
Nutritional Recipe
- Calories per portion: Approximately 150 calories
- Protein: 4g
- Carbs: 30g
- Fats: 0.5g
- Fiber: 1g
- Sugars: 0.5g
- Sodium: 200mg
Why You’ll Love This Crusty Italian Bread: Fresh, Golden, and Irresistibly Warm!
Imagine slicing into a crusty loaf, the crackle of the surface giving way to a soft, pillowy interior. There’s just something soul-satisfying about it. This Crusty Italian Bread is not only a fantastic side for soups and salads but also makes for the ultimate sandwich base or even a simple breakfast toast topped with a dollop of butter and a sprinkle of sea salt. Picture this: dipping warm slices into olive oil or serving alongside your favorite pasta; each bite invites a chorus of flavors and textures that will delight your senses.
The Complete Cooking Journey
Baking this bread is about more than just the procedure; it’s about the anticipation as you wait for the dough to rise, the excitement as you shape it, and the joy that fills your home as it bakes to a perfect golden hue. Follow along as we transform simple ingredients into a masterpiece of comfort.
Ingredients:
For the Dough:
- 4 cups all-purpose flour
- 1 ½ cups warm water (110°F)
- 2 teaspoons active dry yeast
- 2 teaspoons salt
- 1 teaspoon sugar
For the Topping:
- 1 tablespoon cornmeal (for dusting)
Method:
Step 1: Activate the Yeast
In a small bowl, combine warm water, sugar, and yeast. Let it sit for 5-10 minutes until frothy, like a bubbly potion ready to rise.
Step 2: Combine Dry Ingredients
In a large mixing bowl, combine flour and salt. Make a well in the center and pour in the yeast mixture, preparing to bring life to your dough.
Step 3: Mix the Dough
Stir until a shaggy dough forms, embracing the messiness—it’s all part of the fun!
Step 4: Knead the Dough
Knead on a floured surface for about 10 minutes until smooth and elastic. Feel the dough come alive under your hands—it’s both a workout and a joy!
Step 5: Let it Rise
Place the dough in a greased bowl, cover with a damp cloth, and let it rise in a warm place for 1-2 hours, or until it doubles in size. Use this time to clean up and dream about all the delicious things you’ll create with this bread.
Step 6: Preheat the Oven
Preheat your oven to 450°F (232°C) and place a baking stone or an inverted baking sheet inside to heat up. This will help create that irresistible crust we all love.
Step 7: Shape the Loaf
Once risen, punch down the dough and shape it into a round loaf. Place it on a parchment-lined baking sheet dusted with cornmeal, standing proud and ready for the oven.
Step 8: Second Rise
Cover and let it rise for another 30 minutes. Use this time to prepare your kitchen for the delightful aroma about to fill it.
Step 9: Score the Loaf
Using a sharp knife, score the top of the loaf with a few slashes to allow steam to escape. It’s like giving your bread its own personal signature!
Step 10: Bake to Perfection
Transfer the loaf to the preheated baking stone or sheet and bake for 25-30 minutes, or until the crust is golden and sounds hollow when tapped. The sound is music to any baker’s ears.
Step 11: Cool Down
Let cool on a wire rack before slicing. Patience is key—though the smell may tempt you to dig in right away!
Serving Suggestions & Pairings
This Crusty Italian Bread truly shines when paired with a variety of dishes. Enjoy it with a hearty tomato soup, a fresh garden salad drizzled with balsamic vinaigrette, or simply spread with butter or olive oil. Don’t forget a fine cheese platter to showcase the bread’s incredible flavor!
Storage & Leftovers Guide
Store any leftover bread wrapped in a cloth or bread bag at room temperature for up to 3 days. For longer storage, slice and freeze it in freezer-safe bags for up to 3 months. Just pop the slices in the toaster straight from the freezer for a quick warm-up.
Kitchen Wisdom & Success Tips
- Ensure your yeast is fresh by checking the expiration date. Active yeast is key to a good rise!
- Create steam in the oven by placing a shallow pan with water at the bottom while baking to achieve that coveted crust.
- Feel free to experiment with adding herbs or cheese to the dough for a unique twist.
Flavor Variations & Adaptations
Here are some variations to get creative with your Italian bread:
- Mix in roasted garlic for a punch of flavor.
- Add Italian herbs like oregano or rosemary for an aromatic loaf.
- Incorporate olives or sun-dried tomatoes for a Mediterranean flair.
Reader Questions & Solutions
-
Why didn’t my bread rise?
Ensure your yeast is fresh and your water was warm but not hot; it should feel like a warm bath. -
What if my dough is too sticky?
Add a bit more flour while kneading, but be careful not to add too much or it could dry out the dough. -
Can I use whole wheat flour?
Yes, but your texture will change; consider a blend of all-purpose and whole wheat for best results. -
Why is my crust too hard?
Check your baking time; too long can lead to a hard crust. You can also enhance moisture by placing a pan of water in the oven. -
How can I make this bread rise faster?
Try placing your dough in a warm environment, like near a preheating oven, to speed up the process.
Wrapping Up
Making your own Crusty Italian Bread is a rewarding experience that fills your kitchen with warmth and your heart with joy. There’s nothing quite like the smile on your family’s faces as they bite into a slice you made from scratch. So roll up those sleeves, get ready to knead, and let the love for baking fill your home! Happy baking!
PrintCrusty Italian Bread
A simple yet rewarding recipe for Crusty Italian Bread that is fresh, golden, and irresistibly warm. Perfect for soups, salads, or as a sandwich base.
- Prep Time: 20 minutes
- Cook Time: 30 minutes
- Total Time: 150 minutes
- Yield: 10-12 servings 1x
- Category: Bread
- Method: Baking
- Cuisine: Italian
- Diet: Vegetarian
Ingredients
- 4 cups all-purpose flour
- 1 ½ cups warm water (110°F)
- 2 teaspoons active dry yeast
- 2 teaspoons salt
- 1 teaspoon sugar
- 1 tablespoon cornmeal (for dusting)
Instructions
- Activate the yeast by combining warm water, sugar, and yeast in a small bowl. Let it sit for 5-10 minutes until frothy.
- Combine the flour and salt in a large mixing bowl, making a well in the center.
- Pour in the yeast mixture to bring life to your dough.
- Stir until a shaggy dough forms.
- Knead on a floured surface for about 10 minutes until smooth and elastic.
- Place the dough in a greased bowl, cover, and let it rise in a warm place for 1-2 hours.
- Preheat your oven to 450°F (232°C) with a baking stone or inverted baking sheet inside.
- Punch down the dough, shape it into a round loaf, and place it on a parchment-lined baking sheet dusted with cornmeal.
- Cover and let it rise for another 30 minutes.
- Score the top of the loaf with a few slashes.
- Transfer to the oven and bake for 25-30 minutes until golden and hollow-sounding when tapped.
- Cool on a wire rack before slicing.
Notes
Store leftover bread in a cloth or bread bag at room temperature for up to 3 days, or freeze slices for up to 3 months.
Nutrition
- Serving Size: 1 serving
- Calories: 150
- Sugar: 0.5g
- Sodium: 200mg
- Fat: 0.5g
- Saturated Fat: 0g
- Unsaturated Fat: 0g
- Trans Fat: 0g
- Carbohydrates: 30g
- Fiber: 1g
- Protein: 4g
- Cholesterol: 0mg