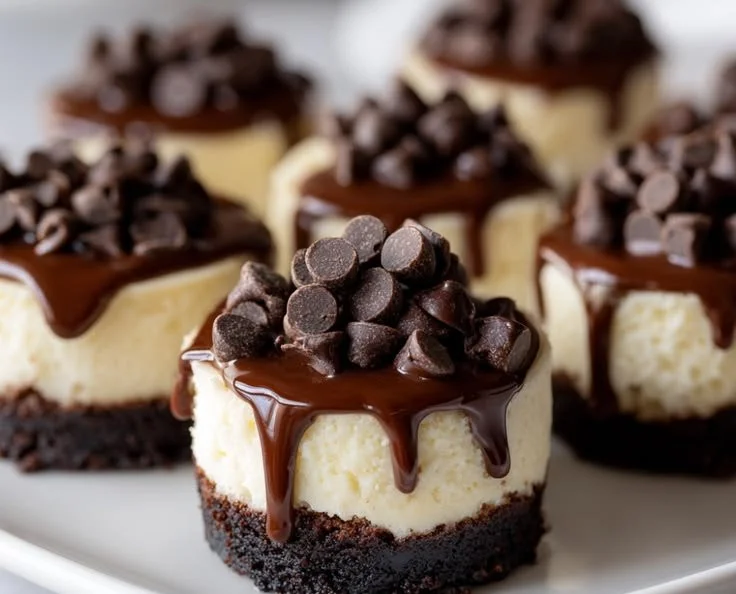
There’s something deeply comforting about cheesecake. Maybe it’s its creamy texture or the way it seems to cradle all the delicious flavors within its layers. Combine that with rich brownie goodness, and you have a dessert that feels like a warm hug on a plate. Today, I’m thrilled to share a recipe that has become a staple in my home: Brownie Bottom Mini Cheesecakes. These little gems are not just a treat for the taste buds; they are a celebration of the joyous moments we get to share over dessert.
I remember the first time I made these mini cheesecakes. It was a rainy afternoon, the kind that makes you want to curl up with something sweet and indulgent. As the aroma of chocolate wafted through the kitchen, my kids came rushing in, lured by the promise of a chocolatey delight. The laughter and excitement that followed as we dipped spoons into these mini masterpieces created memories that I’ll cherish forever. So, let’s dive into this delicious adventure together!
Recipe Timing
- Prep Duration: 20 minutes
- Active Cooking: 30 minutes
- Total Duration: 4 hours 50 minutes (including chill time)
- Portion Size: 12 mini cheesecakes
- Complexity: Simple
Nutritional Recipe
- Calories per portion: Approximately 210
- Protein: 4g
- Carbs: 23g
- Fats: 12g
- Fiber: 1g
- Sugars: 12g
- Sodium: 150mg
Why You’ll Love This Brownie Bottom Mini Cheesecakes (The Ultimate Guide)
These Brownie Bottom Mini Cheesecakes are the perfect fusion of two beloved desserts. Imagine sinking your teeth into a chocolatey brownie base that melts in your mouth, only to be met with the creamy, tangy sweetness of cheesecake. Each bite delivers a delightful flavor contrast and texture that makes them irresistible. They’re also wonderfully customizable—add a drizzle of caramel, a sprinkle of fresh berries, or a dusting of powdered sugar, and you’ve turned a classic dessert into a gourmet delight!
The Complete Cooking Journey
Creating these mini cheesecakes involves a simple, yet rewarding process. You’ll experience the bliss of making a rich brownie base, followed by a silken cheesecake filling that you’ll want to eat straight from the bowl. Follow along as I guide you through each delightful step!
Ingredients:
- 1/2 cup unsalted butter (melted)
- 1/2 cup granulated sugar
- 1 large egg
- 1/4 cup all-purpose flour
- 1/3 cup unsweetened cocoa powder
- 1/2 tsp vanilla extract
- 1/4 tsp salt
- 8 oz cream cheese (softened to room temperature)
- 1/4 cup granulated sugar
- 1 large egg (at room temperature)
- 2 tbsp sour cream (at room temperature)
- 1/2 tsp vanilla extract
Method:
Step 1: Preheat Your Oven
Preheat oven to 350°F (175°C). Line a 12-cup standard muffin tin with paper liners.
Step 2: Prepare the Brownie Batter
In a medium bowl, whisk together the melted butter and sugar until combined. Add the egg and vanilla, mixing until smooth. Gently stir in the flour, cocoa powder, and salt until just combined.
Step 3: Fill Muffin Liners with Brownie Batter
Spoon about 1 tablespoon of brownie batter into each lined muffin cup and press it down into an even layer. Bake for 10-12 minutes, just until the edges are set and the center has a slight softness.
Step 4: Create the Cheesecake Filling
In a large bowl, beat the softened cream cheese until smooth and creamy. Slowly add sugar, beating again until combined. Mix in the egg, sour cream, and 1/2 tsp vanilla, stirring on low speed until just combined.
Step 5: Layer the Cheesecake Filling
Remove the muffin tin from the oven and spoon the creamy cheesecake filling over the warm brownie bases, filling each cup about three-quarters full.
Step 6: Bake the Cheesecakes
Place the muffin tin back in the oven and bake for 15-18 minutes, until the edges are set and the center still has a slight jiggle—don’t overbake!
Step 7: Cool the Cheesecakes
Turn off the oven and allow the cheesecakes to cool inside with the door ajar for about 1 hour. Then, let them cool completely at room temperature before transferring them to the refrigerator.
Step 8: Chill Before Serving
Chill the cheesecakes in the refrigerator for at least 4 hours (or preferably overnight) to set and intensify the flavors.
Serving Suggestions & Pairings
These mini cheesecakes are divine on their own, but why not elevate them? Consider topping them with fresh raspberries, a drizzle of chocolate ganache, or a dollop of whipped cream. They pair beautifully with a cup of coffee or a scoop of vanilla ice cream for an indulgent dessert experience.
Storage & Leftovers Guide
You can store these delicious bites in an airtight container in the refrigerator for up to 5 days. For extended freshness, you can even freeze them! Just wrap each cheesecake tightly in plastic wrap and place them in a freezer-safe container. They’ll stay fresh for up to 2 months. Thaw them overnight in the refrigerator when you’re ready to indulge.
Kitchen Wisdom & Success Tips
- Room Temperature Ingredients: Make sure your cream cheese and egg are at room temperature to achieve a smooth and creamy cheesecake filling.
- Don’t Overmix: When combining your ingredients, be careful not to overmix, especially when incorporating the egg. This helps prevent cracking.
- Check for Doneness: When baking, remember that the mini cheesecakes will continue to set as they cool, so a slight jiggle in the center is perfectly fine.
Flavor Variations & Adaptations
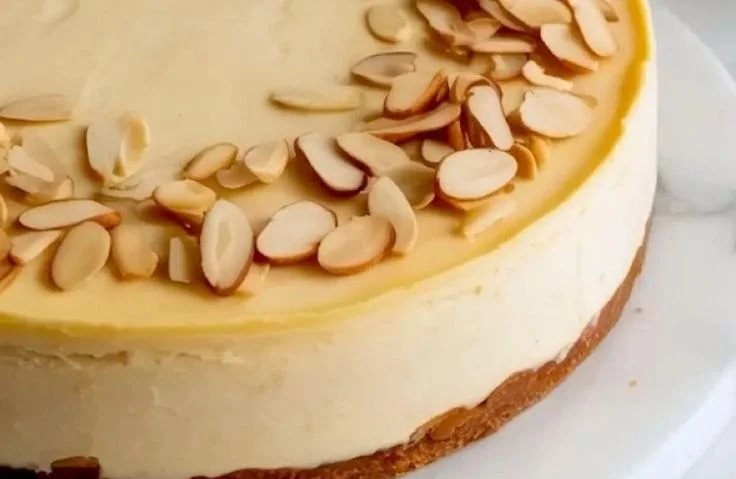
Feel free to get creative! Swap out the sour cream for Greek yogurt for a lighter option, or experiment with flavored extracts like almond or lemon for a unique twist. You can also add an array of toppings such as crushed cookies or a fruit compote to add even more character to these delightful mini cheesecakes.
Reader Questions & Solutions
-
Q: Can I use a different kind of chocolate for the brownie layer?
- A: Absolutely! Feel free to use dark chocolate or even milk chocolate for a sweeter treat.
-
Q: What if I don’t have a muffin tin?
- A: You can use a small baking dish and cut them into squares once fully cooled!
-
Q: How do I prevent my cheesecakes from cracking?
- A: Ensure you don’t overmix your filling and watch for doneness. A slight jiggle is key!
-
Q: Can I make these ahead of time?
- A: Yes! They can be prepared and stored in the fridge for a few days or even frozen for later enjoyment.
-
Q: What’s the best way to serve them?
- A: Serve chilled and topped with your favorite garnishes, such as fresh fruit or a drizzle of caramel, for an extra special touch.
Wrapping Up
These Brownie Bottom Mini Cheesecakes are a beautiful melding of flavors and textures. Whether you’re celebrating a special occasion or simply satisfying a craving, this recipe is sure to bring a smile to your face. So gather your ingredients, roll up your sleeves, and let the sweet magic unfold in your kitchen. Your loved ones will thank you with every delicious bite! Happy baking!
PrintBrownie Bottom Mini Cheesecakes
Delicious mini cheesecakes with a rich brownie base, perfect for any dessert lover.
- Prep Time: 20 minutes
- Cook Time: 30 minutes
- Total Time: 290 minutes
- Yield: 12 servings 1x
- Category: Dessert
- Method: Baking
- Cuisine: American
- Diet: Vegetarian
Ingredients
- 1/2 cup unsalted butter (melted)
- 1/2 cup granulated sugar
- 1 large egg
- 1/4 cup all-purpose flour
- 1/3 cup unsweetened cocoa powder
- 1/2 tsp vanilla extract
- 1/4 tsp salt
- 8 oz cream cheese (softened to room temperature)
- 1/4 cup granulated sugar
- 1 large egg (at room temperature)
- 2 tbsp sour cream (at room temperature)
- 1/2 tsp vanilla extract
Instructions
- Preheat your oven to 350°F (175°C). Line a 12-cup standard muffin tin with paper liners.
- In a medium bowl, whisk together the melted butter and sugar until combined.
- Add the egg and vanilla, mixing until smooth. Gently stir in the flour, cocoa powder, and salt until just combined.
- Spoon about 1 tablespoon of brownie batter into each lined muffin cup and press it down into an even layer. Bake for 10-12 minutes, just until the edges are set and the center has a slight softness.
- In a large bowl, beat the softened cream cheese until smooth and creamy.
- Slowly add sugar, beating again until combined. Mix in the egg, sour cream, and 1/2 tsp vanilla, stirring on low speed until just combined.
- Remove the muffin tin from the oven and spoon the creamy cheesecake filling over the warm brownie bases, filling each cup about three-quarters full.
- Place the muffin tin back in the oven and bake for 15-18 minutes, until the edges are set and the center still has a slight jiggle—don’t overbake!
- Turn off the oven and allow the cheesecakes to cool inside with the door ajar for about 1 hour.
- Let them cool completely at room temperature before transferring them to the refrigerator.
- Chill the cheesecakes in the refrigerator for at least 4 hours (or preferably overnight) to set and intensify the flavors.
Notes
Ensure room temperature ingredients for a smooth filling and avoid overmixing.
Nutrition
- Serving Size: 1 mini cheesecake
- Calories: 210
- Sugar: 12g
- Sodium: 150mg
- Fat: 12g
- Saturated Fat: 7g
- Unsaturated Fat: 4g
- Trans Fat: 0g
- Carbohydrates: 23g
- Fiber: 1g
- Protein: 4g
- Cholesterol: 55mg