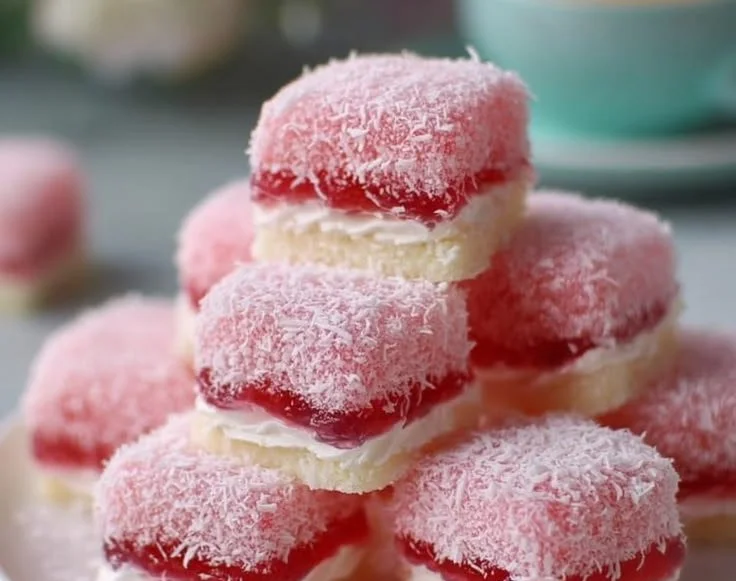
As I caught a glimpse of the vibrant strawberry jelly in my pantry, waves of nostalgia washed over me. It reminded me of summers spent at my grandmother’s kitchen table, where her laughter was as sweet as the confections she created. Among the many treats she served, the Old-Fashioned Pink Jelly Cake stood out – a whimsical masterpiece that delighted not only the eyes but also the taste buds. Each bite brought with it memories of creativity, joy, and a certain magic that only childhood desserts can evoke. If you’re ready to embark on a journey that combines tender sponge with glossy jelly and fluffy cream, then let’s dive into the delightful world of this childhood favorite.
Recipe Timing
- Prep Duration: 30 minutes
- Active Cooking: 15-18 minutes
- Total Duration: Approximately 2.5 hours (including chilling time)
- Portion Size: 24 mini cakes
- Complexity: Simple
Nutritional Recipe
- Calories per portion: Approximately 140
- Protein: 2.2 grams
- Carbs: 20 grams
- Fats: 6 grams
- Fiber: 0.5 grams
- Sugars: 10 grams
- Sodium: 45 mg
Why You’ll Love This Old-Fashioned Pink Jelly Cake
This Old-Fashioned Pink Jelly Cake is a celebration of contrast – the soft sponge, the wobbly jelly, and the heavenly whipped cream all come together in a delightful harmony. It’s perfect for a birthday party, casual afternoon tea, or simply an indulgent treat after a long day. More than just a dessert, each bite carries whispers of tradition, making it a perfect dish to create lasting memories with loved ones. Not to mention, the vibrant pink hue is sure to bring a smile to anyone’s face, evoking feelings of nostalgia and joy.
The Complete Cooking Journey
Step 1: Preheat Your Oven
Preheat your oven to 175°C (fan-forced). A warm oven is the secret to those perfectly baked sponge cakes that we all crave.
Step 2: Prepare the Patty-Pan Tins
Lightly grease two 12-hole patty-pan tins to ensure our cake magic doesn’t stick. Trust me, this step saves a lot of sorrow when it’s time to indulge.
Step 3: Cream Together Butter and Sugar
In a large bowl, cream together the softened butter, caster sugar, and vanilla extract until pale and fluffy. It should look like a soft cloud, inviting you to take a seat and enjoy the process.
Step 4: Incorporate the Egg
Add the egg to the mixture and beat until fully incorporated. This is where we add some life to our beautiful batter.
Step 5: Combine Milk and Flour
Gently fold in the milk and sifted self-raising flour alternately in two batches. The motion should be tender, like a hug – we want our sponge to remain light and airy.
Step 6: Fill the Patty-Pan Holes
Spoon the batter into the prepared patty-pan holes, filling each just below the top. It’s exciting to see them come to life!
Step 7: Bake the Cakes
Bake for 15–18 minutes or until golden; a skewer should come out clean. The aroma wafting through your kitchen will be irresistible!
Step 8: Cool the Cakes
Allow the cakes to cool in the tin for 5 minutes before transferring them to a wire rack to cool completely. Patience is key here!
Step 9: Prepare the Jelly
Dissolve the jelly crystals in boiling water and stir in cold water; refrigerate until partially set for about 1–2 hours. This is where the fun begins!
Step 10: Coat the Cakes in Jelly
Dip the cooled cakes into the jelly mixture with a slotted spoon, letting excess drip off. Watch as they transform into pink-coated wonders!
Step 11: Roll in Coconut
Roll each jelly-coated cake in desiccated coconut, giving them a deliciously delightful finish. The coconut adds a lovely texture that complements our cake’s softness.
Step 12: Assemble the Cakes
Assemble by spooning whipped cream onto one half and sandwiching it with another half. This step is where the cake becomes irresistible, just like Grandma used to make.
Step 13: Chill Before Serving
Refrigerate assembled cakes for 30 minutes before serving. This final chill helps the flavors meld together beautifully.
Ingredients:
- 80g butter, softened
- 1/2 cup (110g) caster sugar
- 1 tsp vanilla extract
- 1 egg
- 2/3 cup (160g) milk
- 1 cup (130g) self-raising flour, sifted
- 85g packet strawberry jelly crystals
- 1 cup (240g) boiling water
- 1 cup (240g) cold water
- 3 1/2 cups (280g) desiccated coconut
- 1 cup (240g) whipped cream
Serving Suggestions & Pairings
This charming cake pairs beautifully with a refreshing cup of tea or coffee, making it a perfect afternoon delight. A side of fresh berries or a drizzle of chocolate sauce can elevate the experience, adding even more dimensions to the flavor profile. Serve it up on a vibrant plate to add that extra pop of color!
Storage & Leftovers Guide
If you’re lucky enough to have some leftovers, store them in an airtight container in the refrigerator for up to 3 days. The jelly might become a bit firmer over time, but the flavor remains delightful.
Kitchen Wisdom & Success Tips
- Ensure your butter is at room temperature for easier mixing.
- Don’t rush the cooling process; letting the cakes cool completely helps avoid a soggy finish.
- When rolling the cakes in coconut, do it gently to maintain the jelly coating.
- Feel free to experiment with different jelly flavors!
Flavor Variations & Adaptations
While strawberry is classic, consider swapping the jelly for raspberry or even lime for a zestier twist. You could also infuse the sponge with lemon zest for an added zing.
Reader Questions & Solutions
Q: My cakes didn’t rise, what could I have done wrong?
A: This might be due to expired self-raising flour or overmixing the batter. Make sure your ingredients are fresh and mix just until combined.
Q: Can I use fresh fruit instead of jelly?
A: Absolutely! Fresh fruit can be a delightful alternative, but it may not provide the same wobbly texture.
Q: What if I don’t have desiccated coconut?
A: You can toast some shredded coconut as a substitute, or simply skip it for a lighter finish.
Q: How do I ensure the jelly coats evenly?
A: Ensure the jelly is still slightly warm and not fully set. This helps it adhere better to the cake.
Q: Can I make these in advance?
A: Yes! Just assemble them closer to serving time to avoid sogginess, but the individual elements can be prepared ahead.
Wrapping Up
Creating the Old-Fashioned Pink Jelly Cake is like painting a delicious canvas, each layer filled with joy and nostalgia. It’s not just a treat; it’s a way to connect with the past and present, to share laughter and sweet moments around the table. So gather your loved ones, unleash your inner baker, and let your kitchen be filled with the warm aromas of this sugary delight. Dive into the charming world of jelly cakes today – your taste buds and heart will thank you!
PrintOld-Fashioned Pink Jelly Cake
A whimsical masterpiece of tender sponge, glossy jelly, and fluffy cream that evokes childhood memories.
- Prep Time: 30 minutes
- Cook Time: 18 minutes
- Total Time: 150 minutes
- Yield: 24 mini cakes 1x
- Category: Dessert
- Method: Baking
- Cuisine: American
- Diet: Vegetarian
Ingredients
- 80g butter, softened
- 1/2 cup (110g) caster sugar
- 1 tsp vanilla extract
- 1 egg
- 2/3 cup (160g) milk
- 1 cup (130g) self-raising flour, sifted
- 85g packet strawberry jelly crystals
- 1 cup (240g) boiling water
- 1 cup (240g) cold water
- 3 1/2 cups (280g) desiccated coconut
- 1 cup (240g) whipped cream
Instructions
- Preheat your oven to 175°C (fan-forced).
- Prepare two 12-hole patty-pan tins by lightly greasing them.
- Cream together the butter, caster sugar, and vanilla extract until pale and fluffy.
- Incorporate the egg into the mixture and beat until fully combined.
- Combine milk and sifted self-raising flour alternately in two batches, folding gently.
- Fill the patty-pan holes with batter, just below the top.
- Bake for 15–18 minutes or until golden and skewer comes out clean.
- Cool the cakes in the tin for 5 minutes, then transfer them to a wire rack.
- Prepare the jelly by dissolving jelly crystals in boiling water, then stir in cold water; refrigerate until partially set (1–2 hours).
- Coat the cooled cakes in jelly using a slotted spoon, letting excess drip off.
- Roll each jelly-coated cake in desiccated coconut.
- Assemble the cakes by spooning whipped cream onto one half and topping with another half.
- Chill the assembled cakes for 30 minutes before serving.
Notes
This cake pairs beautifully with tea or coffee. Store leftovers in an airtight container in the refrigerator for up to 3 days.
Nutrition
- Serving Size: 1 mini cake
- Calories: 140
- Sugar: 10g
- Sodium: 45mg
- Fat: 6g
- Saturated Fat: 4g
- Unsaturated Fat: 2g
- Trans Fat: 0g
- Carbohydrates: 20g
- Fiber: 0.5g
- Protein: 2.2g
- Cholesterol: 30mg