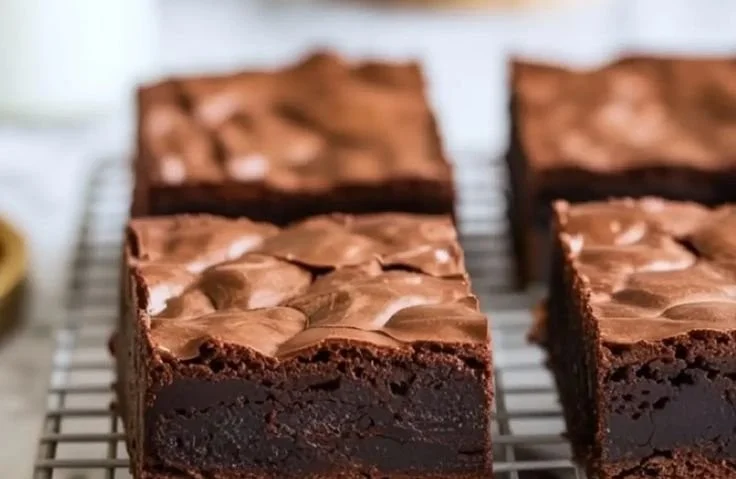
Sinking my teeth into a fudgy walnut brownie is like taking a warm hug from the inside out. It’s the little bites of heaven that bring comfort on a long day or celebrate the simplest of joys—like indulging in a rainy afternoon with a good book or savoring the sweetness of life’s little moments. Growing up, my kitchen was always abuzz with the aroma of baked goods. My grandmother’s walnut brownies were the crown jewels of her repertoire, and every bite was a reminder of her warm embrace. Today, I want to share my homage to her classic recipe, with just the right balance of chocolate and the satisfying crunch of walnuts.
Recipe Timing
- Prep Duration: 10 minutes
- Active Cooking: 30 minutes
- Total Duration: 40 minutes
- Portion Size: 9-16 squares
- Complexity: Simple
Nutritional Recipe
- Calories per portion: Approximately 200 calories
- Protein: 3g per serving
- Carbs: 24g per serving
- Fats: 10g per serving
- Fiber: 1g per serving
- Sugars: 15g per serving
- Sodium: 100mg per serving
Why You’ll Love This Walnut Brownies Recipe
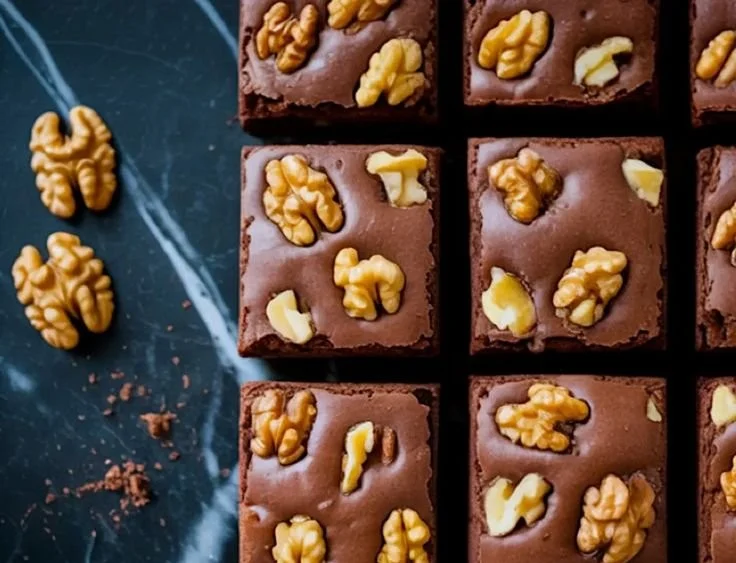
This Walnut Brownies Recipe isn’t just any dessert; it’s an experience. The rich, dark chocolate melds beautifully with the creamy butter, creating a batter that’s smooth and irresistible. The raw walnuts add an earthy crunch, tying each bite together with their delightful texture. Plus, these brownies are deceptively simple to make—perfect for both novice bakers and seasoned pros. Whether you’re craving a late-night snack or prepping for a gathering, these brownies promise to elevate your day.
The Complete Cooking Journey
Embarking on this baking adventure is as satisfying as the end result. Picture the butter melting gently with dark chocolate, filling your kitchen with a heavenly aroma. Each step unfolds like a story, as you whisk together eggs and sugar until they transform into a luscious mixture. When the batter goes into the oven, anticipation builds—will they become the fudgy delights you remember? Trust the process, because when you pull these babies out and let them cool, you’ll be rewarded with a batch of brownies that’s both rich and satisfying.
Ingredients:
- 1/2 cup (115g) unsalted butter
- 6 oz (170g) dark chocolate, chopped
- 3/4 cup (150g) granulated sugar
- 2 large eggs
- 1 teaspoon vanilla extract
- 1/2 cup (65g) all-purpose flour
- 2 tablespoons unsweetened cocoa powder
- 1/2 teaspoon fine sea salt
- 3/4 cup (85g) raw walnuts, roughly chopped, plus extra for topping
Method:
Step 1: Preheat and Prepare the Pan
Preheat the oven to 350°F (175°C). Line an 8×8-inch square baking pan with parchment paper, leaving overhang on two sides for easy removal.
Step 2: Melt Butter and Chocolate
In a small saucepan over low heat, melt the butter and chopped dark chocolate together, stirring constantly until smooth. Remove from heat and let cool slightly for 5 minutes.
Step 3: Whisk Eggs and Sugar
In a medium mixing bowl, whisk the eggs, sugar, and vanilla extract together until the mixture becomes pale and slightly thickened, about 1 to 2 minutes.
Step 4: Combine Chocolate with Egg Mixture
Slowly pour the slightly cooled chocolate mixture into the egg mixture, stirring gently until fully incorporated.
Step 5: Add Dry Ingredients
Sift in the flour, cocoa powder, and salt. Stir gently with a spatula or wooden spoon until just combined, being careful not to overmix.
Step 6: Fold in Walnuts
Add the chopped walnuts to the batter and fold them in evenly. Reserve a few whole pieces to press into the top before baking.
Step 7: Transfer to Pan
Pour the brownie batter into the prepared baking pan. Use a spatula to spread it evenly into the corners. Press the reserved walnut pieces gently into the surface.
Step 8: Bake the Brownies
Bake for 28 to 32 minutes, or until a toothpick inserted into the center comes out with a few moist crumbs. Avoid overbaking to keep the texture fudgy.
Step 9: Cool Completely
Let the brownies cool in the pan for at least 30 minutes before slicing. This helps them set and makes them easier to cut cleanly.
Step 10: Slice and Serve
Lift the cooled brownies out using the parchment overhang. Cut into 9 squares for large portions or 16 squares for smaller bites. Store any leftovers in an airtight container at room temperature or freeze for longer storage.
Serving Suggestions & Pairings
These walnut brownies are delightful on their own, but they shine even brighter when paired with a scoop of vanilla ice cream or a dollop of whipped cream. Serve them warm with a drizzle of chocolate sauce for an extra indulgent treat! They’re also perfect alongside a strong cup of coffee or a soothing mug of herbal tea.
Storage & Leftovers Guide
Keep any leftover brownies in an airtight container at room temperature for up to 3 days. If you want to save them for later, freeze them for up to 3 months. Just make sure to wrap them tightly in plastic wrap and foil to preserve their incredible chocolatey goodness.
Kitchen Wisdom & Success Tips
- Measure Carefully: Baking is a science, so accurate measurements can’t be overstated.
- Quality Ingredients Matter: Choose high-quality dark chocolate for a richer flavor.
- Don’t Overmix: When you fold in the dry ingredients, mix just until combined to ensure your brownies stay fudgy.
- Test for Doneness: Remember, the toothpick should come out with a few moist crumbs for that perfect fudgy texture!
Flavor Variations & Adaptations
Want to switch things up a bit? Try adding a scoop of peanut butter or Nutella into the batter for a creamy twist. You could also experiment with different nuts, such as pecans or hazelnuts, for a unique texture and flavor. For an added kick, sprinkle some sea salt on top just before baking for that sweet-and-salty combo.
Reader Questions & Solutions
-
Can I use vegetable oil instead of butter?
Yes, but the flavor and texture will differ slightly; the brownies may be less rich. -
What if I don’t have dark chocolate?
You can use semi-sweet or milk chocolate, but adjust the sugar to taste since they are sweeter. -
How can I make these gluten-free?
Substitute the all-purpose flour with a gluten-free blend, and check that your chocolate and cocoa powder are also gluten-free. -
What if my brownies are too dry?
Next time, be mindful of the baking time; start checking a few minutes earlier according to your oven’s unique temperament. -
Can I add chocolate chips to the batter?
Absolutely! Fold in some dark chocolate chips after the flour for extra gooeyness.
Wrapping Up
These walnut brownies are much more than just a dessert; they’re a slice of nostalgia, a joy-infused indulgence that reminds us of the sweet moments in life. Whether you enjoy them fresh out of the oven or save them for a special occasion, remember: there’s magic in every mix, and every bite brings a smile. So grab your apron and get baking! Your kitchen is about to become a haven of chocolaty delight!
PrintFudgy Walnut Brownies

Decadent fudgy walnut brownies that combine rich chocolate and crunchy walnuts for a delightful treat.
- Prep Time: 10 minutes
- Cook Time: 30 minutes
- Total Time: 40 minutes
- Yield: 9-16 squares 1x
- Category: Dessert
- Method: Baking
- Cuisine: American
- Diet: Vegetarian
Ingredients
- 1/2 cup (115g) unsalted butter
- 6 oz (170g) dark chocolate, chopped
- 3/4 cup (150g) granulated sugar
- 2 large eggs
- 1 teaspoon vanilla extract
- 1/2 cup (65g) all-purpose flour
- 2 tablespoons unsweetened cocoa powder
- 1/2 teaspoon fine sea salt
- 3/4 cup (85g) raw walnuts, roughly chopped, plus extra for topping
Instructions
- Preheat the oven to 350°F (175°C). Line an 8×8-inch square baking pan with parchment paper, leaving overhang on two sides for easy removal.
- Melt the butter and chopped dark chocolate together in a small saucepan over low heat, stirring constantly until smooth. Remove from heat and let cool slightly for 5 minutes.
- Whisk the eggs, sugar, and vanilla extract together in a medium mixing bowl until the mixture becomes pale and slightly thickened, about 1 to 2 minutes.
- Combine the slightly cooled chocolate mixture into the egg mixture, stirring gently until fully incorporated.
- Add the sifted flour, cocoa powder, and salt. Stir gently until just combined, being careful not to overmix.
- Fold in the chopped walnuts evenly, reserving a few whole pieces to press into the top before baking.
- Transfer the brownie batter into the prepared baking pan. Use a spatula to spread it evenly into the corners and press the reserved walnut pieces gently into the surface.
- Bake for 28 to 32 minutes, or until a toothpick inserted into the center comes out with a few moist crumbs.
- Cool the brownies in the pan for at least 30 minutes before slicing to help them set.
- Slice into 9 large squares or 16 smaller squares. Store any leftovers in an airtight container.
Notes
Pairs beautifully with vanilla ice cream or whipped cream. Store in an airtight container at room temperature for up to 3 days or freeze for up to 3 months.
Nutrition
- Serving Size: 1 square
- Calories: 200
- Sugar: 15g
- Sodium: 100mg
- Fat: 10g
- Saturated Fat: 4g
- Unsaturated Fat: 6g
- Trans Fat: 0g
- Carbohydrates: 24g
- Fiber: 1g
- Protein: 3g
- Cholesterol: 30mg