There’s something incredibly nostalgic about a Victoria Sponge Cake. It’s a sweet reminder of summer picnics in the English countryside, where the gentle hum of bees and laughter of children fills the air. This classic cake, with its light, airy texture and decadent filling, has become my go-to dessert for gatherings, birthdays, and quiet afternoons.
I remember the first time I attempted to bake a Victoria Sponge. The aroma of butter and sugar creaming together filled my kitchen, wrapping me in warmth. As I slid the cakes into the oven, dreams of airy layers and glossy cream danced in my head. When I finally sat down to enjoy a slice, my heart swelled with pride; I had created something beautiful and delicious. This recipe brings me joy every time, and I can’t wait to share it with you!
Recipe Timing
- Prep Duration: 20 minutes
- Active Cooking: 25 minutes
- Total Duration: 45 minutes
- Portion Size: Serves 8
- Complexity: Simple
Nutritional Recipe
- Calories per portion: 350 kcal
- Protein: 4g
- Carbs: 48g
- Fats: 17g
- Fiber: 1g
- Sugars: 24g
- Sodium: 115mg
Why You’ll Love This Victoria Sponge Cake
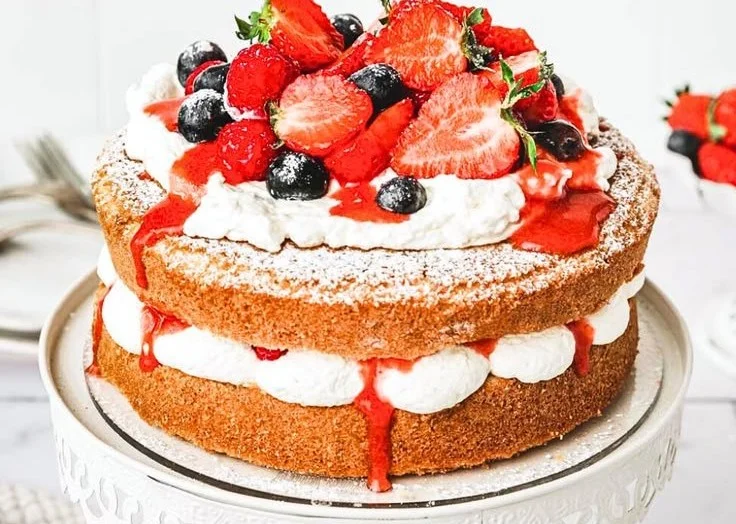
This Victoria Sponge Cake is not just another dessert; it’s an experience. The soft sponge is perfectly balanced by the creamy mascarpone filling and fresh strawberry coulis, creating a delightful explosion of flavor in every bite. Each slice beckons with the promise of summer sweetness, making it the perfect treat for any occasion. Plus, it’s wonderfully versatile—you can add different fruits or even swap out the mascarpone if you’d like!
The Complete Cooking Journey
Baking your own Victoria Sponge Cake is an adventure! From creaming together the butter and sugar to the blissful moment when the cake emerges golden from the oven, you are crafting something special. And don’t forget about the entertainment factor of assembling the layers and garnishing your masterpiece with fresh berries. It’s a delight that will leave everyone at the table smiling!
Ingredients:
- 200g unsalted butter, softened
- 200g granulated sugar
- 4 large eggs
- 200g all-purpose flour
- 2 tsp baking powder
- 1 tsp vanilla extract
- 200ml mascarpone cheese
- 100ml heavy cream
- 200g strawberries, pureed (for coulis)
- Fresh berries (strawberries, raspberries, blueberries) for garnish
Method:
Step 1: Preheat the Oven and Prepare Pans
Preheat your oven to 180°C (350°F). Grease and flour two 8-inch round cake pans to prevent the cakes from sticking.
Step 2: Cream the Butter and Sugar
In a bowl, cream together the softened butter and sugar until light and fluffy, which usually takes about 3-4 minutes. This step is crucial for a light texture.
Step 3: Incorporate the Eggs
Add the eggs one at a time, mixing well after each addition to ensure they are well combined. Stir in the vanilla extract for that lovely aromatic touch.
Step 4: Combine the Dry Ingredients
Sift the flour and baking powder together, then gradually add to the creamed mixture, mixing until just combined. Avoid over-mixing; we want to keep that airy texture!
Step 5: Divide and Smooth the Batter
Divide the batter evenly between the prepared pans and smooth the tops with a spatula for an even bake.
Step 6: Bake the Cakes
Bake for 20-25 minutes, or until a toothpick inserted into the center comes out clean. Resist the urge to open the oven door before the timer goes off!
Step 7: Cool the Cakes
Allow the cakes to cool in the pans for 10 minutes, then carefully transfer them to a wire rack to cool completely. This prevents sogginess.
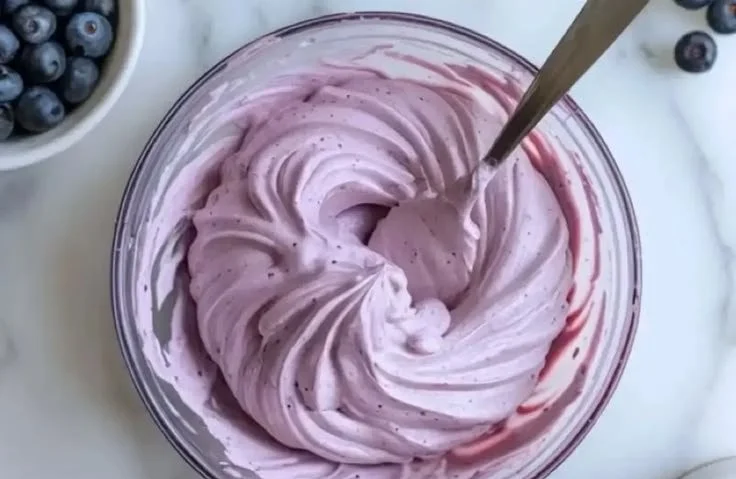
Step 8: Prepare the Mascarpone Cream
In a separate bowl, whip the mascarpone cheese and heavy cream together until thick and spreadable. This rich filling is where the magic happens!
Step 9: Layer with Strawberry Coulis
Once the cakes have cooled, spread a layer of strawberry coulis on one cake layer, followed by the mascarpone cream. Don’t be shy with the toppings—this is a treat!
Step 10: Assemble the Cake
Place the second cake layer on top and repeat the process with more coulis and cream, or leave it plain for a simple finish.
Step 11: Final Touch
Dust the top with powdered sugar if desired, then slice and serve! Enjoy the satisfied smiles as you share your creation with friends and family.
Serving Suggestions & Pairings
Serve this delightful cake with a dollop of extra mascarpone cream on the side, or pair it with a refreshing cup of Earl Grey tea. It also makes a beautiful centerpiece for any spring or summer gathering.
Storage & Leftovers Guide
Store any leftover cake in an airtight container in the refrigerator for up to 3 days. For longer storage, wrap slices tightly in plastic wrap and freeze for up to a month—just thaw before serving.
Kitchen Wisdom & Success Tips
- Room Temperature Ingredients: Ensure your butter and eggs are at room temperature for the best mixing results.
- Avoid Over-Mixing: Too much mixing can result in a tough cake; once the flour is incorporated, stop!
- Toothpick Test: For perfectly baked cakes, do the toothpick test at the 20-minute mark.
Flavor Variations & Adaptations
Feel free to switch up the fruits—raspberries and blueberries can create a delightful twist. You could also experiment with flavored extracts like almond or lemon for the cake itself for a unique touch.
Reader Questions & Solutions
-
Why did my sponge cake come out dense?
- The most common reasons are overmixing or using cold ingredients. Make sure everything is at room temperature and mix just until combined.
-
Can I use different fruits besides strawberries?
- Absolutely! Try using raspberries, blueberries, or a mix of your favorites for a seasonal twist.
-
How can I tell if my cake is done baking?
- Perform the toothpick test! Insert a toothpick into the center; if it comes out clean or with a few moist crumbs, your cake is done.
-
Is it necessary to use mascarpone cheese?
- While mascarpone adds a rich creaminess, you can substitute it with cream cheese for a tangy flavor or whip up some heavy cream sweetened with sugar.
-
Can I prepare the cake ahead of time?
- Yes! You can bake the sponges a day or two ahead. Just wrap them well and store them in the fridge.
Wrapping Up
Baking a Victoria Sponge Cake is not just about creating a dessert; it’s about making memories. From the moment you mix the ingredients to the first bite of that fluffy, fruity delight, you’re embracing the joy of cooking. So gather your loved ones and let this amazing cake take center stage at your next gathering. Happy baking, and always remember—life is sweeter with cake!
PrintVictoria Sponge Cake

A classic Victoria Sponge Cake, light and airy with a decadent mascarpone filling and fresh strawberry coulis, perfect for any occasion.
- Prep Time: 20 minutes
- Cook Time: 25 minutes
- Total Time: 45 minutes
- Yield: 8 servings 1x
- Category: Dessert
- Method: Baking
- Cuisine: British
- Diet: Vegetarian
Ingredients
- 200g unsalted butter, softened
- 200g granulated sugar
- 4 large eggs
- 200g all-purpose flour
- 2 tsp baking powder
- 1 tsp vanilla extract
- 200ml mascarpone cheese
- 100ml heavy cream
- 200g strawberries, pureed (for coulis)
- Fresh berries (strawberries, raspberries, blueberries) for garnish
Instructions
- Preheat the oven and prepare pans: Preheat your oven to 180°C (350°F). Grease and flour two 8-inch round cake pans to prevent the cakes from sticking.
- Cream the butter and sugar: In a bowl, cream together the softened butter and sugar until light and fluffy, which usually takes about 3-4 minutes.
- Incorporate the eggs: Add the eggs one at a time, mixing well after each addition. Stir in the vanilla extract.
- Combine the dry ingredients: Sift the flour and baking powder together, then gradually add to the creamed mixture, mixing until just combined.
- Divide and smooth the batter: Divide the batter evenly between prepared pans and smooth the tops with a spatula.
- Bake the cakes: Bake for 20-25 minutes or until a toothpick comes out clean.
- Cool the cakes: Allow the cakes to cool in the pans for 10 minutes, then carefully transfer them to a wire rack to cool completely.
- Prepare the mascarpone cream: In a separate bowl, whip the mascarpone cheese and heavy cream together until thick.
- Layer with strawberry coulis: Once the cakes have cooled, spread a layer of strawberry coulis on one cake layer, followed by the mascarpone cream.
- Assemble the cake: Place the second cake layer on top, repeating the process with more coulis and cream.
- Final touch: Dust the top with powdered sugar if desired, then slice and serve!
Notes
Store any leftover cake in an airtight container in the refrigerator for up to 3 days. For longer storage, wrap slices tightly and freeze for up to a month.
Nutrition
- Serving Size: 1 serving
- Calories: 350
- Sugar: 24g
- Sodium: 115mg
- Fat: 17g
- Saturated Fat: 10g
- Unsaturated Fat: 7g
- Trans Fat: 0g
- Carbohydrates: 48g
- Fiber: 1g
- Protein: 4g
- Cholesterol: 100mg